Notes
- All credit goes to NRoach44's guide. Check it out. This guide was written to be an easier, more newbie friendly guide to imaging the PSX hard drive. https://blog.nroach44.id.au/011-sony-psx.html#hard-drive-full-hdd-id
- A hard drive image from this guide can only be used to recover data back to the same hard drive*. This can be useful if you are changing system files and something is corrupted.
- *A replacement (the ATA Express) has been made and does allow the system to operate, but as of writing, backups don't work when restored to it. The ATA Express does not ship with any software, so this guide should help you prepare a backup that can be restored to the ATA Express in the future, or to any future project that supports the custom commands.
- With the PSX now being over 20 years old, the hard drives in many of these are starting to die. Due to the slightly customised firmware, a PSX will not recognise a "normal" IDE HDD.
- The PSX encrypts the data sent to the hard drive using an ID from the custom firmware. The unique HDD_ID can be backed up using sg_raw making it easier to restore the drive later.
- This process uses the bootable / live Linux distribution GParted. GParted was chosen because it has all of the built in Linux tools to back up the HDD. Other Linux distributions (or possibly Windows with HDD Raw Copy) could potentially be used for this process.
Requirements
- PSX HDD removed from the console. There are disassembly guides available on YouTube.
- Example guide (only the HDD needs to be removed, not a full disassembly): https://www.youtube.com/watch?v=XsUzviTKfRM
- PC with either an IDE port or a USB to IDE adapter.
- Most USB 3.0 to IDE adapters use a Innostor IS611 chipset that is often not stable and should be avoided.
- Most older generic USB 2.0 adapters have the best compatibility and are preferred if your motherboard lacks native IDE support.
- An example of a tested, compatible adapter can be found here: https://www.amazon.com/dp/B076WZ1N4K
- Thumb drive you can erase and load GParted Linux.
- External storage >500gb (well >160gb or >250gb). I used a SATA SSD. This should be formatted to something like NTFS if you want to transfer the files later with Windows.
- GParted Linux: https://gparted.org/download.php
- Rufus, balenaEtcher, etc. to make GParted bootable
Imaging the PSX HDD
 | In this process, your "Source" drive will always be the PSX Hard Drive. Your "Target" drive will be the drive you are using to back up your HDD Image files to. |
- Download the latest version of GParted Linux. I used "gparted-live-1.7.0-12-amd64.iso"
- Write this to a USB thumb drive using Rufus (https://rufus.ie/en/), balenaEtcher (https://etcher.balena.io/) or similar make a bootable Linux thumb drive.
- Connect your PSX HDD using IDE or a USB to IDE adapter to your PC.
- Also connect some external storage to dump the HDD image to. It's helpful to use something larger than 250GB (like 500gb or 1tb) to avoid confusion when identifying drives during the imaging process. Because the PSX HDD is encrypted, the backup image will be very large and generally won't compress well.
- Connect your newly created GParted USB boot drive. Boot up the PC and make GParted your boot option.
- GParted asks some questions while booting like language, etc. I just hit enter a lot to use the default options.
- GParted launches and loads up a GUI that displays disk information. This can be helpful when identifying which disks are which. In my example /dev/sda is my PSX drive. My /dev/sdb is the SSD "target" for dumping the image to.
- GParted will show your PSX 160gb or 250gb as "unallocated". This is expected. Warning: Don't mess with that drive or partition or you could repartition/erase your PSX drive!
- Open the terminal application on the desktop by double clicking.
- Once again verify and idenify your PSX drive and your target drive to save to. You'll also have a smaller drive that is the USB drive you used to boot GParted, this can generally be ignored.
- Command:
lsblk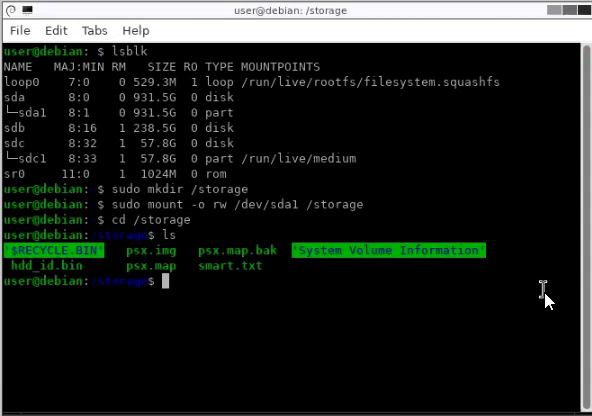
- "lsblk" will give you a list of all disks connected to the system and identified partitions on the disks. The PSX disk will be either ~232gb or ~150gb depending on the original HDD size. GParted won't be able to identify the encrypted partitions, so these won't be displayed. Your "target disk" to save the image to should hopefully be larger (in my case 931gb). Take a note of each.
- Next we need to make a directory so we can mount our "target" disk so we can save the system image to it. To do this, we first need to make a new directory.
- Command:
sudo mkdir /storage
- Now that we have a directory to mount to, we can run the mount command to mount our target disk partition to this newly created directory. Our "Target" disk should be identified from the lsblk command we ran earlier. This should also give us the partition information for that disk. You can also run "lsblk" again to get this information. I had previously formatted my target disk as NFTS so it can be read both by GParted and Windows.
- Command (Replace "sdXX" with the drive ID and partition of your target):
sudo mount -o rw /dev/sdXX /storage- Example: My target disk is "sdb" and target partition is "sdb1". So, I ran "sudo mount -o rw /dev/sdb1 /storage"
- If successful, this command should run, but give no output/return/errors.
- Next let's go to that directory and verify we can get there and have write permissions.
- Command to go to that directory:
cd /storage- Command to list files there:
ls- Note: this should display any/all files on the target disk.
- Command to create a test file:
touch test.txt- Command to view files there:
ls- Now verify that "test.txt" is displayed. If it is, we have write permissions.
- Command to delete that file:
rm test.txt- This will remove that test file.
- Now we can run a command get the HDD_ID which is necessary to restore the dumped image.
- Command to dump HDD ID. Replace "sdX" with your PSX drive ID:
sudo sg_raw -o /storage/hdd_id.bin -b -r 512 /dev/sdX 85 09 0d 00 ec 00 00 00 00 00 00 00 00 00 8e 00
- Check if the file was created.
- Command to view file and size:
ls -lhsrt- Verify that hdd_id.bin exists and it should be 512 size.
- Now it is recommend dumping the SMART data to a file as well. This is drive health information and can be useful.
- Command to dump it (replace sdX with your PSX drive ID):
sudo smartctl -a /dev/sdX >smart.txt
- Ok, now we're ready to image the drive. This process can take hours.
- Command (again, replace sdX with your PSX drive ID:
sudo ddrescue -S /dev/sdX psx.img psx.map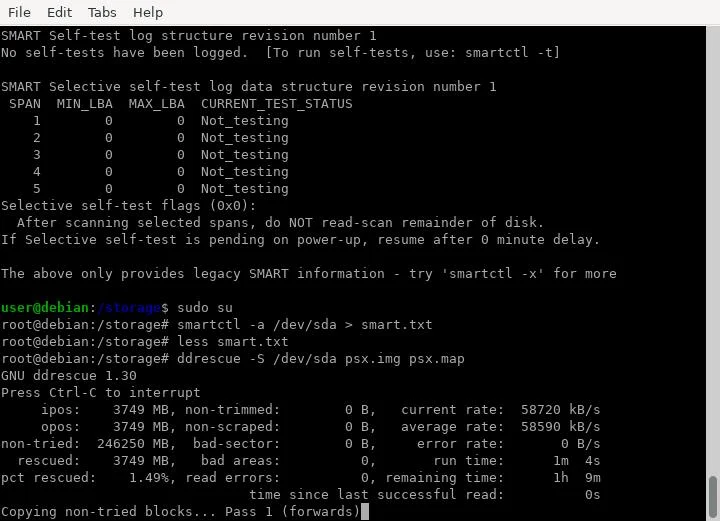
- This command should give an output and status. It will also give an approximate time to finish.
- My backup got to 99.99% and started having a ton of HDD read errors. I assumed this was either an error or the end of my HDD had some corruption. It did take a bit longer, but did finish.
- Once complete, you can verify you have all the necessary files:
- PSX HDD Image: psx.img
- DD Progress and map of HDD bad blocks: psx.map
- HDD_ID File: hdd_id.bin
- HDD SMART Information: smart.txt
- Once complete, shut down the PC, remove the SSD and plug it into a different PC to transfer the files off. Store these in a safe place for the future.
Restoring the HDD Image
| Note: In this process, your "Source" will be your previously created PSX HDD backup files. Your "Target" drive will be your PSX Hard Drive. In this process you will be overwriting your original PSX HDD. |
- Follow steps 1-9 above to boot GParted with your PSX HDD, and drive with your previously created PSX backup files.
- Once again, verify and idenify your PSX drive and your source HDD image file drive. You'll also have a smaller drive that is the USB drive you used to boot GParted, this can be ignored.
- Command:
lsblk- "lsblk" will give you a list of all disks connected to the system and identified partitions on the disks. The PSX disk will be either ~232gb or ~150gb depending on the original HDD size. GParted won't be able to identify the encrypted partitions, so these won't be displayed.
- Next we need to make a directory so we can mount our "source" disk with our HDD image to restore from. To do this, we first need to make a new directory. We can do this on root.
- Command:
sudo mkdir /storage
- Now that we have a directory to mount to, we can run the mount command to mount our disk partition to this newly created directory. Our "source" disk should be identified from the lsblk command we ran earlier. This should also give us the partition information for that disk. You can also run "lsblk" again to get this information. I had previously formatted my target disk as NFTS so it can be read both by GParted and Windows.
- Command (Replace "sdXX" with the drive ID and partition of your source):
sudo mount -o rw /dev/sdXX /storage- Example: My source disk is "sdb" and target partition is "sdb1". So, I ran "sudo mount -o rw /dev/sdb1 /storage"
- If successful, this command should run, but give no output/return/errors.
- Next let's go to that directory and verify we can get there and that our backup files are present.
- Command to go to that directory:
cd /storage- Command to list files there:
ls- PSX HDD Imaging-3.png
- This should list all of the backup files needed to restore the disk. This should include psx.img, psx.map and hdd_id.bin.
- Now run the lsblk command again to confirm our target disk. This is the PSX HDD that we will restore to.
- Once confirmed, we can run the dd command to restore the disk image to the PSX HDD. Be aware that this will overwrite everyting on the PSX disk and restore the image. So make sure this is what you want to do.
- Command (replace "sdX" with your PSX drive letter):
sudo dd if=psx.img of=/dev/sdX bs=1M status=progress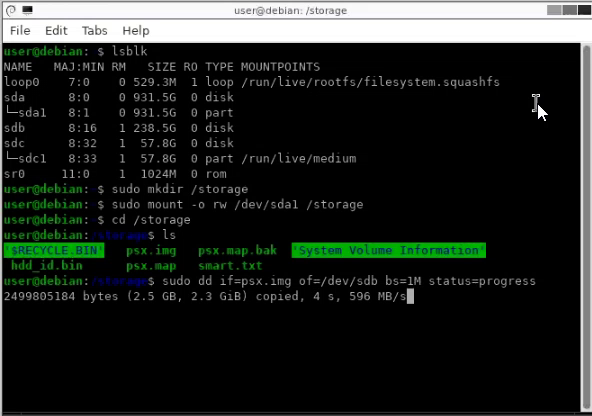
- Once complete, you can shutdown the PC and reinstall the restored PSX HDD.
