The Sega 32x MARS Check ROM can provide you information on your console, whether it be a regular Genesis+32x setup or a Sega Neptune build. While all the tests have not been seen or a fix documented for them, some tests have been documented below for troubleshooting purposes.
Many of the MARS Check ROM tests have not been seen or documented. If you encounter a test that has not been written down, or you find a solution that is not written on here, please add it to this page.
Manual Mode
User Leo Oliveira discovered that It is possible to enter a manual test mode by holding the START button on boot, allowing the user to run specific tests individually.
The menu loaded will be in Japanese, but lists tests in the following order:
- Mega Drive side checks
- SH side checks
- MD & SH combined checks
- Graphics Check
- Sound check
- Automatic check (runs the typical auto test from a normal boot)
Tests
ADDRESS
This is the address that the test is writing to, if you see an error here, this address can be traced to the hardware using the official 32x hardware manual by Sega (mirror)
Write
This is what is being written by the test in hex.
Read
This is what the test is receiving back when it attempts to read what it just wrote. Oftentimes with errors, you may notice a consistent byte is not being properly written which may lead to context clues as to which address or data line is not properly functioning.
Error number
The bottom left of the screen is the error number. The numbers seem to be consistent with the error that occurs, but it would be best for more documentation of other tests to confirm this.
The bottom right of the screen is your total unique error count.
Errors
Frame buffer failure or errors
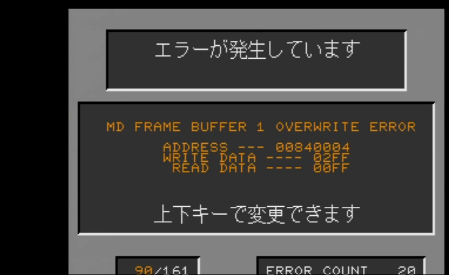
Check connection from 32x VDP (315-5781) to both VRAM chips (TC511664). Check also for shorts across any pins connecting VDP to VRAM. Frame buffering uses address space $840000 on the Genesis side, and $24000000 on the 32x side. Both use the 32x's VRAM, hence why you should check 32x VDP to its two VRAM chips.
SDRAM to Frame DMA Error (or ROM to Frame DMA Error)
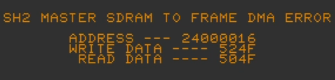
Check same connections as above. The clue is the address space being inside $24000000, which is 32x's VDP VRAM (specifically the Frame Buffer).
SH2 H (or V) Interrupt Error
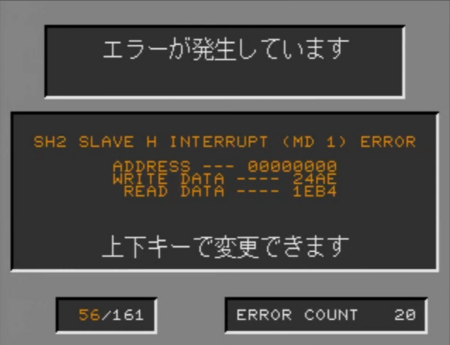
Before reflowing the SH-2 in question (Master or Slave), check the VINT and HINT pins on both the 315-5818 chip or the 32x's VDP 315-5781. If still nothing, double check VRAM just in case.
SH-2 Master Or Slave Timeout Error
Test 16 and 17 check the status of the SH-2s to see if they are responding. If you get this timeout error, check the basics. Are both SH-2s getting voltage and ground (there are many of these pins on the SH-2)? Shift over to the interface chip 315-5818 and make sure it is getting voltage and ground as well. If so, check the SH-2 request pins on the 315-5818 (65 and 66) and continue to check pins 55 through 66 as these pins are all important control pins to the SH-2s. The interface chip interfaces the Genesis hardware with the 32x hardware, so if the test is booting, your Genesis hardware and interface chip are working in some order. If still nothing, reflow the SH-2s before reflowing the interface chip (as it must be working in order to get to this stage of the test).