The Sega Nomad is normally incompatible in numerous ways with the 32X add-on. It requires three pins internally to be connected to fully enable logical compatibility, an external power adapter for the 32X, and a solution for A/V.
The 32X takes the A/V output of the Genesis, overlays it's own generated image, and then feeds that signal through it's own A/V out. Due to the physical dimensions of the 32X, it normally covers up the A/V out port of the Nomad. A thin form factor 90-degree bend AV cable is needed, or a modification to the shell of the 32X. This also means that, unless modified, the 32X could only work while using the Nomad as a home console and sending the image to an external display. However, there exists some mods which can provide A/V input to the Nomad, as well as relocating A/V out, to allow the 32X to fully display on the Nomad's own screen.
Connecting the Cartridge Pins
There are three cartridge pins that need to be connected to the ASIC to allow logical compatibility. It should also future proof the Nomad in the event a future ROM cart adds in 32X emulation support. This mod was originally done by famous Sega-165 contributor TmEE.
This is much like the Sega Master System functionality mod for the Nomad. Three ASIC pins must be connected with high gauge (30-32 AWG) wire to three cartridge port pins.
- Disassemble the Nomad and locate the large ASIC chip labelled 315-5700. On this chip, locate pins 41, 135, and 139. The dots alongside the chip will help to locate them. Check the image here for clarity.
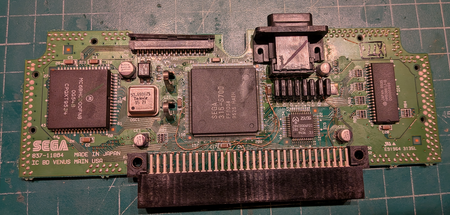
- Optionally, use kapton tape to cover nearby pins to prevent accidentally soldering them, as they are small and delicate.
- Use flux and add a little extra solder to the pins to wet them, then connect a wire to each one. You will need to make three connections:
- Cartridge slot pin B12 to ASIC 39
- Cartridge slot pin B14 to ASIC 41
- Cartridge slot pin B15 to ASIC 135
- Once finished, close it back up but only use one or two screws to keep everything together while you plug in the 32X to test. Be sure the 32X has it's own power plugged in. When successful, you'll only see the part of the image generated by the Genesis graphical unit, without the 32X overlay rendering on top of this. If it's "working", you can fully reassemble the Nomad.
Video Mixing Solution
You will need to decide on a video mixing solution. The easiest of which is to either use a 90-degree cable or modify the 32X shell to allow for a Genesis 2 cable to output directly to your TV. However, there also exists mods to allow the full image to be shown directly on the Nomad's screen.