File Transfer Protocol is a file standard communication protocol that has existed for a long time, and is commonly used with modified game consoles. Files can be transferred to and from modded consoles through a LAN using FTP programs such as FileZilla, WinSCP, and Cyberduck.
FTP Clients
For PC & Mobile
To connect to the console's FTP server, the user needs a FTP client to communicate with them. Here is a list of what clients you can use:
- FileZilla (Windows, macOS, Linux) - Be wary of bundled in installer! The linked provided here is the link to download the normal installers, which doesn't have ads for other software.
- On Linux, it can also be downloaded and installed from the terminal as a Flatpak from Flathub:
flatpak install flathub org.filezillaproject.Filezilla
- On Linux, it can also be downloaded and installed from the terminal as a Flatpak from Flathub:
- WinSCP (Windows)
- It can also be downloaded and installed from the command line or terminal with Winget using the
winget.exe install --id "WinSCP.WinSCP"command.
- It can also be downloaded and installed from the command line or terminal with Winget using the
- CyberDuck (Windows, macOS)
- It can also be downloaded and installed from the command line or terminal with the following commands.
- Windows (Winget):
winget install --id "Iterate.Cyberduck" - macOS (Brew):
brew install --cask cyberduck
- Windows (Winget):
- It can also be downloaded and installed from the command line or terminal with the following commands.
- Primitive FTPD (Android)
- Also available on F-Droid.
- powerFTP (Android)
- AndFTP (Android)
- Documents by Readdle (iOS)
- This can also be used on Macs with Apple Silicon, as they are compatible with iOS applications.
- KDE Dolphin (Windows, Linux)
- Linux distributions that come with the KDE Plasma desktop environment will typically have this installed already. If not, check your distribution's package manager to see if there's a download available.
- GNOME Files (Linux)
- Linux distributions that come with the GNOME 3 desktop environment will typically have this installed already. If not, check your distribution's package manager to see if there's a download available.
- Windows Explorer (Not recommended, due to it being slow and limited)
For Console
Curiously enough, there are also some FTP client applications that run on the consoles themselves as well.
- ezRemote Client; available on the following:
- Swiss (GameCube)
Hosting an FTP server on a Windows PC
- Create a directory on your PC that you want to serve files from.
- Download xlight FTP server and extract xlight.exe to the directory you created. Run xlight.exe.
- If prompted with a Firewall warning, choose the option to allow it on your private network.
- Click the "New Virtual Server" button. Click OK to accept the default options.
- Double-click the newly created server (e.g. 0.0.0.0) and select "Public Path" and then the + button. Enter the following settings and click OK:
- Virtual Path:
/ - Real path: (filepath to the folder you want to serve)
- Permission: Check all options.
- Virtual Path:
- Click OK to return to the server listing. Click the "User List" button and then Add. Set a username and password (e.g.
gamecubefor both). Set/as the home directory, click the Permission button, and enable all permissions. - Click OK twice to return to the server listing. Select the server and click the "Run Server" button.
- Right-click the server and choose "Server Network Interfaces". It will list the IP addresses associated with your PC. Note the one for your network, e.g. 192.168.0.5. This is the IP address you will put into the console's FTP client.
Connection Methods
Connecting a console to a PC without an active internet connection
This involves connecting the console and PC to each other with an Ethernet cable, but without an active internet connection on the PC.
This method is fast, and easy to set up if you don't set a manual IP address.
Automatic IP
Connect the console to your computer via Ethernet. You may need a USB Ethernet adapter if either your computer doesn't have any extra Ethernet ports, or you are already using the built-in Ethernet port (if applicable) for its current internet connection.
Afterwards, test the internet connection on the console if you can. Once you get an IP Address, you are ready to set up FTP.
Manual IP
This method more technical, but it allows the user to type a shorter and permanent IP address for the console.
Windows
- Connect an Ethernet cable between your PC and console.
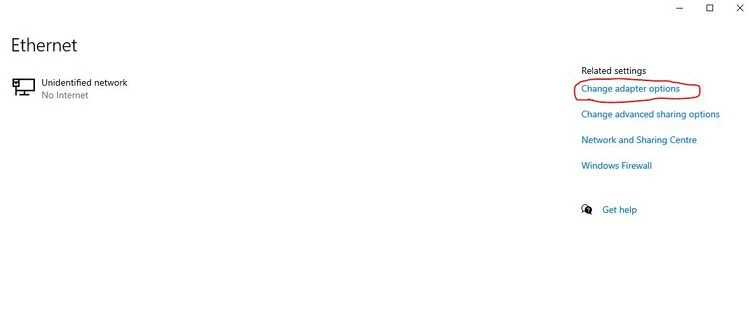
- On your PC, go into Start → Settings → Network & Internet → Ethernet and then, at the top right, choose "Change Adapter Options". You can also access the adapter settings by pressing Windows Key + R, writing ncpa.cpl in the Run program, and pressing enter or the OK button.
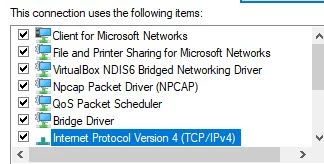
- Find the Ethernet Adapter you are using and right click on it then choose "properties"
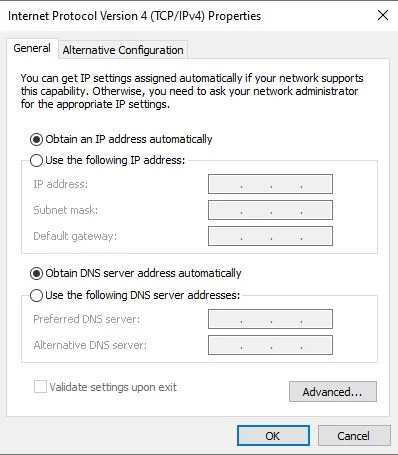
- Double left click on "Internet Protocol Version 4 (TCP/IPv4)"
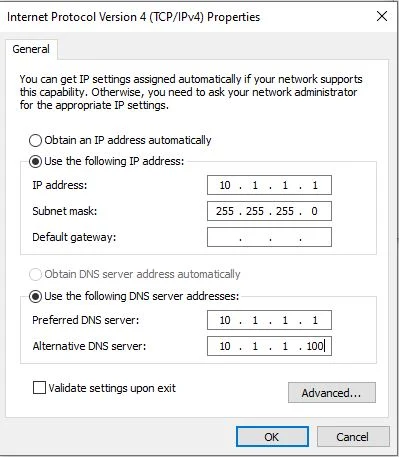
- Press on the empty circle next to "Use the following IP address:" to unlock the fields below it
- Fill them in to match as shown in the image below
- Go to your console, go to its internet settings, and choose the following manual options:
- Set "IP Address" to "10.1.1.2"
- Set "Subnet Mask" to "255.255.255.0"
- Set "Default Gateway" to "10.1.1.1"
- Set "Primary DNS" to "10.1.1.1"
- Set "Secondary DNS" to "10.1.1.100"
- Set "MTU Settings" to "Automatic" Set "Proxy Server" to "Do Not Use"
- Once you get an IP Address, you can proceed to set up FTP for your console.
macOS
- Connect the console to your Mac via Ethernet.
- You may need a USB Ethernet adapter if either your Mac doesn't have any extra Ethernet ports, or you are already using the built-in Ethernet port for its current internet connection.
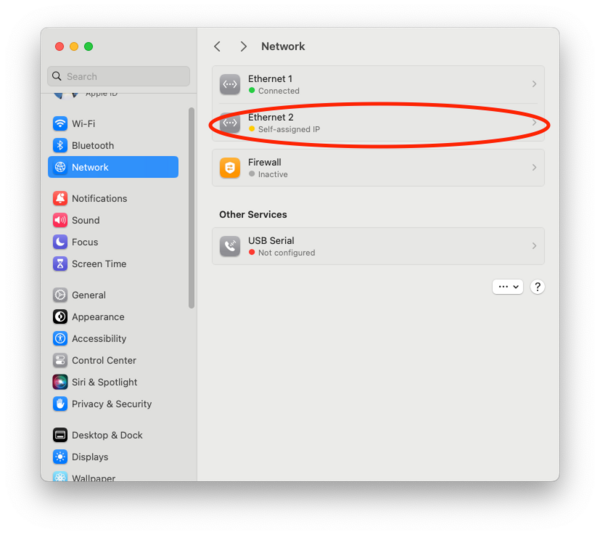
- Go to the your Mac's Network settings in System Settings → Network. You can do this quickly by opening Spotlight with Command + Space, and searching
networkin the search bar. - Select the Ethernet adapter used to connect the PS4 to the Mac.
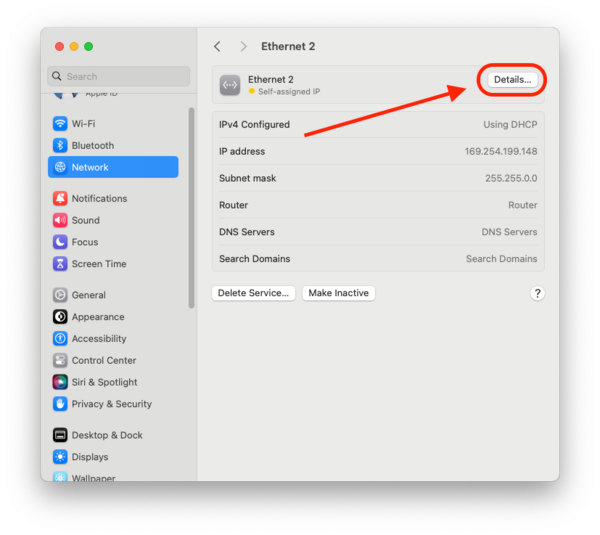
- Select its "Details..." menu.
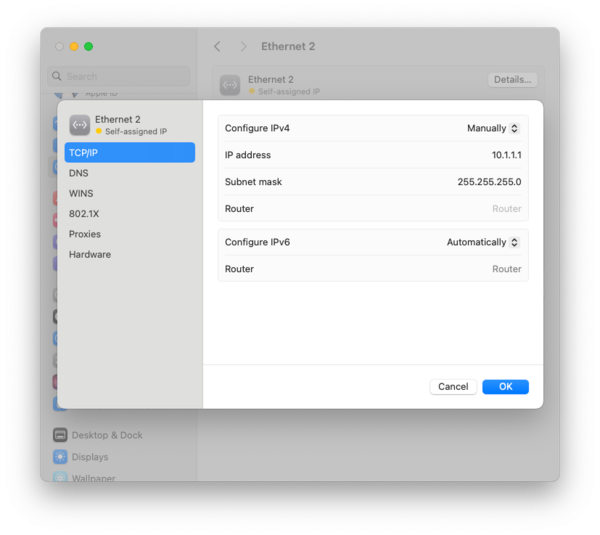
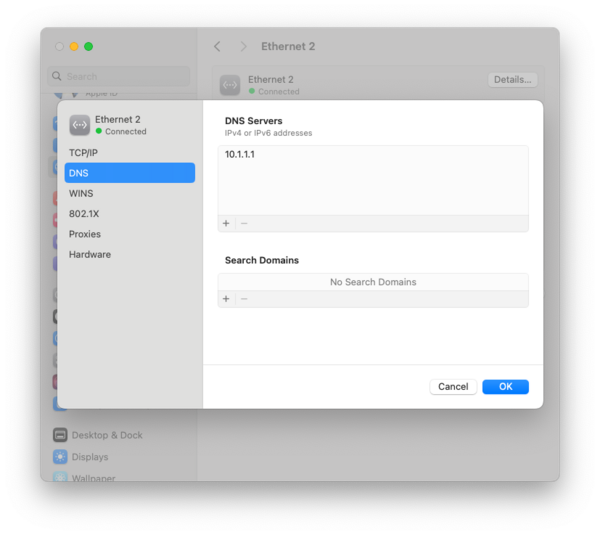
- Enter the following settings for TCP/IP and DNS.
- Go to your console, go to its internet settings, and choose the following manual options:
- Set "IP Address" to "10.1.1.2"
- Set "Subnet Mask" to "255.255.255.0"
- Set "Default Gateway" to "10.1.1.1"
- Set "Primary DNS" to "10.1.1.1"
- Set "Secondary DNS" to "10.1.1.100"
- Set "MTU Settings" to "Automatic" Set "Proxy Server" to "Do Not Use"
- Once you get an IP Address, you can proceed to set up FTP for your console.
Connecting a console to a PC with a bridged internet connection
This method involves connecting the console and PC to each other with an Ethernet cable, but also bridging the PC's internet connection to it. It's just as easy as setting up the console with an automatic IP, while also having the bonus of internet access for the console's web browser, streaming apps, or Homebrew Stores.
Windows
- Connect the console to your PC via Ethernet.
- You may need a USB Ethernet adapter if either your PC doesn't have any extra Ethernet ports, or you are already using the built-in Ethernet port (if applicable) for its current internet connection.
- Go to your PC's LAN adapter settings. You can do this by pressing Windows Key + R, writing
ncpa.cpl, and pressing enter. - You can then right click on your Wi-Fi or Ethernet adapter that has an active internet connection and then then right click and choose Properties.
- Find the Sharing tab, and tick the
Allow other network users to connect through this computer's internet connection. - On your console, setup a normal LAN internet connection with all default settings, except for DNS if applicable (like if you need it for custom game servers, Pretendo's SSSL, Wiimmfi, etc.)
- Once you get an IP Address, you can proceed to set up FTP for your console.
macOS
- Connect the console to your PC via Ethernet.
- You may need a USB Ethernet adapter if either your Mac doesn't have any extra Ethernet ports, or you are already using the built-in Ethernet port for its current internet connection.
- Go to the your machine's sharing settings in System Settings → General → Sharing. You can do this quickly by opening Spotlight with Command + Space, and searching
internet sharingin the search bar. - On the drop down menu for
Share your connection from, select the device that's being used for the Mac's current internet connection (either the Wi-Fi, or an available Ethernet adapter) - Under
To devices using, select the other Ethernet adapter connected to the PS4. You can leave the NAT64 option disabled. - Create a folder called "pkg" and put your pkgs inside of it.
- On your PS4, setup a normal LAN internet connection with all default settings.
- Go to
Settings, and thenNetwork - Select
Set Up Internet connectionand chooseUse a LAN Cable. - Choose
Manual. - Choose
Automaticfor the IP Address settings.
- Go to
- Once you get an IP Address, you can proceed to set up FTP for your console.
LAN connection on both devices through a router with Wi-Fi or Ethernet
This method is very slow over the console's Wi-Fi (especially on PS3s, early PS4 CUH-1XXX models, any DS/DSi, any Xbox 360 wireless adapter, or the Wii and Wii U, as they only have 2.4 GHz Wi-Fi!) but is easy to setup.
After jailbreaking, connect your console and PC to your home network with Wi-Fi or Ethernet. Ideally, the console should only be connected with Ethernet, but if the PC can support at least 5 GHz Wi-Fi 5 or faster, then using Wi-Fi for the PC's router connection will be acceptable.
Xbox or Xbox 360
Files can be transferred to and from an Xbox using FTP programs. On a custom dashboard, an FTP server will always be running in the background.
Note that XBMC (and variants) will automatically truncate filenames to fit the hard drive if they are too long. This will break some original Xbox games which have long file names, such as Tony Hawk's Pro Skater 4.
- Make sure you have either an Ethernet or WiFi connection between your Xbox and PC.
- Take note of your Xbox's IP address. It should be on the dashboard.
- If there is no IP; change the IP address to a static one. You may need to also set the gateway to your PC's IP address, but this isn't usually necessary.
- Open an FTP program, and connect using your Xbox's IP, along with
xboxfor both the username and password.- You may need to navigate to Network and Sharing Center → Change Adapter Settings → Right click the ethernet adapter → Properties → Configure... → Speed & Duplex → Select 100Mbps Full Duplex from dropdown and hit OK.
- If you're using Xbox 360:Aurora, its default username and password is instead
xboxftp.
- You should see a directory listing of the different partitions on the drive.
- You can view the Xbox:Files and Directories article for what each directory does on the original Xbox, and Xbox 360:Files and Directories for the Xbox 360.
- You can upload or download files by right clicking them and choosing the relevant option.
- If you have problems with DHCP, try using the following settings for a static IP address:
Xbox IP: 172.16.16.2
Xbox Subnet Mask: 255.255.255.0
Xbox Gateway: 172.16.16.3
Xbox DNS 1: 8.8.8.8
Xbox DNS 2: 8.8.4.4
Computer IP: 172.16.16.3
Computer Subnet Mask: 255.255.255.0
Computer Gateway: (leave blank)
Computer DNS: (leave blank)
PlayStation 3
Files can be transferred to and from your PS3 using File Transfer Protocol (FTP) programs. If you have webMAN enabled, an FTP server will always be running in the background, otherwise you can just open Multiman and it will be running as long as you are in the app.
Note that FTP has a higher failure rate when transferring many small files like those found in 'JB folder' game disc folder rips, which may cause the PS3 to drop-connection or freeze. It is recommended to transfer either ISO or PKGs instead, and to use a wired connection on the PS3 instead of wireless, due to the PS3's native wireless chipset being extremely slow and outdated.
A common misconception is that FTP requires an internet connection, when in reality it only requires a network connection between host and client.
- Make sure you have either an Ethernet or WiFi connection between your PS3 and PC.
- If you want to have the fast speeds of Ethernet but are unable to connect the PS3 to the router with an Ethernet cable, you can view the section on the top of the page on connecting it directly to a PC instead.
- On your PS3, browse to "Network Settings" and test Internet connection. Make note of your PS3's IP address. Alternatively, you can set a static IP for your PS3 and use that.
- Open an FTP client on your PC, and connect to the PS3's FTP server using the PS3's IP.
- You should see a directory listing of the different partitions on the drive and USB devices.
/dev_hdd0/is your hard drive's main directory/dev_usb00#/is a USB device/dev_blind/or/dev_rebug/is your flash - Do not modify files here unless you know what you're doing.
- You can upload or download files by right clicking them and choosing the relevant option.
PlayStation 4
An exploited PS4 can have full access to the filesystem allowing swapping files, extracting files, sending files, etc.
List of FTP payloads
During its many iterations of jailbreaks with different firmware versions, the PS4 has multiple versions of FTP payloads with different firmware support, port and more. Note that some of these FTP payloads may need a external command (MTRW) to enable full-access to the filesystem!
| FTP Name | Supported firmwares | Port | Info |
|---|---|---|---|
| BD-JB FTP | 9.00, 9.03, 9.04 | 1337 | Userland only (limited filesystem access). Requires a Blu-Ray burner and disc. |
| FTP | 4.05-9.60 | 1337 | Can be found on various exploit hosts. |
| FTP Server + Debug Settings | 1.76 | 1337 | Can be found on PS4 Playground (1.76 only). |
| GoldHEN FTP (Recommended) | 5.05-13.00 | 2121 | Bundled in GoldHEN; can be enabled in GoldHEN settings. |
| OrbisFTP | 5.05-9.00 | 1337 | Discontinued. |
| OrbisMan | 4.55, 5.05 | 21 | Automatically enabled when launching the homebrew app. |
| PS4Xplorer | 5.05-9.00 | 21 | When running the homebrew app, press L3 to enable FTP. |
PlayStation Vita
Files can be transferred to and from your PS Vita using File Transfer Protocol (FTP) programs.
Using VitaShell's FTP server
- Open VitaShell.
- Press
 .
. - Press
 twice to
  button option.
 - Make sure the option is set to FTP, if it isn't press
 .
. - Press
 or to back out to the main menu.
 - Press to enable the FTP service.
- On your choice of FTP Browser, enter the provided
IP:port. - You now you have an FTP connection to your PS Vita.
GameCube
Swiss has a built-in FTP client that allows you to connect to a server and download files to the console. This is different from most systems that host an FTP server that you connect to with a PC. You can view the File Transfer Protocol (FTP) section of this page to know how to host an FTP server that Swiss can connect to.
In Swiss, open the network settings page and set your "FTP Host IP" to the IP of your PC as well as the username and password you set.
Press B and then A to change device. Scroll over to the "File Transfer Protocol" option and press A. It should connect and list the files being served from your PC.
Wii
Using FTP for the Wii is a convenient way of transferring files to your Wii without having to swap an SD Card back and forth. The Wii takes advantage of FTP through homebrew, and is an excellent option for users.
Why WiiXplorer should be used over FTPii
In order for the Wii to take advantage of FTP, it needs to host a server on the network, this is done with homebrew and can be fairly easy for most users. For the most part, FTPii has been used as the FTP server for the Wii, but issues arise every year due to it not receiving updates.
FTPii is an old homebrew application that opens an FTP server on your network, it has not been updated in over 12 years and has reportedly straight up not work for users.
WiiXplorer is a multi-tool file browser with more than just FTP capabilities. It has support for Samba too, if you have that set up on your network, but as an FTP Server, it seems to be more reliable. WiiXplorer also has an FTP Client in case you have a dedicated server on your network.
Requirements
You'll need some things in order to take advantage of FTP for your Wii:
- A Wii with the homebrew channel installed and the ability to connect to a network.
- The SD Card or USB drive you store homebrew on.
- An active network, doesn't necessarily need the internet, a plain router should be fine.
- A computer on the same network that can transfer files to the Wii's SD Card
- WiiXplorer (mirror)
Getting Started
- Download WiiXplorer using the link above.
- Extract WiiXplorer to the /apps folder of your SD Card, then reinsert it to your Wii.
- Connect your Wii to the network that your computer is connected to.
- Launch WiiXplorer from the Homebrew Channel.
- Click on "Start" then click on "FTP Server"
- Click on "Startup FTP" and take note of the IP address of your Wii being displayed
- The default port for the FTP server is 21
- Now, download an FTP Client to your computer.
- In your FTP Client, connect using the IP Address of your Wii and the port the FTP Server is listening on.
- You should now be able to transfer files to your Wii's SD card via the network, NAND access is unavailable.
- When you are finished, disconnect from your Wii and then click "Shutdown FTP" on WiiXplorer
References
Our Discord for helping decide what FTP server and clients to use
WiiBrew for technical information about WiiXplorer
Wii U
 | This tool lets you browse system partitions on the memory, and, if you get too curious, you could brick your Wii U. Don't mess with anything on the SLC or MLC (unless you have quite a good reason to), or else you will permanently brick your console. |
FTPiiU Everywhere is a modification of FTPiiU, which is itself based on FTPii for the Wii. It can be downloaded here.
Requirements
- An FTP client.
- A computer with an SD card slot and/or a USB storage port.
- A hacked Wii U.
- A custom firmware, such as Tiramisu or Aroma.
Installation
You would install FTPiiU Everywhere like you would any other Wii U homebrew app or plugin. Copy the zip file's /wiiu/ folder to the root of your storage device, giving it permission to merge files. Alternatively, it is available on the Homebrew App Store.
Legacy (Homebrew Launcher)
In legacy CFW, FTPiiU Everywhere is an app that is booted up and run via the Homebrew Launcher. Once launched, it will display the IP address and port of your Wii U console so that you can connect using your desired FTP client.
Aroma (plugin)
On Aroma CFW, FTPiiU Everywhere is a plugin. This means it runs in the background at all times, thus you can access the files of your Wii U at any time, and you don't ever have to launch it as an app. If you would like to disable it, that can be done within the plugin config menu. Also in that menu is where you will find the IP address and port of FTPiiU, for connecting with a preferred FTP client.
3DS
Required Items
- Make sure you have Custom Firmware (CFW) installed.
- FTP Client
Using FTPD
- Install
FTPD.ciamanually or by using Universal Updater - Launch the FTPD application. It will show an IP address and port number, such as 192.168.0.16:5000 (as an example)
- Launch your FTP Client on your PC.
- Type in the IP Address and Port on the client. It will show the SD Card directory.
- Transfer or copy over any files you want from your PC to your 3DS.
Switch
Required Items
- Make sure you have Custom Firmware (CFW) installed.
- FTP Client
Using FTPD
- Open HB Appstore from the HB Menu or Title Takeover.
- Install
FTPDfrom either the HB App store, or GitHub. - Once the installation is complete, go back to the HB menu and you should see FTPD as app.
- On your PC, go to your FTP application and enter the IP Address displayed on your Switch's screen.
- You can now access your SD Card when you have the
FTPDapplication open.