This page will cover setting up custom firmware (CFW) on the Nintendo Switch, which allows you to extend the functionality of the device significantly.
Checking if the Console is Exploitable
First, check if it is compatible with software exploits. You can check the back of the system for the model number. Models HAC-001(-01) (Switch v2, released in 2019), HDH-001 (Switch Lite) and HEG-001 (Switch OLED) are patched, and require a modchip to be modded.
Covering modchip installation is out of scope for this page, but if you have one of these models with a modchip then the instructions for setting up CFW on the SD card are about the same regardless.
If a console has been modchipped, it will show some sort of "No SD card" screen when you turn it on without an SD card.
If you have an HAC-001 (without the extra -01, sold between 2017 and 2019) but don't have the hardware required to exploit it, you can check if it's potentially exploitable with its serial number. This GBAtemp thread is also helpful for identifying if your HAC-001 is exploitable or not through the serial number. To play online safely with a modded Nintendo Switch, you must boot into your clean, unmodded stock system software (SysNAND) and only use legitimate games.
Installing CFW to microSD Card
 | The SD card files for a modchipped Switch are set up nearly identically to an unpatched Switch; just without the need of an RCM injection app (they are incompatible with patched consoles anyway). |
Requirements
- The latest version of Atmosphere
- This is the CFW you will use on your Switch to have access to homebrew and such. At the time of writing, the latest Atmosphere version supports the latest Switch firmware (21.2.0)
- Make sure to download the
fusee.binfile as well.
- The latest version of Hekate (if it's not already downloaded)
- A Swiss army knife in terms of Switch homebrew. It allows you to do several things, like creating and managing NAND backups, create and manage emuNAND, install and boot other operating systems, and more.
- microSD Card that's at least 8 MB or more (bare minimum to just install Atmosphere and Hekate, but it's recommended to have 64 GB or more to have more storage for games and game mods)
- USB SD card reader
- The card reader is so you can put the initial files on the microSD card; this only needs to be done once. The files can be updated later with either FTP or the Switch's USB port.
File Setup
- Plug the microSD card used for the Switch into your USB SD card reader, then plug that into your computer.
- If you have an unpatched Switch and followed the
Mounting SD Cardsection, you can skip this step.
- If you have an unpatched Switch and followed the
- Extract the
atmosphere,bootloader,switch,hekate_ctcaer_x.x.x.binfiles from the Atmosphere and Hekate zip files directly to the root of the Switch's SD card. You also need to transfer thefusee.binfile into thebootloader\payloadsfolder. It should look something like this: - Rename the
hekate_ctcaer_x.x.x.binfile topayload.binif you have a modchipped console. If you're setting up the files for an unpatched console instead, just delete the file. - After the files have been transferred to the console's SD card, use the corresponding button in your operating system to safely eject it from your computer, and insert it back into your Switch.
- If you're using an unpatched Switch with ums-loader (as seen in the unpatched Switch preparations), just navigate to the option
Reboot RCMin order to go back to recovery mode, then inject thehekate_ctcaer_x.x.x.binfile instead.
- If you're using an unpatched Switch with ums-loader (as seen in the unpatched Switch preparations), just navigate to the option
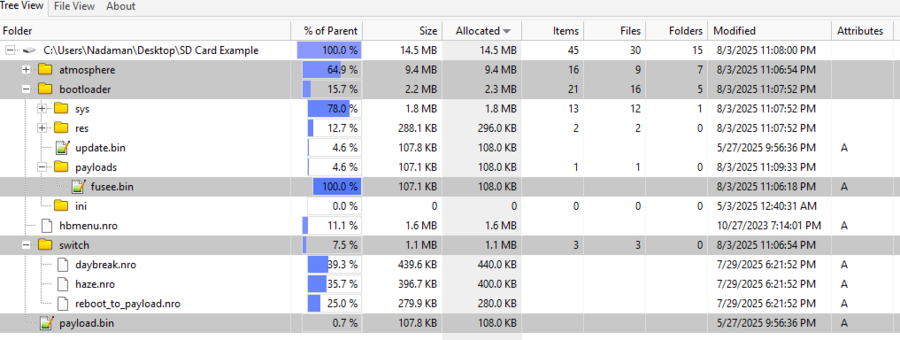
Finalizing
| If your console is modchipped, it should automatically boot into the Hekate menu when you turn it on. On unpatched consoles, you will need to re-enter RCM and inject the hekate_ctcaer_x.x.x.bin if it wasn't done already. |
Now that you're in Hekate, it is essential to make a NAND backup of your console in order to recover it from a brick in the future.
- Using the touch screen (or left Joy-con analog stick), tap
Tools, thenBackup eMMC, theneMMC BOOT0 & BOOT1. After that backup is complete, selecteMMC RAW GPPto back up the rest of the NAND. This will save the NAND backup to the SD card (file path shown on the Hekate backup screen). If your SD card is too small, you can also mount the NAND over USB and copy it directly to a PC with NxNandManger. - After your NAND backup, make sure to transfer the folder it's located in to a safe location on a computer, phone, NAS, cloud storage, etc. Then, make sure to delete the NAND backup from the Switch in order to have more SD card space.
- Once your NAND backup is safe, it's highly recommended (though not required) to re-format the SD card as FAT32, due to the Switch operating system not having proper protections against file system corruption. FAT32 is significantly less likely to be corrupted on the Switch, since FAT32 itself inherently has some protection against corruption.
- Navigate to
Tools⇒Partition SD Card⇒ OK ⇒Next Step⇒Start. Hekate will automatically back up the files that are on the SD card if it's less than 1 GB of data. You can also choose to partition an emuMMC here, though it isn't required for just homebrew and most mods/cheats.
- Navigate to
- You are now ready to use CFW! Simply go to the
Hometab, pressPayloads, then pressfusee.binto boot Atmosphere.- It should be noted that CFW is never truly "installed" permanently, as the Switch doesn't have a known bootloader exploit. This is especially visible on an unpatched Switch, as Atmosphere will not be loaded anymore when the Switch has been manually shut off and turned on again.
If you would like suggestions on what to do next, check the Recommended Setup page.