MemoryEngine360
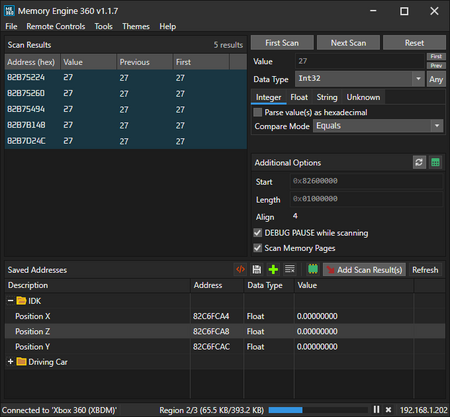
| Information | |
|---|---|
| Type | Debugger |
| Version | 1.1.7 |
| License | GPL-3.0, LGPL-3.0 |
| Source | https://github.com/AngryCarrot789/MemoryEngine360 |
MemoryEngine360 is a debugging and value scanning tool, similar to Cheat Engine. At its core, you can scan for values (integer, float, etc.), run next scans to refine the results, save and load those results to a file, and modify live values in the console memory.
It also provides a set of extra tools, such as a live memory viewer, module explorer, pointer scanner, debugger, and task sequencer.
SetupYou will need XBDM (Xbox Debug Monitor) installed as a plugin on your console. This can be done easily using Aurora's homebrew store and DashLaunch.
- On the Aurora dashboard, click the Back button on your controller, click Scripts, click Homebrew Store, click Other, and click Debugger Tools. It will show a prompt, click
Yes. - Launch DashLaunch, and expand the Plugins section.
plugin1should link to where xbdm.xex was downloaded (by default, it's Hdd:\Debug\Xbdm.xex)- JRPC2.xex does not seem to be required, but if you have trouble connecting, maybe add it as
plugin2.
- JRPC2.xex does not seem to be required, but if you have trouble connecting, maybe add it as
- Reboot your Xbox 360.
- MemoryEngine360 is hosted on github. You can download the latest via the Releases page. The ZIP file will contain
MemoryEngine360.exe, a few DLLs required for operation, and a keymap file for keyboard shortcuts. Feel free to compile from source yourself however. - After launching the application, press
CTRL + Oto open the connection dialog.- On the left, Select Xbox 360 (XBDM) (which is the default option)
- On the right, enter the console's IP address in the text box
- Click Connect, and if all went well, the dialog should close, and the application is now connected to your console.
Some issues that might prevent a connection being made include:
- Being connected to a VPN
- Your PC is on a different subnet mask than the Xbox
This is a hypothetical example for Black Ops 1 Multiplayer split screen. We'll try to modify the ammo count of the primary weapon. This assumes you're in-game and MemoryEngine is connected to the console.
To speed up scans, we can narrow the scan range down to the game's actual memory sections (preferably, it's .data section, but we'll just do the whole game). Feel free to skip these three steps and use the default scan range instead (which works for most call of duty games).
- In the
Toolsmenu, clickModule Explorer. Then, at the bottom, should be the active game (in this case, default_mp.xex). - On the right, in the Addressing and sizes panel, will be the Base Address and Module Size fields. Take note of these.
- Back in the the Memory Engine UI, in the Additional Options panel, copy those two values into the
StartandLengthfields.
To start scanning for a value, make an assumption on what the data type is. I know for a fact ammo counts are stored as 32-bit integers, however, some games may chose smaller data types, or even floats, or maybe even strings.
- On the top-right of memory engine, specify the
Data Type(in this case, Int32). - Now look to Black Ops 1, and look how many bullets are in the chamber. I shot a few rounds first, so I have 27, so specify that in the
Valuefield. - Click
First Scan... this gave me 186 results. Next, shoot some more bullets. Now I have 20 bullets, so enter that into theValuefield and clickNext Scan. - Now I only have two results. In the case where you get more than one result, you have two options:
- Do more
Next Scans to further refine the values. - Modify result(s) until the ammo count changes in-game. This can be done by pressing
CTRL + E, entering a new value, and clickingOK.
- Do more
- In my case, the ammo count's address turned out to be
8303AA08. Now I can pressCTRL + Eto write a new value to the console and change the ammo count.
Note, reading data from the console is slow, roughly 1 MB/sec, and this is with DEBUG PAUSE while scanning enabled in the Additional Options panel. So for black ops 1, which is around 42MB, the full read may take up to 42 seconds! However, if you enable Scan Memory Pages, it may complete in significantly less time, since it won't be scanning memory that is not assigned to any sections.
The Saved Addresses panel allows you to save and load results.
- Select scan results (in the example case, select the one with the address
8303AA08) - Click
Add Scan Result(s)in the panel header. It will insert that result as a new row. You can select it and pressF2orCTRL + Rto give it a name.
Optionally, you can manually insert a row by clicking the green plus icon in the panel header.
- Specify the Memory Address, and optionally the Description.
- Click OK, another dialog shows. Specify the Data Type that the address represents (in the example case, specify Int32). Optionally, you can display the value as hex or as an unsigned integer.
To save the results, click the save button, and specify a file path, and click Save. You can load the results by clicking the orange </> button and specifying the file path of the file you originally saved. Saved Addresses are stored in XML, so if you wish, you can modify them in a text editor.
Saved Addresses can also be grouped by selecting rows and pressing CTRL + G. You can also move them around by drag-dropping them. The context menu shows all of the available operations and their respective shortcuts (such as duplicate, edit data type, edit address, etc.)
The task sequencer can be found in the Tools menu.
Freezing values
- Click the green plus icon to add a new sequence.
- Type "inf" in the
Run Countfield and press enter, so that the sequence runs forever until cancelled. - At the top right, click
Set Memory. This will add an operation to the list which sets an address to a value. Specify the address, the data type and value to write. - You may also want to insert a delay of 20 or more milliseconds, otherwise the application will use almost 100% of an entire CPU core just writing the value.
Then, click the run button (or press F5), the sequence will start and the value will be written to the specified address at a high rate, effectively freezing it.
 | It's recommended to use a Dedicated Connection for each sequence if they read and write very often, otherwise, you won't be able to scan for values in the memory engine window, since they all share the same connection. To open a Dedicated Connection, click the icon with a controller and golden arrow, located on the bottom of the window, when a specific sequence is selected. |
Conditional writing
The task sequence isn't just for freezing values though. Clicking an operation will show some editor panels in the Operation Editors tab on the bottom half of the screen.
- The Set Memory panel lets you switch between constant and random value assignment.
- The Write Mode panel lets you change the write mode. Set simply writes the constant or randomly generated value. The others involve reading the current value, and applying it (Adding, Multiplying or Dividing) by the constant or random value and writing the final result.
The conditions tab allow fine control over when the sequence's operations can run. The operations can only run when all of the conditions are met (e.g. when a value is within range of another)
- Click
Memory Compareon the top-right of the panel. - Specify the address to read from, and the value that the console value is compared to (and of course the data type of the value).
- Click one of the compare buttons (e.g. the
<button) - Optionally, you can edit the output mode by right clicking a condition and clicking
Edit output mode.- While Met outputs high while the condition met, hence it's the default option.
- While Not Met outputs high while the condition is not met
- Change to Met pulses the output as high when the condition becomes met.
- Change to Not Met pulses the output as high when the condition becomes not met.
- ... and (once) equivalents, which only apply once and never again until the sequence is restarted.
For example, the below condition will only be met when the integer value at 8303AA08 is less than 30, which in the Example Usage section, we discovered is the player's primary ammo in Black Ops 1.
| Compare Value At | 0x8303AA08 | < | 30 | Int32 |
|---|
This condition could then exist in a sequence whose operations assign a random value to, for example, the player's position values. The final result being, if the player has shot any bullets, their location is randomized, until they reload.
| Conditions are evaluated before operations run, and on the same thread. So for example, if you insert a delay operation for 500ms, then conditions can only update every at least every 500ms. |