 | The steps on this page are considered risky for your console, as there is a chance you can brick it. Please have someone else mod your console if you are not experienced in soldering! |
RGH1.2 combines RGH1-like PLL slowdown with Glitch2 images to allow reliable glitching of Falcon/Jasper consoles with split CB (post 14699 kernel). RGH1.2 V2 ports this hack to Trinity/Corona consoles as well as fixing a few issues on Jaspers.
Equipment Needed
- A compatible glitch chip:
- Coolrunner Rev A/B/C/D
- CR3 Lite
- Matrix Glitcher
- Squirt BGA/Reloaded
- X360ACE V1/V2/V3
- X360ACE V3+ (Trinity/Corona only)
- X360ACE V4/V5 (Phat or Slim)
- DGX
- A PC running Windows Vista or later
- A soldering iron, solder, flux, and Isopropyl alcohol with cotton swabs
- Specific recommendatons can be found on this page
- Sufficiently gauged wire (30 AWG sufficient for signals. VCC & Ground may require larger gauge wire to function correctly with certain glitch chips like Matrix)
- A NAND and glitch chip programmer:
- A NAND Backup with XeLL written to the console
- J-Runner with Extras[1][2] (Includes RGH1.2 V2 Matrix/Coolrunner Timings)
- RGH1.2 V2 Timing Files (X360ACE/Squirt chips only)
- X360ACE V4/V5 timings for Falcon/Jasper (Precompiled binaries under "Releases". For Slims use the ones from the RGH1.2 V2 Timing Files pack)
Reading your NAND
4 GB Corona/Waitsburg/Stingray
There are a few different tools for reading your NAND chip: xFlasher 360, Nand-X, JR Programmer, Matrix USB NAND Flasher, PicoFlasher, or a LPT cable. Consider the pros and cons below and choose the method that’s right for you. An LPT cable is not recommended as it's extremely slow, requires more work than other options, and cannot be used to program glitch chips.
A guide on how to dump and write to a standard NAND can be found here.
4 GB Xbox 360 S/E SKUs made after mid 2011 use an MMC NAND (Corona) or eMMC chip (Waitsburg/Stingray/Winchester) These 4 GB consoles require that you use an xFlasher 360, PicoFlasher, Element18592's 4GB USB tool, or an SD card tool, as mentioned in the comparison chart.
A guide on how to dump and write to a 4 GB NAND can be found here.
| Device | Pros | Cons |
|---|---|---|
| xFlasher 360 |
|
|
| PicoFlasher |
|
|
| 4GB USB Tool |
|
|
| SD Card Tool (any brand) |
|
|
| Nand-X |
|
|
| Matrix USB NAND Flasher |
|
|
| LPT Cable |
|
|
All Other NAND Types
There are a few different tools for reading your NAND chip: xFlasher 360, Nand-X, JR Programmer, Matrix USB NAND Flasher, PicoFlasher, or a LPT cable. Consider the pros and cons below and choose the method that’s right for you. An LPT cable is not recommended as it's extremely slow, requires more work than other options, and cannot be used to program glitch chips.
A guide on how to dump and write to a standard NAND can be found here.
| Device | Pros | Cons |
|---|---|---|
| xFlasher 360 |
|
|
| PicoFlasher |
|
|
| 4GB USB Tool |
|
|
| SD Card Tool (any brand) |
|
|
| Nand-X |
|
|
| Matrix USB NAND Flasher |
|
|
| LPT Cable |
|
|
Programming the Glitch Chip
Standard Xilinx-based Glitch Chip
This includes common chips like the CoolRunner, Matrix V1/V3, X360ACE V1/V2/V3, etc.
- Plug the cable from your programmer into the chip programmer.
- If you are using an xFlasher, ensure the switch is set to
SPI. - CoolRunner: Slide switch to "PRG".
- If you are using an xFlasher, ensure the switch is set to
- Open J-Runner with Extras. Click "Program Timing File" in the upper left, select the RGH 1.2 tab, and the relevant radio button for RGH 1.2.
- You can use the timing assistant in the bottom left to auto select a safe timing for your motherboard revision.
- When complete, unplug the cable from the glitch chip.
- Coolrunner: Set the switch back to "NOR".
X360ACE V3+/V4/V5
xFlasher 360 or other Gowin compatible programmer is required in order to program these chips.
Programming Instructions
Corona Specific Instructions
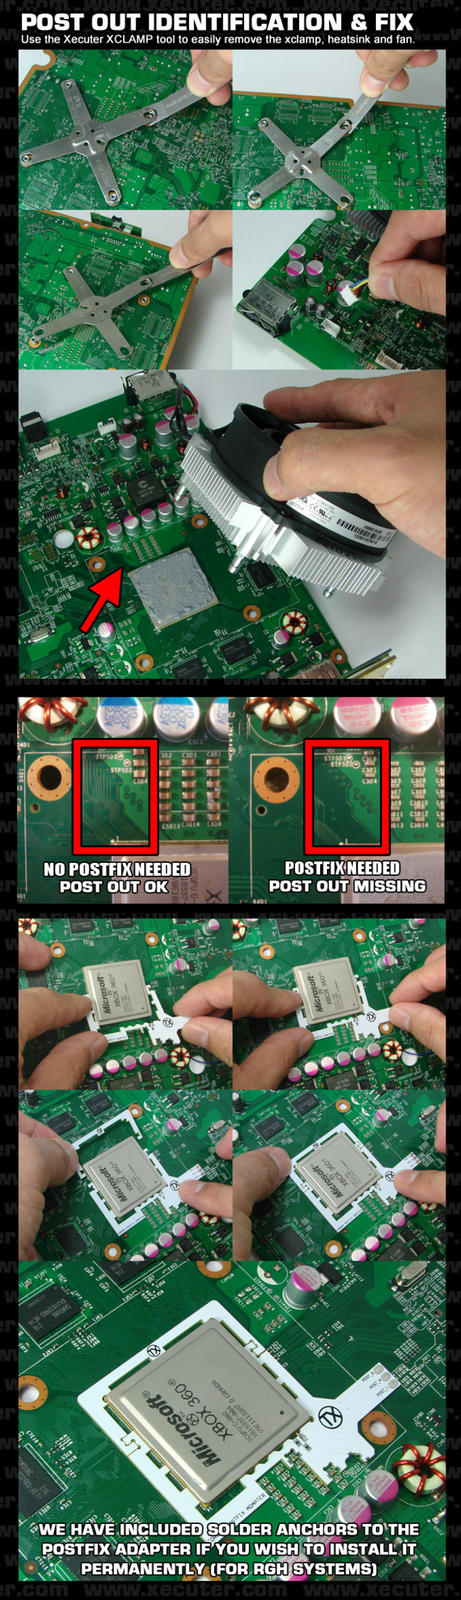
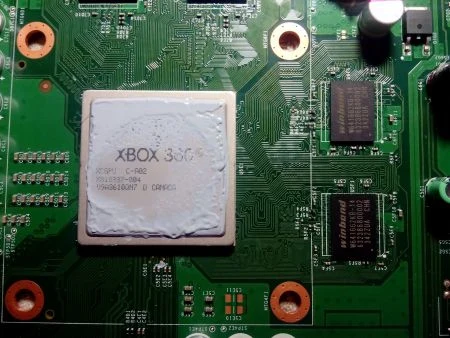
On later revisions of Corona based motherboards (named Waitsburg and Stingray for Xbox 360 S and E respectively), the trace connecting the CPU's POST to the POST pad on the bottom of the motherboard has been removed, so you need to use a postfix adapter to be able to attach a pogo pin to the POST connection underneath the CPU, allowing for CPU POST output once again. You can use the following image to determine if you need the adapter or not by removing the heatsink:
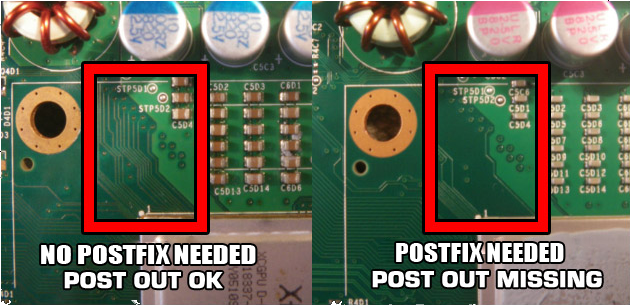
You can also identify if you have a Waitsburg motherboard instead of a Corona by looking for the part number of X862605 on the bottom left of the PCB. Generally, Xbox 360 S consoles manufactured in 2012 will be Waitsburgs and need postfix adapters for RGH. Every Stingray will also need a postfix adapter with RGH.
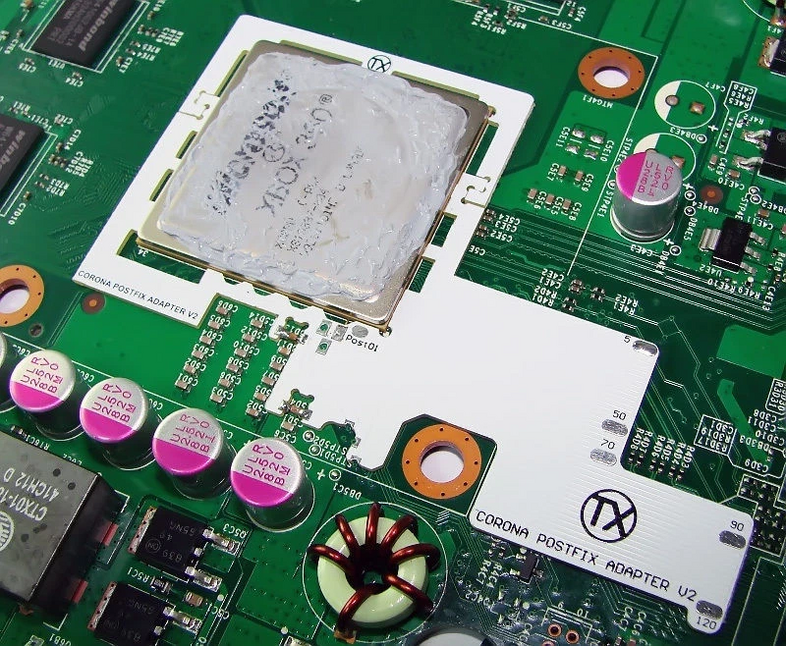
As shown in following diagram, you can install it by carefully sliding the larger piece of the adapter onto the left side of the CPU (when looking at the CPU from a readable position). Gently press the PCB inward toward the CPU to depress the pogo pin, and slide the smaller PCB part over the other side of the CPU, interlocking the two PCBs together. Solder the four anchor points on the edges of the postfix adapter to prevent it from coming loose.
Glitch Chip Installation
Motherboard Points
Phat
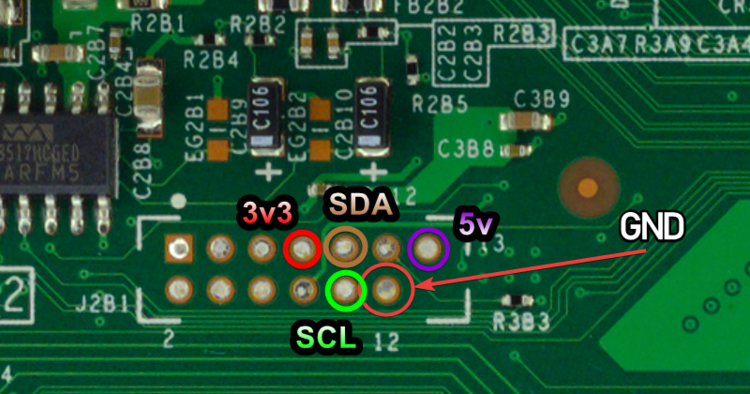
3.3v, 5v, and GND
- J2B1
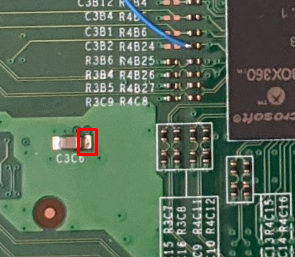
1.8V (Only if using an X360 ACE V1/V2/V3)
- Non-Xenon
- Xenon
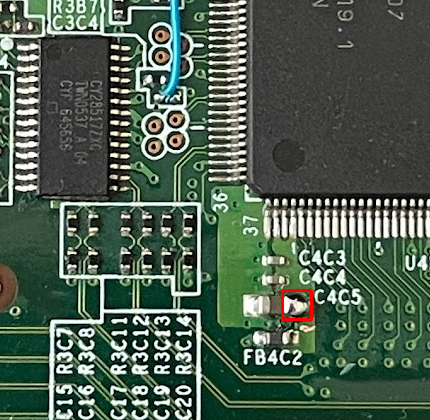
CPU_RST
- C7R112
- R8C2
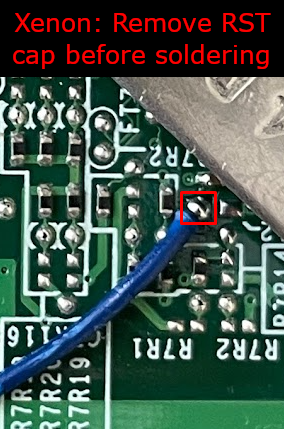
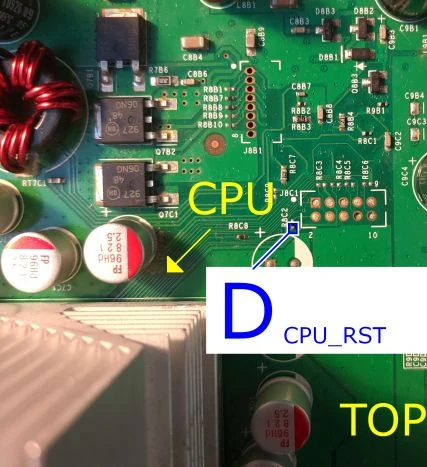
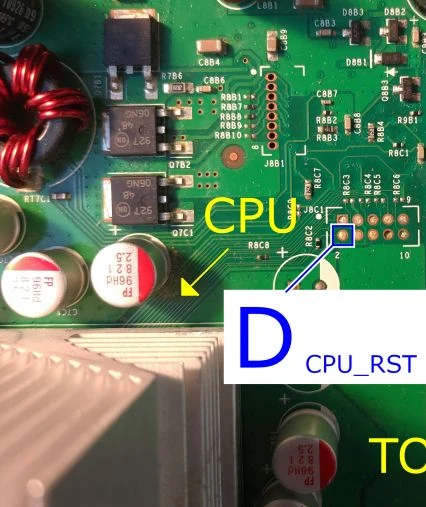
- J8C1
- Not recommended.
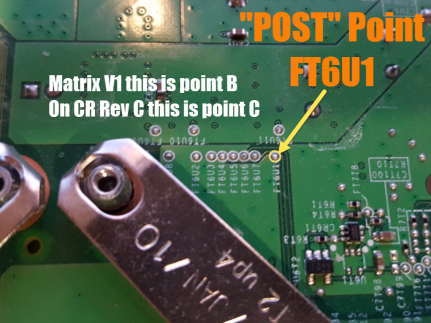
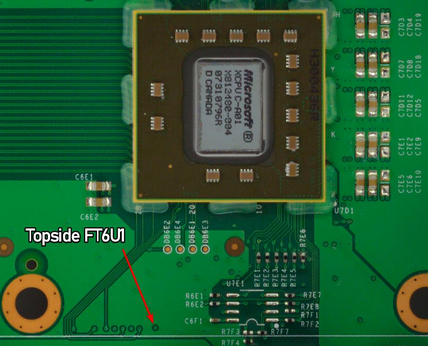
FT6U1 POST
- Bottom
- Top (requires scraping)
GND
- J2B1 Header
- AV Port
- Any other ground point
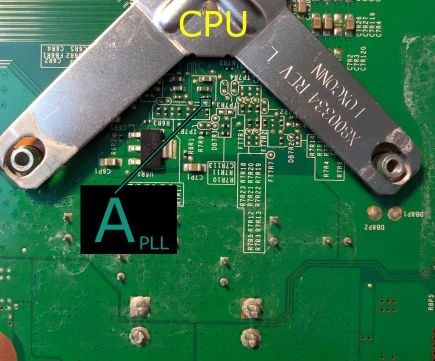
PLL
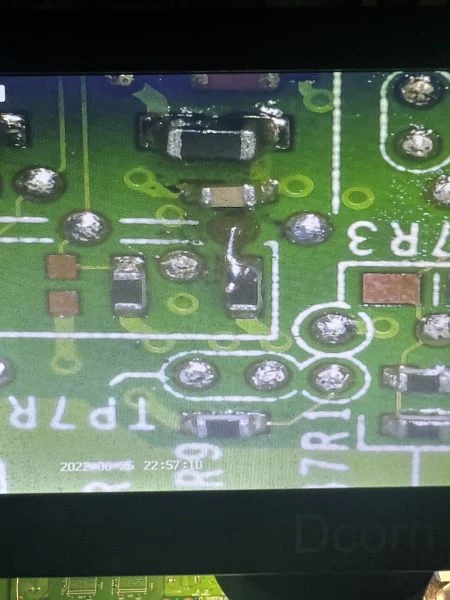
- Bottom
- Top (under CPU heatsink; requires scraping)
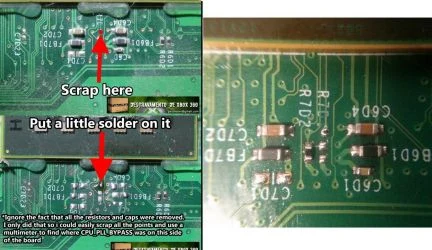
STBY_CLK
- Top (Xenon)
- Top (Non-Xenon)
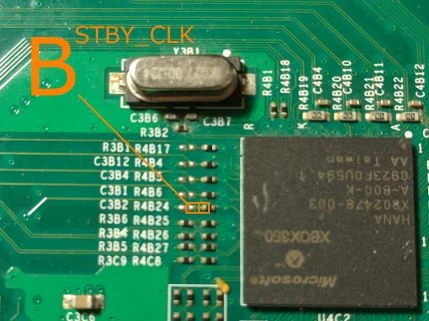
- There are 2 points boxed; either can be used.
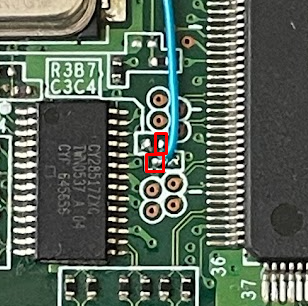
- Bottom (Non-Xenon)
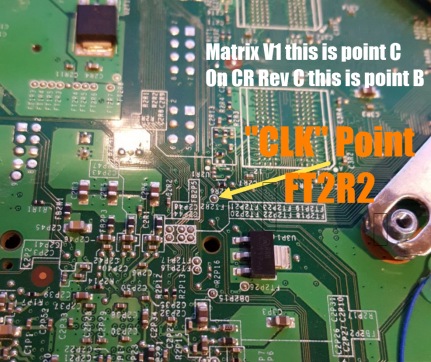
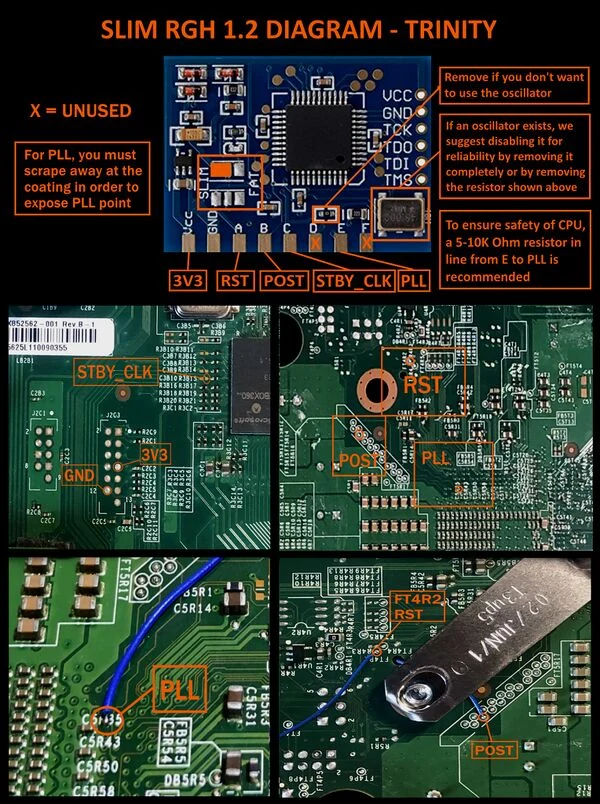
Trinity
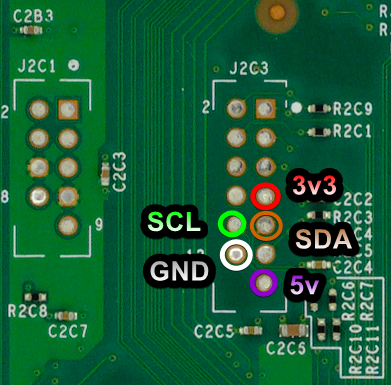
3.3v, 5v, and GND
- J2C3
CPU_CLK (Only if using an X360 ACE V4/V5)
- Top (HANA)
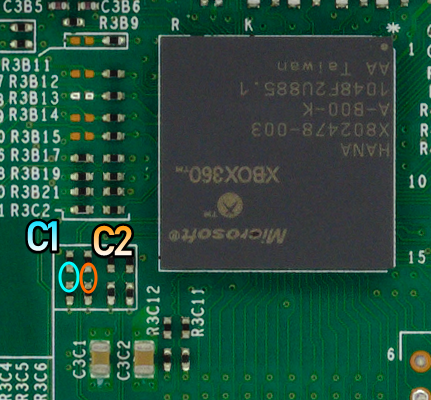
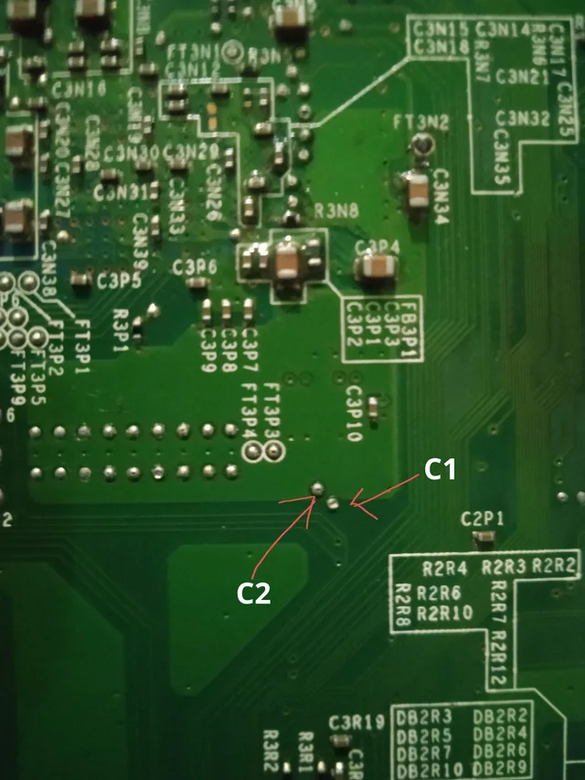
- There are two points circled for C1 and C2 respectively; either can be used or bridged.
- Bottom
PLL
- Bottom (Requires scraping)
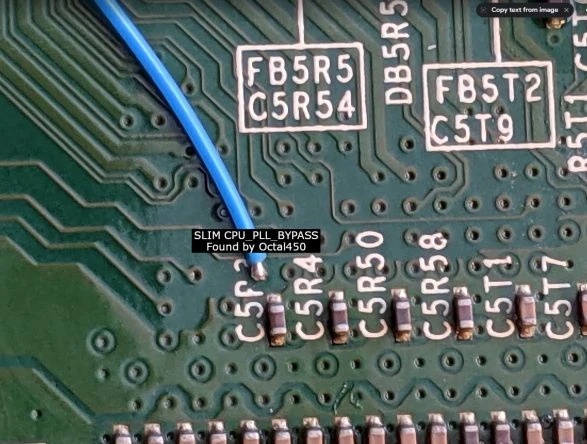
- No alternative point!
POST & RST
- Bottom
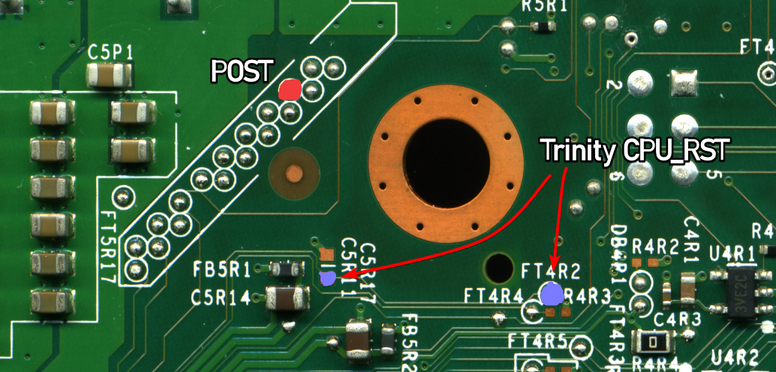
- There are two RST points, either can be used.
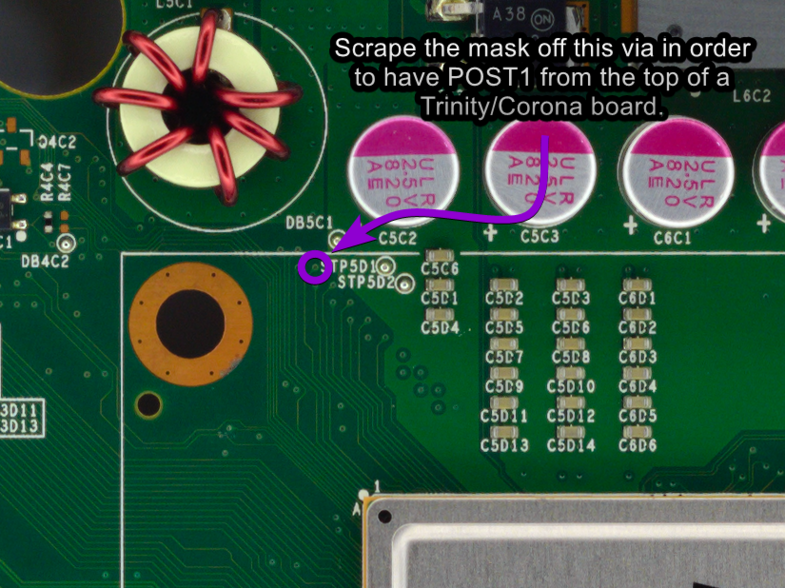
- Top (without postfix adapter, requires scraping)
- Top (with postfix Adapter)
- A Postfix adapter can be used on Trinity in case the POST point is damaged.
- For Postfix v1, use the POST_1 pad.
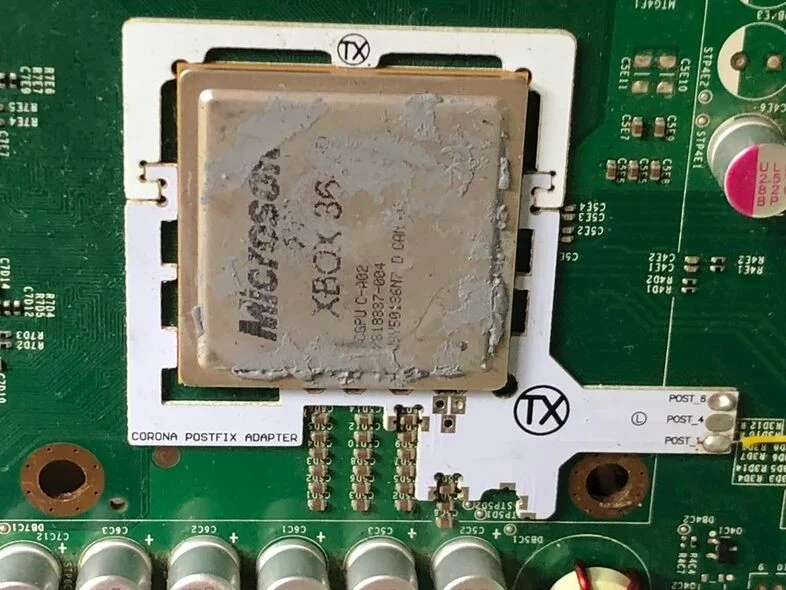
- For Postfix v2, use any pad, as they all connect to the same spot on the CPU anyway. It was only used for tuning the boot times of early I2C RGH methods.
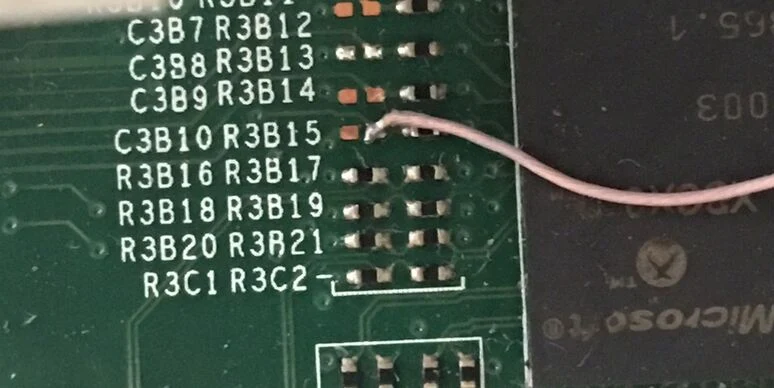
STBY_CLK
- C3B10 (Top)
- FT3N2 (Bottom)
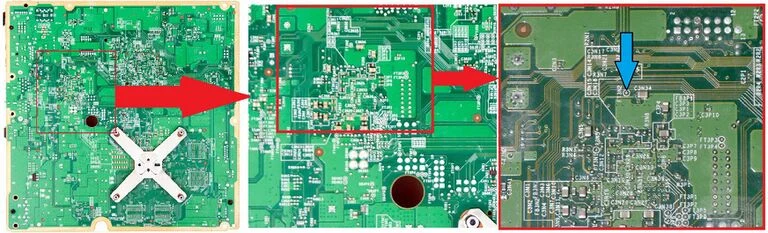
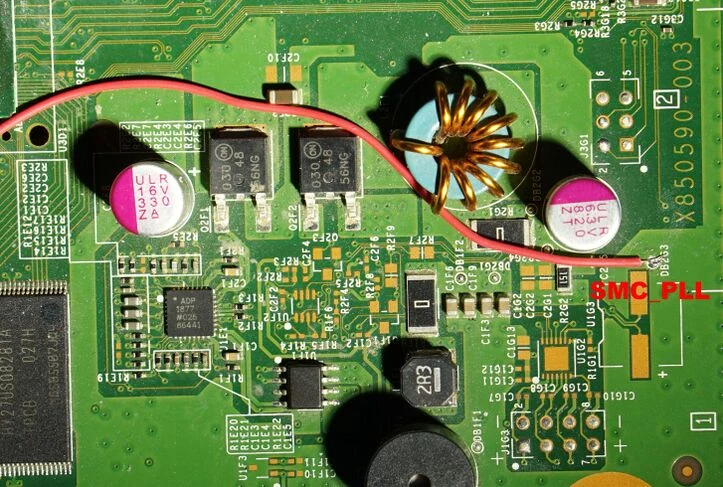
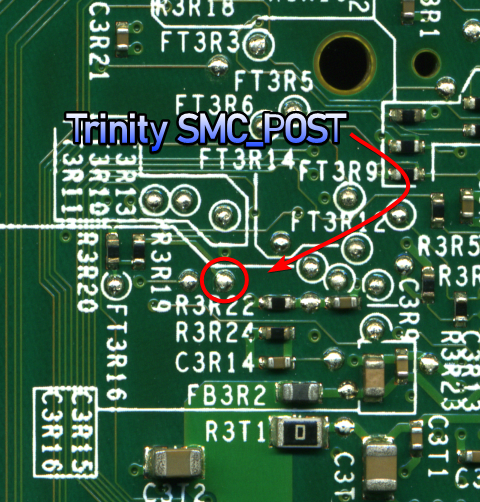
SMC
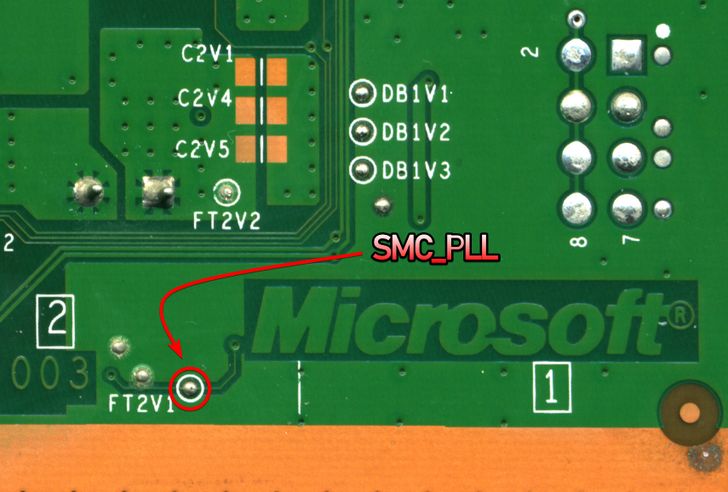
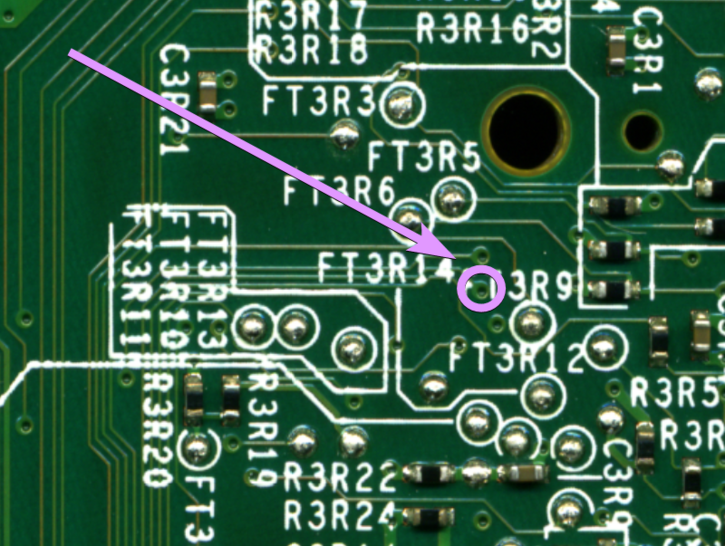
- The GPIO used for SMC_PLL is also used for Muffin/Mufas
- SMC_PLL
- Bottom
- Bottom (Alt point, requires scraping)
- Top (Alt point; preferred for Muffin/Mufas)
- Bottom
- SMC_POST
- Bottom
- Bottom
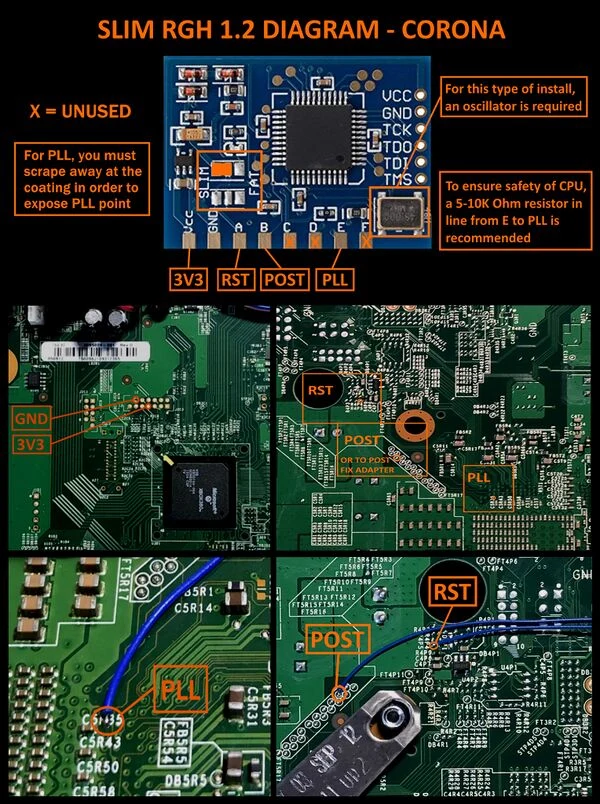
Corona/Waitsburg/Stingray
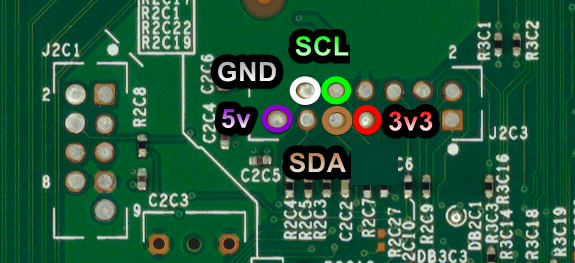
3.3v, 5v, GND, and RGH 2 i2C
- J2C3
CPU_CLK (Only if using an X360 ACE V4/V5)
- Top
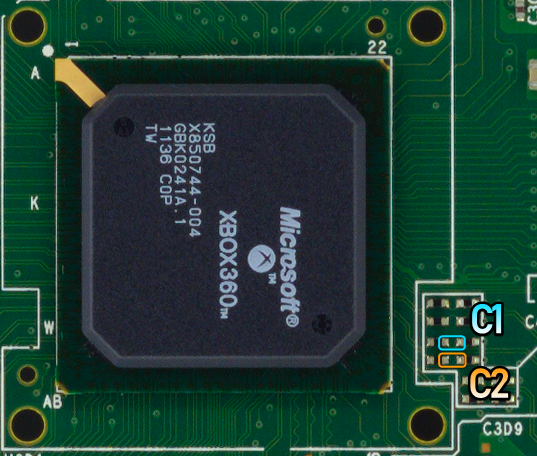
- There are two points circled for C1 and C2 respectively, either can be used or bridged.
PLL
- Bottom
- No alternative point!
POST & RST
- Bottom
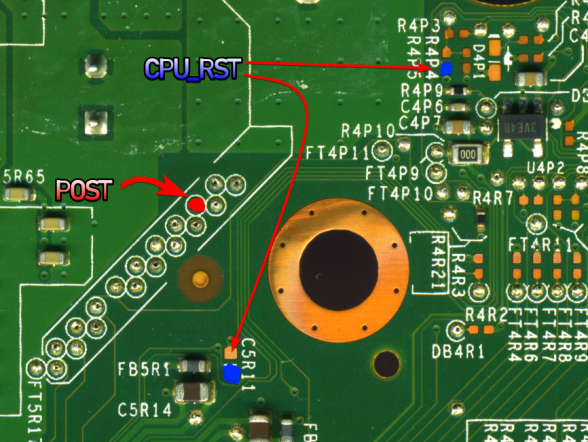
- There are two RST points; either can be used.
- Top (without postfix adapter)
- Top (Postfix Adapter)
- If POST on the bottom is disabled (like in Waitsburg & Stingray boards) or damaged, a postfix adapter is required.
- For Postfix v1, use the POST_1 pad.
- For Postfix v2, use any pad, as they all connect to the same spot on the CPU anyway. It was only used for tuning the boot times of early I2C RGH methods.
Glitch Chip Pinouts
Note: RGH 1.2 on Corona consoles requires a glich chip with a built in oscillator. STBY_CLK will be unused when using a chip's oscillator.
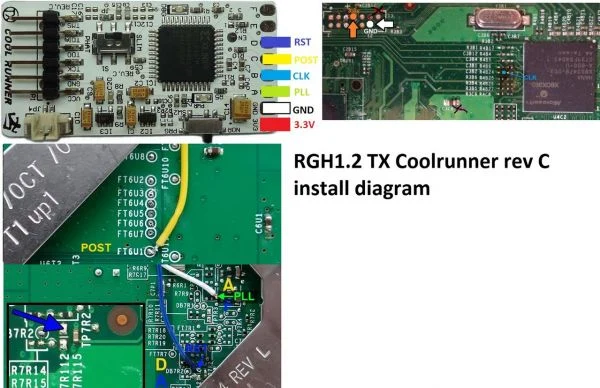
Coolrunner Rev A/B/C/D
- A - PLL (Phat)
- B - STBY_CLK (only if not using oscillator on Phat or Trinity)
- If you have a Rev D, the built in oscillator can be easily disabled if this resistor is removed instead of removing the entire oscillator.
- C - POST
- D - RST
- E - PLL (Slim, 5-10K ohm resistor recommended)

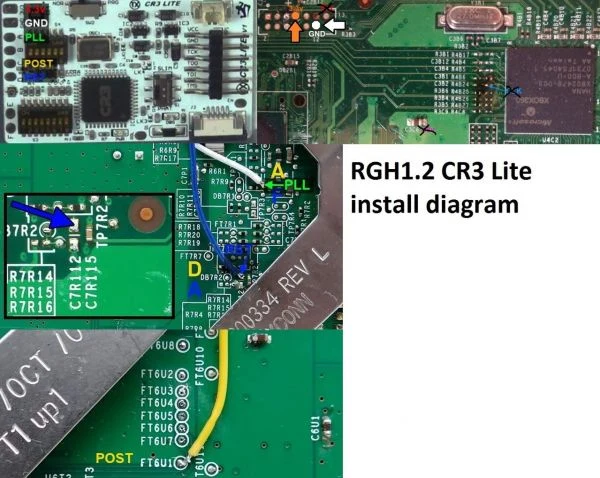
CR3 Lite
- A - PLL (Phat)
- B - STBY_CLK (only if not using oscillator Phat or Trinity)
- C - POST
- D - RST
- E - PLL (Slim, 5-10K ohm resistor recommended)
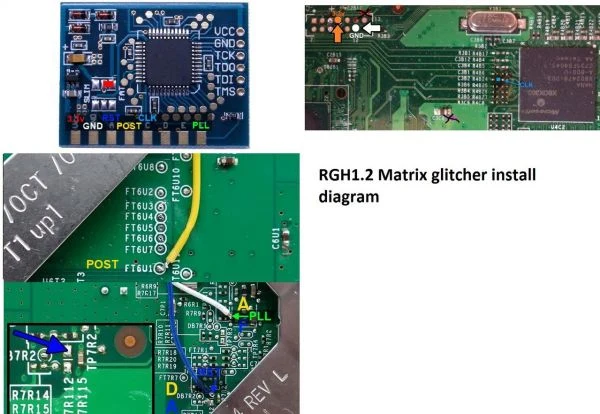
Matrix Glitcher
- A - RST
- B - POST
- C - STBY_CLK (only if not using oscillator Phat or Trinity)
- If you have a Matrix that comes with an oscillator, it can be easily disabled if this resistor is removed instead of removing the entire oscillator.
- E - PLL (Slim, 5-10K ohm resistor recommended)
- F - PLL (Phat)

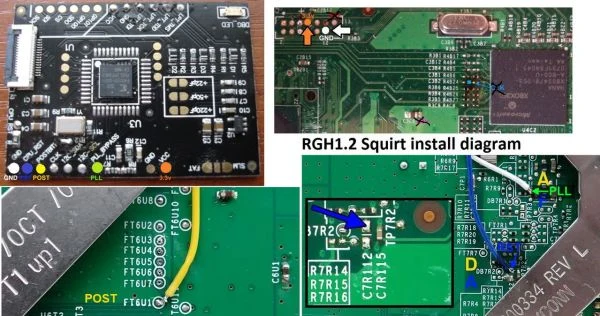
Squirt
- (Phat) Squirt BGA 1.2: Disable the onboard 670pf and/or 480pf caps by removing R7 and R8
- (Phat) Squirt Reloaded 2.X: remove R2 and connect STBY_CLK
- (Slim) Squirt Reloaded 2.X: remove R2 and connect STBY_CLK or remove 100 MHz and add 48 MHz oscillator
- (Slim) Use SCL pad for PLL
- Pinout follows written labels
- Don't use POST or RST tuners
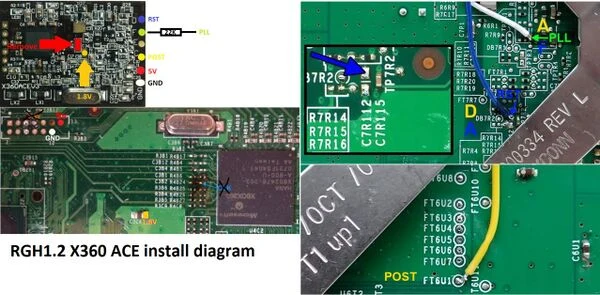
X360ACE (V1/V2/V3/V3+), DGX
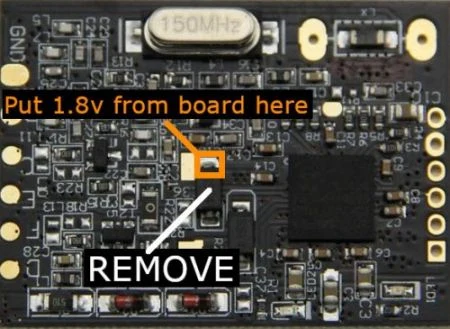
- C - POST
- D - RST
- E - STBY_CLK (Only when using 48 MHz timings on Phat)
- F - PLL (5-10K ohm resistor recommended on Slim, 22K ohm resistor required on Phat)
- Remember to remove the diode and connect 1.8V on Phat
X360ACE V4/V5 (Phat)
| If you are using X360ACE V4/V5 on a Phat console you need to modify the chip for 1.2V VCCIO according to the diagram in the next section. It is also mandatory to use a 22k resistor inline with PLL as it is not included on the X360ACE V4/V5 |
- A - RST
- B - POST0
- C1 - STBY_CLK
- D - PLL (22K ohm resistor required)
X360ACE V4/V5 (Slim)
- A - RST
- B - POST
- C1 - CPU_CLK_DP
- C2 - CPU_CLK_DN
- D - PLL (5-10K ohm resistor recommended)
Glitch Chip Diagrams
Phat Diagram for CR3 Lite
Phat Diagram for Coolrunner
Phat Diagram for Matrix
Trinity Diagram for Matrix
Corona Diagram for Matrix
Phat Diagram for X360ACE
Phat Diagram for Squirt
Phat Digram for X360ACE V4/V5
| If you are using X360ACE V4/V5 on a Phat console you need to modify the chip for 1.2V VCCIO according to this diagram. It is also mandatory to use a 22k resistor inline with PLL as it is not included on the X360ACE V4/V5. |
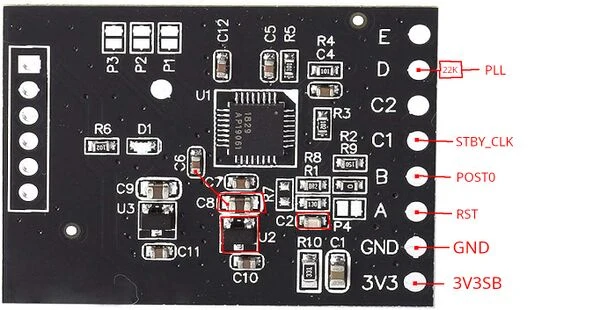
U2, C8, and C2 must be removed. A jumper must then be soldered from the left side pad of C8 to the bottom of C6.
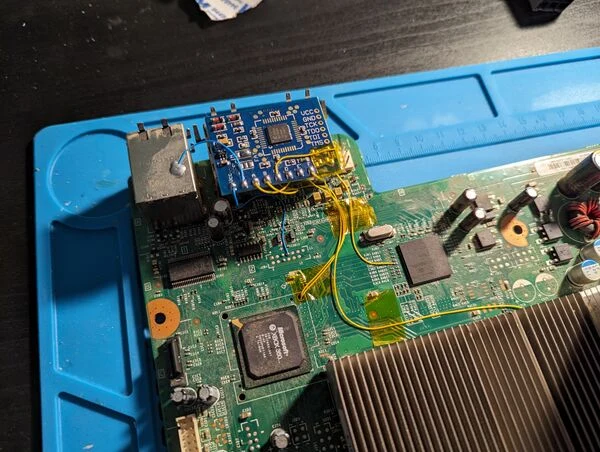
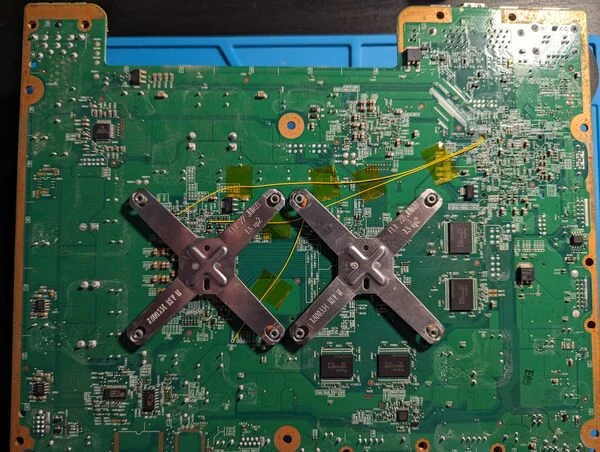
Installation Examples
Phat
Top
Bottom
Slim
TBD
Testing the Console
Once you've finished soldering, clean up any flux with isopropyl alcohol and cotton swabs. Partially re-assemble your Xbox 360, ensuring that:
- Heatsinks are attached (If they were removed for some reason)
- Fan(s) are in place and plugged in (On a phat console, the fans can be angled on top of the heatsinks to cool them for testing)
- The RF board is plugged into the front of the console
- An A/V or HDMI cable is plugged into the Xbox 360 and into a TV or monitor
- A power brick is plugged in to both the wall and Xbox 360
- (Optional) An ethernet cable is plugged into the Xbox 360 and a LAN (e.g. a switch, router, or directly to a PC)
Turn on your console, and it should boot into XeLL RELOADED within a minute. If you don't have an ethernet cable connected, write down (and/or take a picture of) the "CPU Key" listed on screen. If the console doesn't boot into XeLL, check all previous steps and double check your wiring accuracy and quality.
Writing a New NAND Image
Once you have successfully booted XeLL, we can use XeBuild to make a Freeboot image with your now obtained CPU key, which is a modified version of the OS built specifically for your console.
Decrypting & Patching the NAND
- Open J-Runner and select
...next to the Load Source field and select one of your original NAND dumps if not already selected. In the upper right of J-Runner, ensure theGlitch2radio button is selected. If not, or you used Bad Update to do a NAND dump, enable it. - Enter your CPU key into the CPU Key text field.
- The J-Runner software itself can automatically grab the CPU key of a console if both are connected to the same network. To do this, enter the IP address XeLL gives you into the lower right of the app. You can then click
Get CPU Keyand XeLL will automatically decrypt the retail NAND dump you backed up earlier. It's recommended to also click "Extract Files" in order to extract additional data from the NAND, such as your keyvault. - You can also use XeLL's built-in web server to get the CPU key; simply enter the Xbox's IP address in your preferred web browser. You will see information about the console, and the CPU key can be easily copy and pasted from this web page. It's recommended to download the keyvault as well.
- If you didn't have access to an Ethernet cable to plug the Xbox into a PC or LAN, you can manually type the CPU key into J-Runner in order to decrypt your original NAND dump.
- The J-Runner software itself can automatically grab the CPU key of a console if both are connected to the same network. To do this, enter the IP address XeLL gives you into the lower right of the app. You can then click
- Go in the
Patchestab and enable any desired options. Commonly used ones will be listed below.UsbDSecwill remove the console's security restrictions of XInput peripherals, allowing you to use various controllers or controller adapters as long as they output the XInput protocol. This is also mentioned in the Using Modern Controllers page.XL HDDandXL USBenable the ability to use USB/SATA storage larger than 2 TB, with the caveat that they have to be formatted in a special way with FATXplorer.
- Click "Create XeBuild Image". This will take a few moments, and when it's finished, it will be a
updflash.binfile in J-Runner's working directory. You can click theShow Working Folderbutton in order to quickly get to it.
NAND Flasher Method
- Power down the console and connect your programmer to the motherboard.
- If you are using an xFlasher, ensure the switch is set to
SPI.
- If you are using an xFlasher, ensure the switch is set to
- In J-Runner, select the
updflash.binXeBuild image created by the program and click "Write NAND". - Disconnect your NAND programmer from the console's motherboard and the PC when the process completes.
- Check if the console boots to the Microsoft dashboard. If it successfully boots to the dashboard, it is an indication that you've successfully hacked your console.
- Continue in the Cleaning Up section.
XeLL Method
- Copy the
updflash.binfile created by J-Runner to a FAT32 formatted USB storage device and plug it into your powered-off console. - Turn on your console. It will boot into XeLL and begin flashing your NAND. Once it has finished, it will power off your console.
- With Bad Update, you can also access XeLL with either XeUnshackle directly, or the XellLaunch application.
- Turn it back on, and it should boot to the Microsoft dashboard, which is an indication that you've successfully hacked your console.
- Tune boot times if necessary.
- Continue in the Cleaning Up section.
Simple 360 NAND Flasher Method
Since this method requires a homebrew app, it can only be done with Bad Update on a stock console.
- Unzip 360 NAND Flasher to your Xbox 360's internal hard drive or a USB drive.
- Copy
updflash.binto the directory of 360 NAND Flasher's executable. - Run the application in your desired dashboard. (e.g. Aurora, Freestyle, XeXMenu, etc.)
- Press the A button and then press START. The program will flash the new NAND image and automatically reboot the console when finished.
- Verify that everything works. Make sure you are in the latest kernel version.
- Tune boot times if necessary.
- Continue in the Cleaning Up section.
Tuning Boot Times
Jasper Consoles
- If the console does not glitch reliably even after tuning the value, add a 10nf-100nf capacitor (ex: ceramic cap or SMD cap) from PLL to GND (revised by Octall450).
- Onboard 100nf on Coolrunner Rev-C may be used by bridging CAP.
- Onboard 100nf on Squirt Reloaded 2.X may be used by bridging J5.
- If adding a cap, PLL will be more sensitive to noise. If you have strange blinking, be sure that your wire is routed away from clock signals.
- For X360ACE/DGX make sure the capacitor is after the 22K Ohm resistor.
Tuning Glitch Chip Timings (Phat)
Start at the top of the recommended range (noted in J-Runner's timing assistant and commented in the extra timings folders) and work down until you get good boots. On chips with crystals, the optimal timing will depend on the crystal (how close it is to its rated frequency)
- If the light stays on at the end of a cycle:
- This means that the checks were passed, but the console failed to start
- The timing is probably too low, or the pulse length is too large
- If the light goes off at the end of a cycle but doesn't boot:
- This means that the checks failed
- the timing is too high, or the pulse length is too small
Note: The debug light behavior may be slightly misleading due to using POST_OUT bit 0.
Tuning Glitch Chip Timings (Slim)
Start at the top of the recommended range (noted in J-Runner's timing assistant and commented in the extra timings folders) and work down until you get good boots
On chips with crystals, the optimal timing will depend on the crystal (how close it is to its rated frequency)
- 2 Short Blinks, then Short
- .....##...##...................##............
- This means that the checks were passed, but the console failed to start
- The timing is probably too low
- 2 Short Blinks, then Long
- .....##...##...................##############
- If the light stays on at the end of a cycle:
- This means that the checks failed
- The timing is probably too high or far too low
Advanced POST diagnostics
The blinking LED on the glitch chip simply reflects the current POST bit state (on = 1, off = 0). It can't provide detailed information about where exactly the boot failed. For that, you will need to monitor the full POST bus to see where the error occurred.
Some POST codes on failure are:
- 0xDA - CPU got stuck when executing the signature check. Reset pulse wasn't timed correctly (too early or too late) and crashed the CPU.
- 0xDB - The reset glitch caused the hash check to pass, but the bootloader crashed just before the jump to CB_B. Uncooperative Jasper consoles will often fail here (see below).
- 0xF2 - CB_B signature check failed. Reset pulse happened too late or didn't affect code execution.
- 0x20-0x23 - CPU crashed very early during CB_B execution. Typically happens at 0x22 (security engine init) or 0x23 ("system RAM init"; on hacked 9188 CB_B this is just before 0x2E runs - it doesn't actually initialize system RAM).
- 0x2E - CPU crashed during hardware initialization. This is typically where Jaspers and Falcons will crash upon a failed boot.
Retail CB_Bs will never load 3BL; that is only present on development systems. Instead they will load and verify CD (4BL), which in the case of RGH systems is exploit code that chainloads XeLL.
If you can't be bothered to wire up all of the POST bits, you can monitor these test points with no more than a multimeter, alligator clip cables, and a lead of wire soldered to the appropriate point.
- Bit 5 (FT6U3 on phats): If it reads 1 volt at the end of a cycle, either 0xF2 was raised (also check bit 7), or the CPU crashed early while executing CB_B.
- Bit 7 (FT6U8 on phats): This bit is only ever 1 if CB_A is executing or a system error occurred.
See Post Codes on XenonLibrary for a full list of POST codes and what they mean.
Super uncooperative Jaspers
If you have tried all possible wire routing and capacitor combinations and still can't rule out the cause of why your Jasper can't consistently boot, this section is for you.
Some Jasper and Tonkaset boards can be very uncooperative. The cause of these issues isn't known, but the behavior is.
On power up there is a random, but significant chance that the CPU will fail to glitch past POST 0xDB. When that happens, all glitching attempts for the remainder of that power-on will consistently fail at that POST code, regardless of timing or pulse width variations. The only way around this is to power cycle the console and try again.
Cleaning Up
- Remove the NAND programmer wires from the console and clean the points. Clean all flux off the board, allow it to dry, and test it once more before re-assembling.
- You may want to leave your Xbox 360 disassembled so that you can disable the eFuse-blowing circuit so you can't accidentally install official updates on your console.
Installing XeXMenu
- Plug a flash drive into your Xbox 360 and navigate to Console Settings > Storage. Select the flash drive and format it.
- Make sure you have hidden folders enabled on your PC.
- Go into
File ExplorerunderViewon top, check markHidden Items.
- Go into
- Plug the flash drive into your PC. Open the
Contentfolder, select "New Folder", and name it0000000000000000(16 zeroes). Open the new folder, make another folder under the nameC0DE9999, open that folder, and finally make one last folder called00080000The full folder path should now be0000000000000000/C0DE9999/00080000/. - Extract the
C0DE99990F586558file from the XeXMenu archive to the0000000000000000/C0DE9999/00080000/directory on the USB drive. - Safely eject your flash drive and plug it into your Xbox 360. Navigate to the Demos section of your dashboard, and it should list XeXMenu there. Select it to launch it.
- You can install XeXMenu to your hard drive by going to Console Settings > Storage and copying it from your flash drive to the hard drive.
From here, you can install any homebrew or mods that you want. See this page for a list of recommended modifications and applications to install.
Technical details
This is a brief explanation as to how the exploit actually works, as implemented in Octal450's timing files (assuming a Falcon/Jasper console).
When the glitch chip detects the CPU has been reset, it counts toggles on POST bit 0. The CPU runs through the boot process in a predictable manner, which is why only one POST wire is needed - this is the same on all RGH methods.
Once the CPU reaches POST 0xD9 an approximately 400 ms delay occurs before CPU_PLL_BYPASS is asserted. After 0xDA arrives, a much shorter delay happens (between 7.2-7.3 ms; around 349,821 cycles @ 48 MHz for timing file 21), then the glitched reset pulse is sent. Finally, the glitch chip waits a bit before de-asserting CPU_PLL_BYPASS, allowing the CPU to run at full speed.
Since this attack effectively glitches out the CPU, the CPU will be in an unstable state just after the glitch is performed, and it is possible for it to crash soon after. This means it's normal for your console to occasionally fail to boot on the first try.
References
- ↑ Original J-Runner with Extras repo: NOTE: THIS PROJECT IS NO LONGER UNDER DEVELOPMENT BY OCTAL450. Work is being continued by Mena from PhenomMod.
- ↑ "J-Runner with Extras: IMPORTANT NOTICE" post by Octal450 mentioning currently active fork