Replacing LEDs (also know as an Ring of Light mod, commonly abbreviated to RoL mod) is an way to customize your Xbox 360. It is quite a difficult mod and requires some soldering skills while being able to work with small SMD LEDs.
Requirements
The requirements are as follows:
- A soldering iron, solder, flux, and isopropyl alcohol with cotton swabs
- Soldering knowledge. You are going to be handling small SMD components.
- A pair of tweezers (Not required but would really recommend, really hard to execute the mod without them. About 3$)
- 0603 SMD LEDs of any color (usually less than $0.05 per LED when bought in bulk). These LEDs are the ones we are going to replace the default ones with.
- Phat consoles require 5 LEDs, along with optional 4 red LEDs
- Slim consoles require 9 LEDs, along with optional 1 red LED
- E consoles require 5 LEDs, along with optional 1 red LED
- Controllers require 4 LEDs
- Digital microscope (Not required, but useful to check joints)
- This will be helpful to re-solder the 0402 resistors if you happen to accidentally knock one of them off.
Phat consoles
Disconnect the RF board from your console. Then remove the plastic diffuser covering the LEDs.
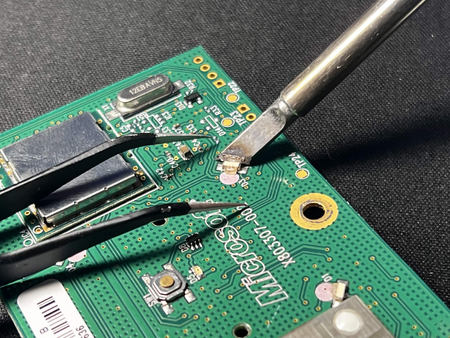
To remove the LEDs, first heat up your soldering iron and apply small amounts of flux to the points where the LEDs are soldered to. A quick and easy method of removing them is hold the iron against the LED to heat up the solder and then use a pair of tweezers to pull the LED out. This has a chance of destroying the LED, but we won't use it anymore since we are replacing it. If you have an copper soldering braid, you can use that. Melt some solder on the board and then go with the soldering braid over the solder points.
To solder the new LEDs, we must first get our LEDs and find out which terminals are positive and which are negative, below are diagrams but can do this yourself by using a multimeter set into resistance mode by connecting the wires from the multimeter to the terminals of the LED. As we can see we have the common positive, this is where the positive end (anode) of the LED should go, then we can notice the red and the green negative pad. The green negative pad will be enabled when the console is behaving normally (this is where we want to connect the LED to), and the red negative pad is going to be enabled when something is wrong with the console.
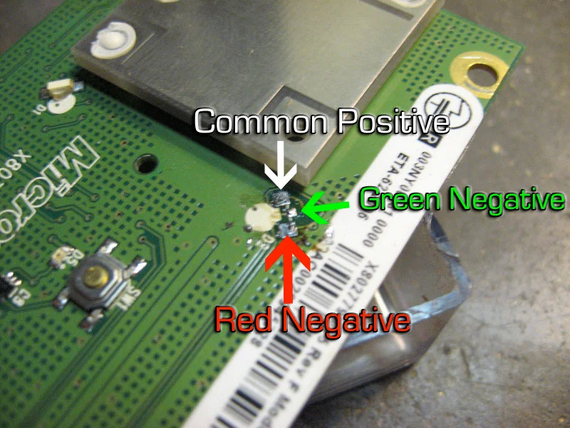
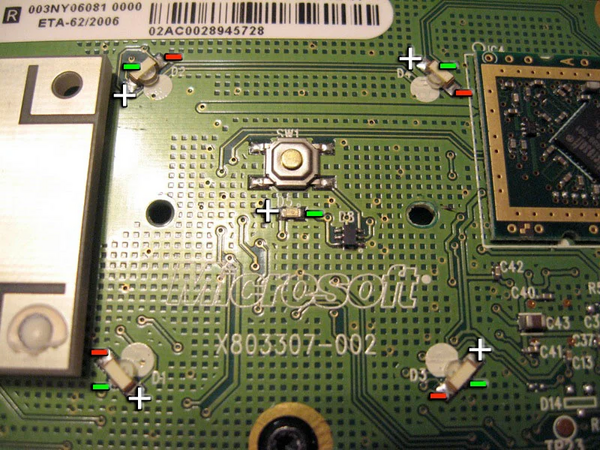
So we want the LEDs to be connected with:
- The positive side (anode) connected to Common Positive.
- The negative side (cathode) connected to Green Negative.
Red LEDs can be much more difficult to solder on to Phat RF boards. This guide won't be covering how to do that, but an easy way to maintain the red ring error code functionality is to bridge the Green and Red negative terminals with solder.
Slim and E consoles
On Slim and E consoles, the process is different as there are no red LEDs along the ring of the console.
- Slim consoles have 2 green LEDs for each quadrant and one green LED in the middle, making 9 colored LEDs required.
- E consoles have 1 green LED for each quadrant and one green LED in the middle, making 5 colored LEDs required.
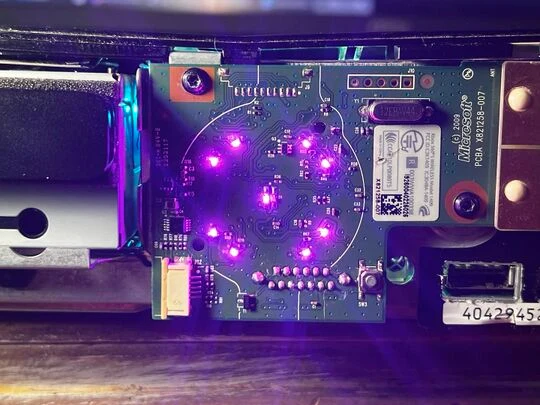
Disconnect the RF board from your console. Then remove the plastic diffuser covering the LEDs. You may notice that the center LED is larger than the others. This is because these are two LEDs combined into one package, but that's okay, as you can still solder two separate 0603 LEDs. The left side is the power LED (green), and the right side is the error LED (red).
To remove the LEDs, first heat up your soldering iron and apply small amounts of flux to the points where the LEDs are soldered to. Be careful removing them on the Slim, as there are resistors very close that, if removed, the LEDs will stop working, and will require microsoldering to re-solder them to the board. A quick and easy method of removing them is to hold the iron against the LED to heat up the solder and then use a pair of tweezers to pull the LED out. Try keeping one of the green LEDs intact, as if you don't have a red LED, you can use this to act as your "Red Dot of Death" LED.
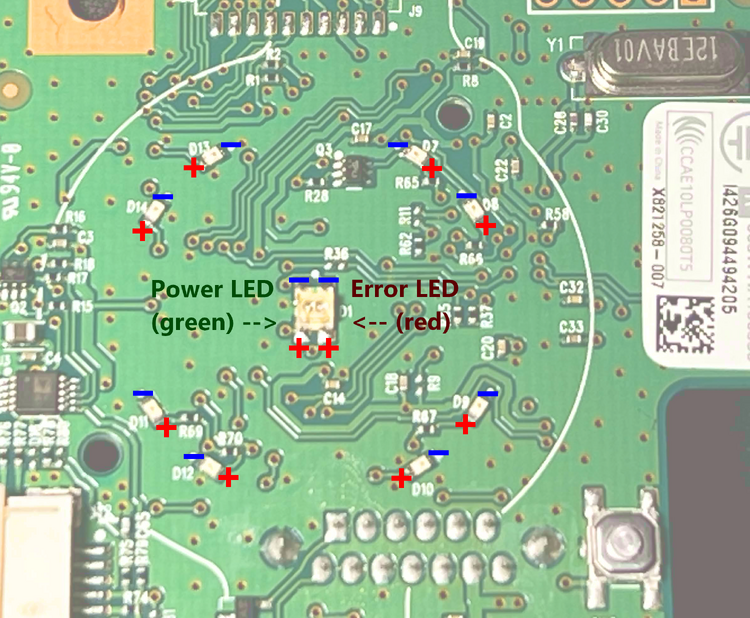
On Xbox 360 E consoles, the polarity is printed directly on the board.
Testing & Troubleshooting
Congrats! You have finished the soldering. But what now?
- Test your RoL mod using an app like 360LED or Lightshow.
- If some LEDs do not work, double check if the polarity is correct and try reflowing the solder joints.
- If it still doesn't work, either the LED is dead, or the one of resistors for the LED have been knocked off. Some resistors are on the back of the board.
- It is also possible that a trace was damaged or cut, or a pad was lifted, but this is unlikely if you were being careful and using the right equipment.