- English
If your Sega Chihiro unit is having issues, check the below general troubleshooting tips for help. If it's an issue with the bottom board (Xbox motherboard) the standard troubleshooting page for Xbox applies.
LED Errors
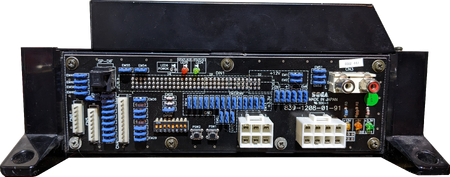
Since the Chihiro is essentially an Xbox with extra hardware, the LED errors codes are the same as the original Xbox and are displayed on the red and green LEDs on the filterboard. See the Xbox Error Codes page.
Additionally, if the green LED is lit for over 20 seconds and then flashes red and green, the SEGABOOT.xbe failed to load from the mediaboard.
Errors and Caution Codes
The Chihiro also can display a white "Chihiro" screen showing "Error ##" or "Caution ##" written on screen. The following error codes were taken from official game manuals.
| Error Code | Error Message | Cause | Countermeasures |
|---|---|---|---|
| Error 02 | Main board malfunctioning. | MAIN BOARD is inoperative. | Verify that the MAIN BOARD is connected properly. |
| Error 03 | Bad serial number on main board. | Unable to read MAIN BOARD serial ID. | Disconnect the MEDIA BOARD from the MAIN BOARD and send the MAIN BOARD for repair. |
| Error 04 | Bad serial number on media board. | Unable to read MEDIA BOARD serial ID. | With the MEDIA BOARD still attached to the MAIN BOARD, send the Chihiro for repair. |
| Error 05 | This game is not acceptable by main board. | The game is a foreign edition. | Use the domestic version of the game.. |
| Error 11 | JVS I/O board is not connected to main board. | (1)I/O BOARD is not connected. (2)Unreliable connection between MAIN BOARD and I/O BOARD. |
(1)Connect the I/O BOARD to the MAIN BOARD. Verify that the power cable is connected to I/O BOARD. (2)Reconnect or replace the JVS CABLE that connects the I/O BOARD to the MAIN BOARD. |
| Error 12 | JVS I/O board does not fulfil the game spec. | Correct I/O BOARD is not connected. | Use an I/O BOARD that provides the proper input/output for the game. |
| Error 14 | Network firmware version does not fulfil the game Spec. Required version XX.XX. | The firmware version installed on either the NETWORK BOARD or the DIMM MEDIA BOARD is older than the required version. | Use a NETWORK BOARD or DIMM MEDIA BOARD with firmware that meets or exceeds the required version. |
| Error 20 | Unknown. | Unknown. | If error No. 20 is generated, the power must be turned OFF and ON again inorder to clear it. |
| Error 21 | This game is not acceptable by main board. | Game data loaded from the GD-ROM to the DIMM BOARD is corrupted. | Verify the GD-ROM DRIVE and Chihiro connection. Check the GD-ROM disc for scratches, dust or dirt. |
| Error 22 | Communication error occurred between main board and media board. | No response from DIMM BOARD to MAIN BOARD. | Ensure that the DIMM BOARD and the GD INTERFACE BOARD are properly connected. Should the problem persist, the DIMM BOARD or GD INTERFACE BOARD may be damaged. |
| Error 23 | GD-ROM drive cover is open. | The GD-ROM DRIVE cover is open. | Ensure the GD-ROM DRIVE cover is firmly closed.. |
| Error 24 | GD-ROM is not found. | GD-ROM disc is not found. | Insert the GD-ROM disc correctly. Verify that the disc is a Chihiro GD-ROM disc. Check the GD-ROM disc for scratches, dust or dirt. |
| Error 25 | Cannot access GD-ROM drive. | (1)Unable to access GD-ROM DRIVE. (2)The GD-ROM DRIVE cover is open. |
(1)Verify that the GD CABLE and the power cable are properly connected to the GD-ROM DRIVE. (2)Close the GD-ROM cover securely. Should the problem persist, the GD-ROM DRIVE may be damaged. |
| Error 26 | Media board malfunctioning. | KEY CHIP is not found. | Attach the proper KEY CHIP for the game. Insert the KEY CHIP securely. |
| Error 27 | DIMM memory is not enough. | (1)Insufficient DIMM MEMORY on DIMM BOARD. (2)DIMM MEMORY is not connected securely. |
(1)Provide a suitable amount of DIMM MEMORY for the software. (2)Verify that the DIMM MEMORY is connected securely to the DIMM BOARD. |
| Error 31 | This game is not acceptable by main board. | The game has not been downloaded into the DIMM MEDIA BOARD from the Server (Hub). | Check the connection between the Server (Hub) and the Chihiro. Make sure that the TEST MODE in the NETWORK SETTING is suitable for the game. Restart the main power first, and then restart the satellite power once the game appears on the main screen. Attach the proper KEY CHIP for the game. Check the internal DIMM BOARD battery is functioning correctly. Should the problem persist, either the network equipment, the DIMM MEDIA BOARD, or the Server (Hub) may be damaged |
| Error 32 | DIMM memory is not enough. | (1)Insufficient DIMM MEMORY on DIMM MEDIA BOARD. (2)DIMM MEMORY is not connected securely. |
(1)Provide a suitable amount of DIMM MEMORY for the software. (2)Verify that the DIMM MEMORY is connected securely to the DIMM BOARD. |
| Error 33 | Gateway is not found. | The Server (Hub) is not found. | Check the power of the Server (Hub). Check the NETWORK SETTING for the Chihiro. Attach the proper KEY CHIP for the game. Check the connection between the Server (Hub) and the Chihiro. Should the problem persist, the Server (Hub) may be damaged. |
| Error 34 | Gateway cannot be found. | No connection to the Server (Hub) at startup. | Check the connection between the Server (Hub) and the Chihiro. |
| Caution 51 | Wrong video output setting of horizontal scanning frequency. | The game does not support horizontal sync frequency setting. | Change the DIPSW correctly on the CONNECTOR BOARD. The monitor must support these frequencies. |
| Caution 52 | Wrong video output setting of horizontal/vertical screen. | The game does not support the vertical/horizontal screen settings. | Change the No. 1 DIPSW on the CONNECTOR BOARD. ON is for vertically placed monitor screens, OFF is for horizontally placed monitor screens. Change the monitor placement from vertical to horizontal or vice versa if necessary. |
| Caution 53 | Unknown | Possibly a result of bad DIMMs. RAM must be either a single 512MB or two 512MB sticks, 256MB is not supported. | Check that DIP switch 3 on the filterboard is functional and try toggling it. |
Jumper and DIP Settings
There are three sets of jumpers on the Chihiro, one on the mediaboard, and one on the bottom of the baseboard, and one on the filterboard. Note that it's common for the switches to fail, so you may need to toggle it many times to restore its functionality or to bridge the jumper pins with a wire to manually set them.
Mediaboard Jumpers (Type 1)
| Jumper number | 1-2 | 2-3 | Notes | |||||||||
|---|---|---|---|---|---|---|---|---|---|---|---|---|
| JP10 | 1GB | 512MB | DIMM setting | |||||||||
| JP11 | ? | Default | Unknown | |||||||||
| JP12 | GD-ROM | Network | Where to boot games from
| |||||||||
| JP13 | Default | - |
Mediaboard Jumpers (Type 3)
| Jumper number | 1-2 | 2-3 | Notes | |||||||||
|---|---|---|---|---|---|---|---|---|---|---|---|---|
| JP4 | ? | Default | FRAG if set to 1-2 | |||||||||
| JP5 | 1GB | 512MB | DIMM setting | |||||||||
| JP6 | 128MB | 256MB | RAM size | |||||||||
| JP7 | Default | ? | Unknown, memory related | |||||||||
| JP8 | ? | Default | ||||||||||
| JP9 | GD-ROM | Network | Where to boot games from
| |||||||||
| JP10 | Default | - |
Baseboard Jumpers
| Jumper number | 1-2 | 2-3 | Notes |
|---|---|---|---|
| JP3S | Default? | ? | Controls line count for D-Terminal output |
| JP4S | ? | Default? | Controls line count for D-Terminal output |
| JP5S | ? | Default? | Controls refresh for D-Terminal output |
| JP6S | Default? | ? | Controls refresh for D-Terminal output |
| JP7S | ? | Default? | Controls wide-screen vs letterbox |
| JP8S | Default? | ? | Controls wide-screen vs letterbox |
There is also an unpopulated JP1S jumper that is connected with a 0ohm resistor across 2-3 which connects to DIP5 on the filterboard (serial).
Filterboard DIP Switches
The Chihiro has explicit DIP switches which set video settings found in this service manual.

| Jumper number | Default State | Notes |
|---|---|---|
| 1 | OFF | Vertical monitor orientation (ON), Horizonal monitor orientation (OFF) |
| 2 | OFF | Video settings (below) |
| 3 | ON | Video settings (below) |
| 4 | ON | Video settings (below) |
| 5 | OFF | "Serial select" (unknown usage) |
| 6 | ON | Video settings (below) |
| 7 | ON | Video settings (below) |
| 8 | ON | Video settings (below) |
| SW2 | SW3 | SW4 | SW6 | SW7 | SW8 | Notes | ||
|---|---|---|---|---|---|---|---|---|
| 15KHz | OFF | OFF | OFF | ON | ON | ON | 4:3 VGA connector RGB output | |
| 31KHz (VGA) | OFF | ON | ON | ON | ON | ON | 4:3 VGA connector RGB output | |
| SVGA | ON | OFF | ON | ON | ON | ON | 4:3 VGA connector RGB output | |
| XGA | ON | ON | ON | ON | ON | ON | 4:3 VGA connector RGB output | |
| D4 | OFF | ON | ON | OFF | ON | ON | 16:9 D-Connector Output YPbPr | |
| D3 | OFF | OFF | ON | OFF | ON | ON | 16:9 D-Connector Output YPbPr |
Video Checking
An original Xbox SCART cable can be plugged into the Xbox motherboard using sync on green.