This guide is duplicated (for preservation) from the Xbox-Scene forums posted by Prehistoricman on May 4, 2025. A video adaptation of the XycloMod tutorial can also be viewed by MrMario2011. It has long been thought that the Xyclops chip, …
This guide is duplicated (for preservation) from the Xbox-Scene forums posted by Prehistoricman on May 4, 2025.
A video adaptation of the XycloMod tutorial can also be viewed by MrMario2011.
Post
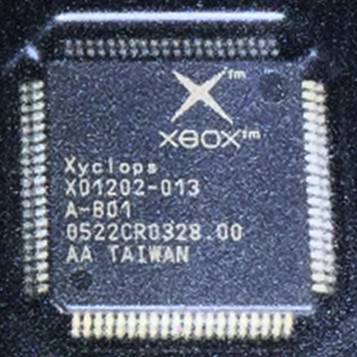
It has long been thought that the Xyclops chip, which contains the BIOS on a v1.6 motherboard, is not flashable. However, Prehistoricman recently discovered it has a serial port with a variety of interesting commands. It supports dumping the BIOS as well as the Intel 8051 code that runs the SMC functions of the chip. And just like the other Xbox versions that have the TSOP flash, we can reprogram the BIOS on the v1.6.
In one way, this mod is better than your typical TSOP flash because it's easy to recover from if you screw it up. The serial port will still be available.
Tutorial
Required items
3.3V USB to UART adapter. You can find many of these available online at very low prices.
See if you can get one that has a TX resistor value lower than 1K, because the Xbox's RX has a 1K pulldown.
v1.6 Xbox with Xyclops marked A-A02. A-B01 is not supported.
Soldering iron
Either the GUI for Windows or the command-line scripts:
A comparison of every popular BIOS can be found on the BIOS Features page.
Installing the Xyclops Wires
Connect your USB to UART adapter to the Xbox. This can be done either by connecting to the AV port, or by opening the Xbox and using internal connections.
Internal Connections
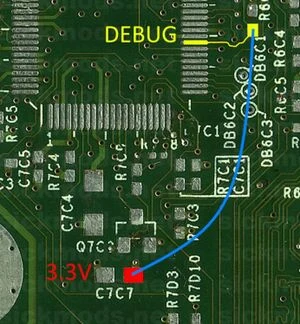
Xyclops pin 29 is DEBUG. You can either wire it to the motherboard's 3.3V standby voltage, or the TTL adapter's 3.3V output. Xyclops pin 29 DEBUG
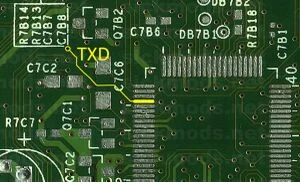
Xyclops pin 64 is TXD. Wire it to the adapter's RX pin.
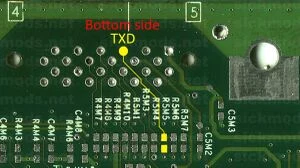
Either Near Xyclops: Xyclops pin 64OR under the AV port (use the bottom pad of the resistor): Xyclops pin 64 is TXD. Under the AV port
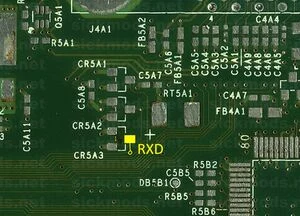
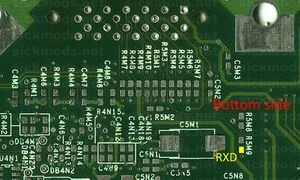
Xyclops pin 63 is RXD. Wire it to the adapter's TX pin.
Either Top side, near AV port: Xyclops Pin 63OR under the AV port: Xyclops pin 63 is RXD. Wire it to the adapter's TX pin.
Connect ground to the adapter's GND pin. You can use the Xbox metal case, any screw holding the motherboard down, or pin 2 of the LPC header (see pin layout here).
Remove resistors below the AV port: R5M3, R4M10. This will affect the video mode recognition and can prevent normal display, so they should be replaced after the mod is complete. Alternatively the end user can repalce the 0Ω R5M3, and R4M10 replaced with 4.7KΩ resistors to both be able to flash the Xyclops through the AV port, and keep normal AV pack detection. This method is experimental! please provide feedback.
Connect any ground pin (such as pin 6, 7, or 8) to the adapter's GND pin.
Dumping the Xyclops (Optional)
Plug in the USB adapter. It's better to do this before powering on the Xbox.
Plug in the Xbox. It can be left in standby.
Identify what serial port your adapter has.
On Windows, you can use the Device Manager to find each COM device connected to the PC. You can expect it to something like COM3, COM4, COM5, etc.
On macOS and Linux, you will need to open the terminal and enter the command ls /dev/tty* to list every TTL device that's currently connected.
GUI method (Windows)
Run the XycloModGUI executable
Select the COM port if you know it
Click the Connect to Xyclops button
Click the "Dump Current BIOS" button
Script method (Windows/macOS/Linux)
Open the dumping script with a text editor. This is required, as the dumping script doesn't have any terminal settings.
On the third line, edit the COM port for the TTL adapter to the one that corresponds to your adapter.
For example, if the line says port = serial.Serial("COM4", 9600, timeout=0.1), and your adapter is actually using COM5, change COM4 to COM5.
On the fifth line, change cmd = 0x15 to cmd = 0x14 in order to make a BIOS dump.
On the 24th line, you can optionally change response = port.read(1 + 64) to response = port.read(1 + 256) in order to make a full BIOS dump. This isn't required for a valid dump, as the actual BIOS size is still 64 KB; it's just split up into four banks. You will need to change the value back to 64 if you want to configure the script for an SMC dump.
Execute the script by either typing it in the Terminal, or click the file directly to launch it with the Python Launcher.
Rename your dump.bin file to something like dump1.bin, so you can run the script again. It's recommended to do two dumps to ensure you have a good BIOS dump.
Flashing the Xyclops
Plug in the USB adapter. It's better to do this before powering on the Xbox.
Plug in the Xbox. It can be left in standby.
Identify what serial port your adapter has.
On Windows, you can use the Device Manager to find each COM device connected to the PC. You can expect it to something like COM3, COM4, COM5, etc.
On macOS and Linux, you will need to open the terminal and enter the command ls /dev/tty* to list every USB to TTL device that's currently connected.
GUI method (Windows)
Run the XycloModGUI executable
Select the COM port if you know it
Click the Connect to Xyclops button
Click Browse... to select the BIOS to flash
Click Start Selected Operation to flash the BIOS to your Xbox. It should take about 6 minutes
Script method (Windows/macOS/Linux)
Install Python 3 if you haven't got it already.
Open cmd, PowerShell, bash, or whatever the terminal is on your PC.
Execute the script by writing python xyclops_flasher.py your_bios.bin COM5 to the terminal, replacing your_bios.bin with the path to your BIOS file, and COM5 with your serial port. Press enter.
Follow the on-screen text. It should say Xyclops communication established and ask if you want to erase the flash.
Once the connection has been made, or even attempted, you may be unable to turn on or off the Xbox. That's normal. The SMC gets frozen while the serial is active.
The Xyclops can get upset and stop responding sometimes. If you can't get communication, try unplugging the Xbox for 10 seconds.
If you get an erase timeout, make sure you made the GND connection.
If you can't get communication, then your serial adapter might have too much internal resistance. Identify its TX resistor and reduce it to ~500 ohms.
The flashing process takes about 2 minutes, and the verification (if you want to do it) takes another 2 minutes.
If you want to verify again, use the -v option: python xyclops_flasher.py your_bios.bin COM5 -v
The Xbox power button should work again, so try turning it on.
If you get video issues (like greyscale video) and you removed two resistors in step 1.2.5, you will need to place the resistors back.
Disconnect the DEBUG wire for enhanced stability. The Xyclops will freeze whenever it sees any activity on the RX pin.
FAQ
Can we use a BIOS bigger than 256KiB?
Not on a retail Xbox. Some rare devkits may be able to do 512KiB, but this has not been confirmed
I ran the script and my Xbox won't turn on!
Yes, the SMC will freeze when it receives serial communication. The script should resolve that if it exits successfully, so it can be assumed that it failed.
You can unplug your Xbox for 10 seconds and plug it back in to reset and try again.
Can this be done via a software method?
Not to anyone's knowledge, but it is rumored to have been discovered.
Technically, the answer is yes, but it involves using the serial first and then reprogramming the SMC (advanced).
What else can it do?
The Xyclops serial port is able to do a lot of low-level actions on the SMC. For example, it can 'press' the front panel buttons, change fan speed, or change LED colors. It can also potentially do some hacky things such as spoofing the video cable mode, or bypassing the boot challenge (FRAG).
We are also able to re-program the SMC, which could lead to some more advanced mods for specific and niche purposes.
Through the AV port???
Yeah, seems strange, right? We can't be sure why Microsoft made it this way. It's too slow for factory programming, AND there are those resistors preventing it on retail units. It could definitely have expedited the development process of Xyclops, but that doesn't explain why it was left present in the retail motherboard.