 | Reading Corona NANDs with an SD tool can often be inconsistant across multiple console motherboards and card readers, even with the same SD tool and same card reader model. It is recommended to use a USB tool like the xFlasher360, Element's 4GB USB tool, or PicoFlasher. |
This guide will walk you through obtaining NAND dumps, creating a XeLL .ecc file, and writing it to the console using a SD card read/write kit or dedicated NAND flasher.
This guide is only compatible with 4GB NAND Corona motherboards. You can view the guide for other NAND types here.
Equipment Needed
- A PC running Windows Vista or later
- A soldering iron, solder, flux, and isopropyl alcohol with cotton swabs
- J-Runner with Extras
- One of the following:
- xFlasher360 by Element18592
- 4 GB USB Tool by Element18592
- SD Tool 2.2 by Element18592
- Raspberry Pi Pico (or other RP2040 based board) flashed with PicoFlasher
- Maximus SD Tool for 4GB Corona NAND Kit
- Xecuter Corona 4GB NAND RW Kit V4
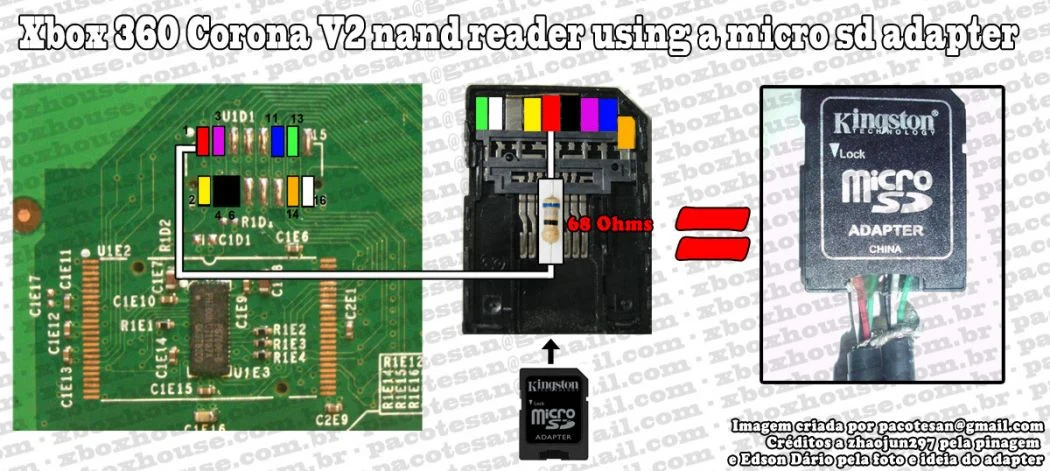
- Your own DIY R/W cable made with a microSD to SD card adapter
- A supported SD card reader if you are using an SD tool
- Micro-USB cable if using a Raspberry Pi with PicoFlasher, or an xFlasher 360 rev A
- USB-C cable if using an xFlasher 360 rev B or newer, or USB-C RP2040 SBC with PicoFlasher
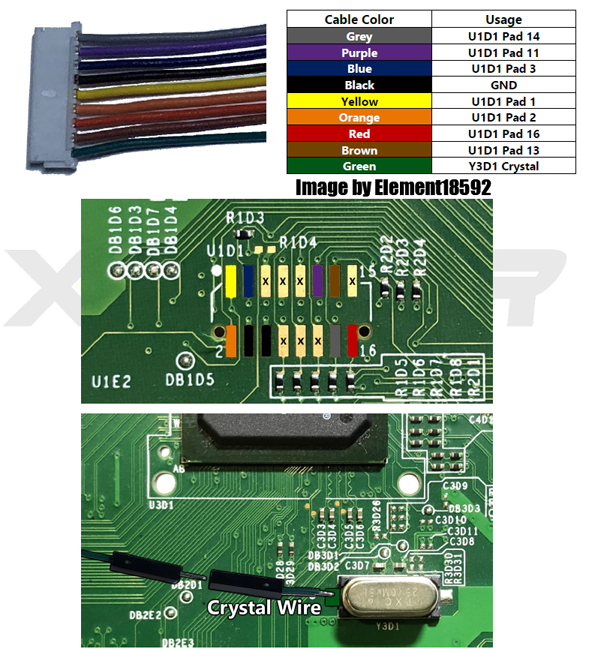
Soldering to the Motherboard
xFlasher 360
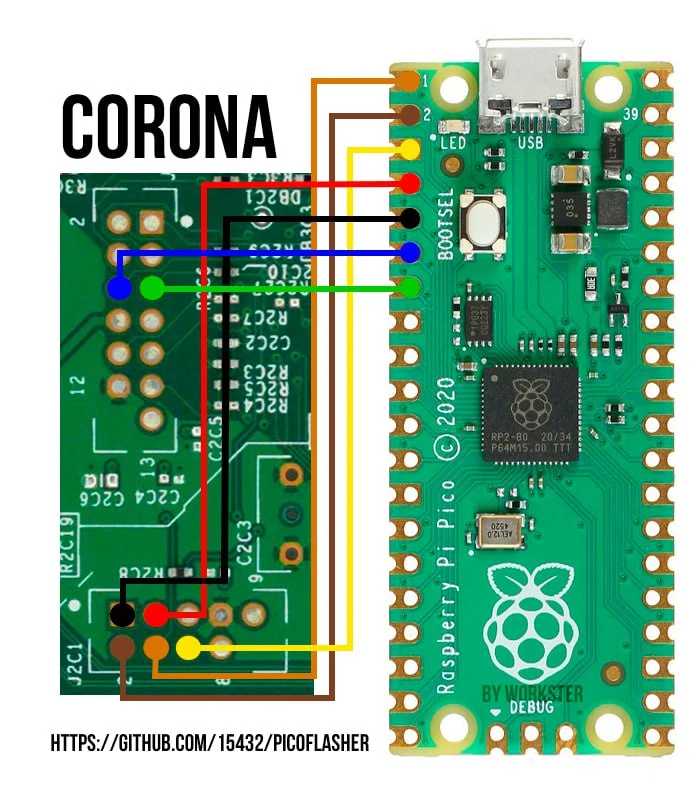
PicoFlasher
15432's Firmware
This wiring diagram can also apply to 16 MB Corona/Waitsburg/Stingray models, since they use the same interface.
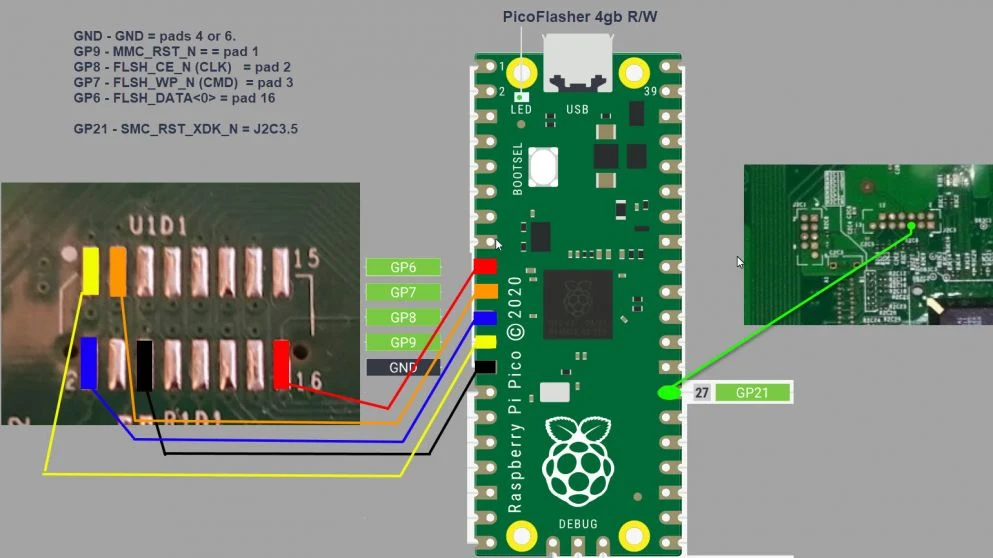
balika011's Firmware
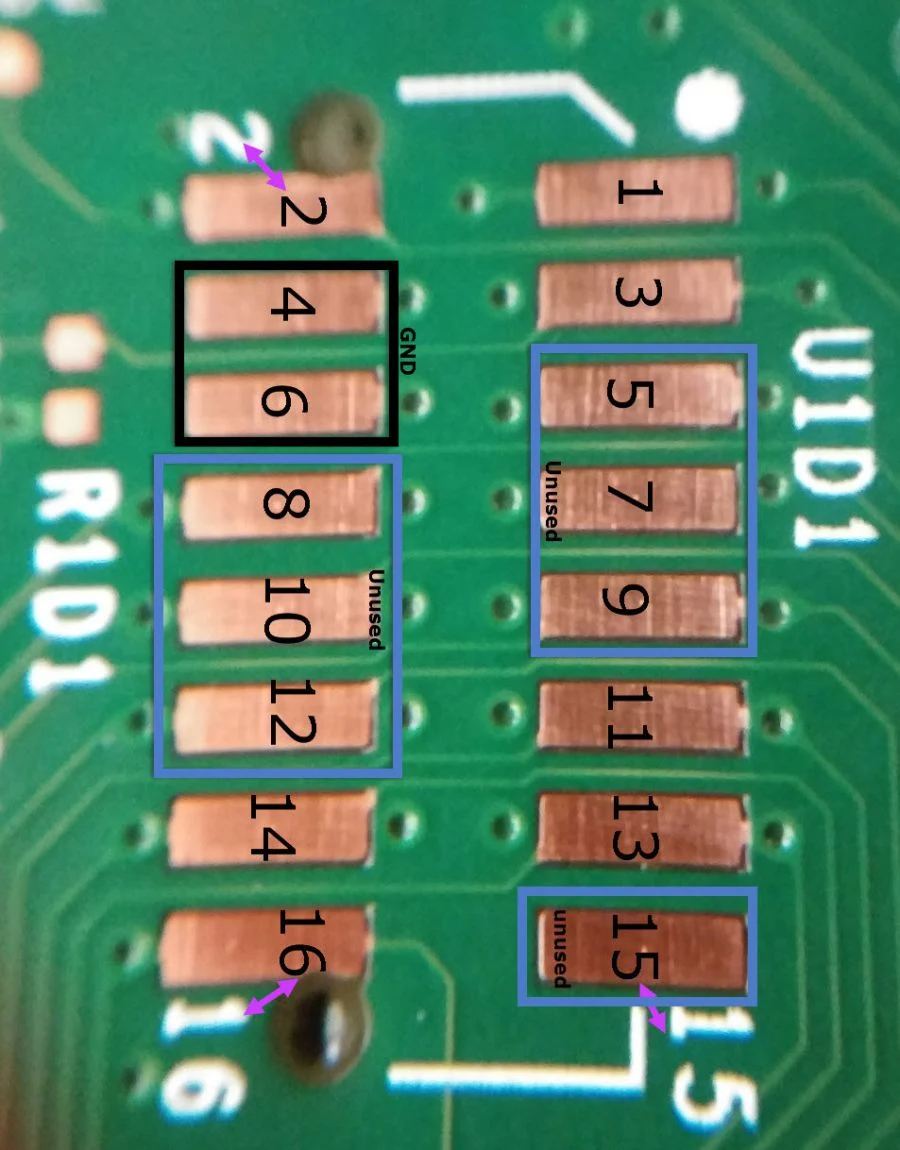
SD Tool 2.2 or 4GB USB Tool
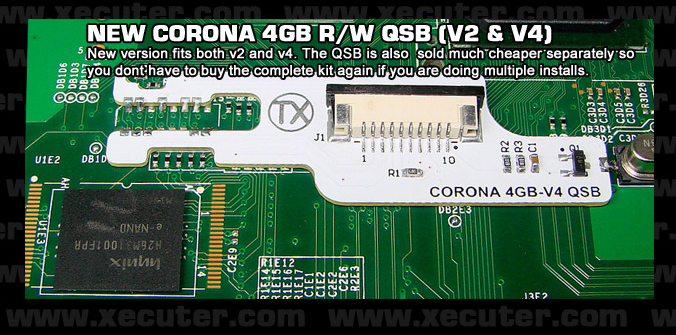
Team Xecuter Corona SD Card R/W kit
Maximus SD Tool
Manual (Only pages 1-4 are needed, as they show what needs to be soldered)
DIY SD Card Tool
Reading the NAND with J-Runner
- Extract J-Runner with Extras.
- With your Xbox 360 powered off and the card reader or USB tool plugged into a PC, insert the SD card into the reader. Plug your Xbox 360 power supply in, but do not turn it on.
- If you are using an xFlasher, set the switch to
eMMC.
- If you are using an xFlasher, set the switch to
- Launch J-Runner, and in the top right, click the
NAND Typebutton and selectCorona 4GBand OK. - In J-Runner, select
Read Nandin the top left. A pane will open in the lower right, listing some removable drives. If everything is wired properly, one will show up as Removable Media.- If you don’t see it, see the troubleshooting steps at the bottom of this page. Select the drive and click "Read". It will read your NAND twice and automatically compare the dumps. When it has finished, it will tell you if the two dumps are an exact match. If they aren’t, take more dumps until you get matching ones.
- Copy one of the dumps to a safe place such as cloud storage or send it to yourself in an email to keep it safe. They are located in the output folder.
Writing XeLL to the NAND with J-Runner
- With your Xbox 360 powered off, and the card reader plugged into a PC, insert the SD card into the reader. Plug your Xbox 360 power supply in, but do not turn it on.
- Launch J-Runner, and in the top right, click the "NAND Type" button and select "Corona 4GB" and OK.
- Select "…" next to the Load Source field and choose your
nanddump1.binornanddump2.bin. In the top right of the window, select the latest dashboard version in the dropdown menu next to "Dash Version".- If you want to add a dashboard, extract it to the XeBuild folder inside your J-Runner directory, and restart J-Runner.
- Select the appropriate
Glitchradio button in the top right of the window:Glitch2- For RGH1.2, RGH2, RGH3, Muffin/Mufas, and S-RGHGlitch2m- Same as Glitch2, but only used if your eFuses are in a non-bootable state.
- Put a check in the appropriate checkbox (if applicable) in the top right of the window.
- If you are using RGH1.2 or S-RGH, toggle
SMC+ - If you are using Project Mufas, select
SMC+ - If you are using RGH2 with a X360ACE, use
SMC+ - If you are using RGH2 or RGH2+ with a CR3/CR4, toggle
CR4 - If you are using RGH3, toggle
RGH3 - If you have an Xbox 360 E Stingray motherboard, select
WB 2K- Some Xbox 360 E motherboards use Winbond W641GG2KB-14 RAM, which is incompatible with older Corona bootloaders. This setting just installs a newer bootloader that's compatible with this new RAM type, which was already installed on other Corona revisions through system updates. This means that it can still be enabled on Xbox 360 S Corona/Waitsburg motherboards, though it won't gain any benefits. You can leave this setting disabled if you know your board has Samsung RAM, but if you forgot or are unsure, then just enable the option to be safe.
- If you are using RGH1.2 or S-RGH, toggle
- Select the
Create XeLLbutton and wait for it to finish. - Select the
Write XeLLbutton, select your system, and press OK. A pane will open in the lower right, listing some removable drives. If everything is wired properly, one will show up as Removable Media.- If you don’t see it, see the troubleshooting steps at the bottom of this page.
- Select the drive and click "Write". J-Runner will write the modified NAND dump to the motherboard.
- Once it has successfully written to the motherboard, unplug the power cable from your Xbox 360 and unplug the USB cable from the computer and programmer.
- Proceed to your desired RGH method in the RGH Wiring section.
Troubleshooting
- Console does not show up in the list of devices
- Check soldering
- Make sure you insert the SD card tool before powering the Xbox
- If possible, try a different card reader
- Make sure the crystal is grounded properly
- What should I do if I ripped off a soldering pad?
- Look online for an alternate point to solder on to. Practice more on junk electronics before attempting to continue.