Bad Update is a non-persistent software only hypervisor exploit by Grimdoomer for all Xbox 360 models, that only works on the (currently latest) 17559 software version. Combined with InvoxiPlayGames' FreeMyXe or Byrom's XeUnshackle, Bad Update can be used to run arbitrary content/XEXs on your otherwise stock console. A video tutorial can be found on MrMario2011's YouTube channel.
The following entry points are currently supported:
- Exploited Xbox Avatar via ABadAvatar (allows the exploit to run automatically after the console starts, as long as there are no profiles with auto sign-in enabled)
- Rock Band Blitz (trial or full game)
 | This exploit is not persistent, and arbitrary code execution will be lost after the console is turned off. |
Required Items
- An Xbox 360 (this does not work on an Xbox One/Series console) with the latest 17559 dashboard.
- A supported game from the above list, and/or ABadAvatar 1.3 from bibarub.
- If using a game, you will need Xbox360BadUpdate from Grimdoomer.
- If using ABadAvatar, the console will also need access to the extra avatar data obtained from a system update. If your avatars are showing as a gray icon, this is a sign that the update is required.
- Both can be installed at the same time, as ABadAvatar 1.3's unique files have different file names than the Bad Update files.
- A USB drive with at least 64 MB storage, formatted to FAT32. Small flash drives and external SSDs/HDDs can both be used for the exploit files.
- If you are using Rock Band Blitz, then you will need 512 MB or larger USB storage instead.
- 2.0.17559.0 system update (mirror) (optional)
- This is needed if you either have a console that is on an outdated system version, and/or you need to install the extra data for avatars for the ABadAvatar exploit to function.
- If your console is already up to date (this can be seen if your console can access Xbox Live without an update prompt) and you can access avatars, then you do not need to download this.
- You also do not need to download this if you want to update your console by connecting it to the internet and letting Xbox Live install the update for you.
- XeUnshackle Max from klofi
- Pre-configured launch.ini
- XeXMenu 1.1
- Aurora
- DashLaunch Application
- Any other homebrew you wish to run, such as emulators.
- Recommendations can be found in the Recommended Setup page.
If your Xbox 360 doesn't have internal storage or a hard drive, you will also need to set up the USB drive as a System Drive.
Preparing the USB drive
Installing Exploit Files to USB Drive
- Format your USB drive as FAT32 (it might be using another file system such as exFAT by default). This can easily be done with the Xbox 360 dashboard's storage settings.
- If you have a Windows machine and a USB drive that's bigger than 32 GB, you'll have to use the Xbox 360 dashboard to format the USB drive unless you download extra software (such as Rufus or GUIformat).
- Extract the contents of the zip corresponding to the entry point you are using (either Bad Update or ABadAvatar) to the root of the USB drive.
- Extract the contents of the
XeUnshackle-Max-v1.0.0folder to the root of the USB drive, except for JRPC2.xex. - Extract Launchini.7z and place the
launch.inifile on the root of the USB drive. - Extract Aurora to a folder called
Auroraon the root of the USB drive. - Extract the Content folder from the XeXMenu 1.1 zip to the root of the USB drive.
- Extract the DashLaunch folder inside another folder for homebrew apps on the USB drive, such as
Applications - Optionally, you can create folders named
GamesandEmulatorsrespectively. You can use the Games folder for installing Xbox 360 game backups (explained more at the end of the guide), or the Emulators folder for homebrew emulators.
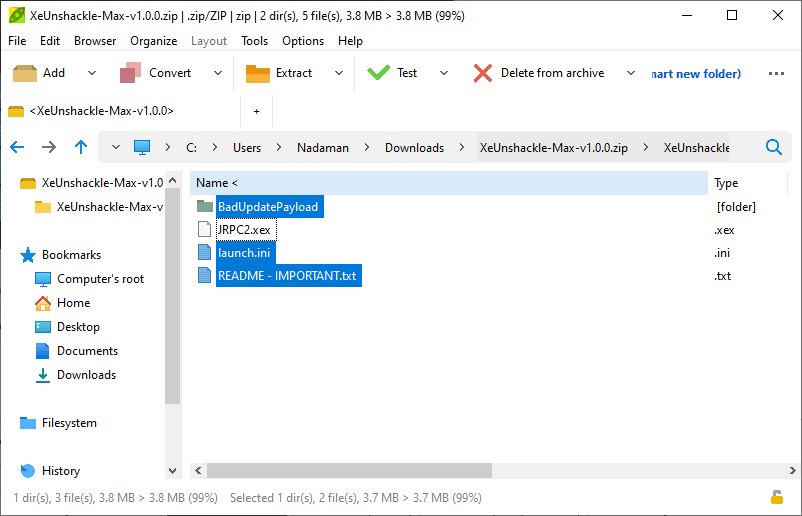
The contents of the USB drive will look like the following if you're using ABadAvatar 1.3:
💾 Usb0:
 ┣ 📂 $SystemUpdate
 ┃  ┗ All system update files will be in this folder; you don't need to interact with them.
 ┣ 📂 Applications
 ┃ ┗ 📂 DashLaunch
 ┃    ┗ 📜 default.xex
 ┣ 📂 Aurora
 ┃  ┣ 📂 Data
 ┃  ┣ 📂 Media
 ┃  ┣ 📂 Plguins
 ┃  ┣ 📂 Skins
 ┃  ┣ 📂 User
 ┃  ┣ 📜 Aurora.xex
 ┃  ┣ 📜 live.json
 ┃  ┗ 📜 nxeart
 ┣ 📂 BadUpdatePayload
 ┃  ┣ 📜 BadStorage.xex.dll
 ┃  ┣ 📜 BadUpdateExploit-4thStage.bin
 ┃  ┣ 📜 BadUpdateExploit-Avatar-2ndStage.bin
 ┃  ┣ 📜 BadUpdateExploit-Avatar-3rdStage.bin
 ┃  ┣ 📜 BadUpdateExploit-Avatar-Data.bin
 ┃  ┣ 📜 default.xex
 ┃     ┗ This file should be the one from the XeUnshackle download, NOT the one that comes with Bad Update. The file the comes with Bad Update is just a Nyan Cat video.
 ┃  ┣ 📜 GamerProfile.xex
 ┃  ┣ 📜 update_data.bin
 ┃  ┗ 📜 xke_update.bin
 ┣ 📂 Content
 ┃  ┣ 📂 0000000000000000
 ┃  ┃  ┗ 📂 C0DE9999
 ┃  ┃     ┗ 📂 00080000
 ┃  ┃        ┗ 📜 C0DE99990F586558
 ┃  ┗ 📂 E0002FF78DFBDE7B
 ┃     ┗ 📂 FFFE07D1
 ┃        ┗ 📂 00010000
 ┃           ┗ 📜 E0002FF78DFBDE7B
 ┣ 📂 Games
 ┣ 📂 Emulators
 ┣ 📜 launch.ini
 ┗  📜 name.txt
Creating & Using a System Drive
| If your console has an internal memory unit, or has a hard drive, you can skip this step. This section is only for users that don't have any form of internal storage for the Xbox 360, and are forced to rely on only USB storage. If you're in this situation and want to use an HDD/SSD over USB, you may still want a second flash drive just for the System Drive, so there isn't wasted space on the HDD/SSD. |
If the drive is already formatted as FAT32, you can go in the Device Options of the drive, and select the option Make System Drive to add the old Xbox360 file system.
If the drive shows as "Unformatted" on the console, you can click Customize in the drive's settings to both format it as FAT32, and add the extra Xbox360 folder. In this screen, you can configure the size of the Xbox360 folder to your liking, though it will still be limited to 32 GB maximum.
Since the Xbox 360's stock dashboard will only read user data from the System Drive file system rather than the FAT32 file system, some of the files for Bad Update will need to be moved here as well.
- Install FATXplorer on your PC.
- Select the
Devicestab in FATXplorer.- Your USB drive may not show up, so if this is the case, click
Load USB Dirand select theXbox360folder on the USB drive.
- Your USB drive may not show up, so if this is the case, click
- Select the drive, and mount the Content partition.
- If you have a pop-up asking for a license, you can just click
Start Trial. Of course, if you want to support the FATXplorer project, you can also buy a license key on the website.
- If you have a pop-up asking for a license, you can just click
- Cut & paste the entire Content folder from the FAT32 USB drive to this Content folder. The contents of the USB drive will now look like this:
💾 Usb0 (FAT32 portion):
 ┣ 📂 $SystemUpdate
 ┃  ┗ All system update files will be in this folder; you don't need to interact with them.
 ┣ 📂 Applications
 ┃ ┗ 📂 DashLaunch
 ┃    ┗ 📜 default.xex
 ┣ 📂 Aurora
 ┃  ┣ 📂 Data
 ┃  ┣ 📂 Media
 ┃  ┣ 📂 Plguins
 ┃  ┣ 📂 Skins
 ┃  ┣ 📂 User
 ┃  ┣ 📜 Aurora.xex
 ┃  ┣ 📜 live.json
 ┃  ┗ 📜 nxeart
 ┣ 📂 BadUpdatePayload
 ┃  ┣ 📜 BadStorage.xex.dll
 ┃  ┣ 📜 BadUpdateExploit-4thStage.bin
 ┃  ┣ 📜 BadUpdateExploit-Avatar-2ndStage.bin
 ┃  ┣ 📜 BadUpdateExploit-Avatar-3rdStage.bin
 ┃  ┣ 📜 BadUpdateExploit-Avatar-Data.bin
 ┃  ┣ 📜 default.xex
 ┃     ┗ This file should be the one from the XeUnshackle download, NOT the one that comes with Bad Update. The file the comes with Bad Update is just a Nyan Cat video.
 ┃  ┣ 📜 GamerProfile.xex
 ┃  ┣ 📜 update_data.bin
 ┃  ┗ 📜 xke_update.bin
 ┣ 📂 Games
 ┣ 📂 Emulators
 ┣ 📜 JRPC2.xex
 ┗ 📜 launch.ini
💾 USBMU0 (System Drive):
 ┣ 📂 Content
 ┃  ┣ 📂 0000000000000000
 ┃  ┃  ┗ 📂 C0DE9999
 ┃  ┃     ┗ 📂 00080000
 ┃  ┃        ┗ 📜 C0DE99990F586558
 ┃  ┗ 📂 E0002FF78DFBDE7B
 ┃     ┗ 📂 FFFE07D1
 ┃        ┗ 📂 00010000
 ┃           ┗ 📜 E0002FF78DFBDE7B
 ┗ 📜 name.txt (optional)
Installing the 2.0.17559.0 System Update & Avatar Data
| You will also need a System Drive set up for the console, if it doesn't have any form of internal storage (either HDD or internal memory unit). |
If your console has an outdated system version, or your avatars are all gray (which doesn't allow for ABadAvatar to function), you will need to install a system update on your console for the exploit to work.
- Plug the USB drive with the system update into your Xbox.
- Press yes on the pop-up to install the update.
- The Xbox 360 will install missing data and then reboot. Verify the installation by going to the original dashboard and checking that your avatar has skin and does not look like a generic white character anymore.
- If you're doing an actual system update (such as going from 17349 to 17559), you may need to let the console run the update again if you don't have a System Drive, memory unit, or hard drive connected, as installing the Avatar data is a separate process.
Disabling Profile Auto Sign-In (ABadAvatar)
Since ABadAvatar relies on the console scanning the avatars of every profile on the console, it's preferred to disable the profile that currently has auto sign-in enabled, as this will allow the exploit to run without any user interaction when the console boots.
- Press the Xbox Guide button.
- Navigate to the Settings tab, and click the Profile button. These are the settings for the profile you're currently signed in to.
- Click
Sign-in Preferences, and turn the auto sign-in feature off. You can now proceed with running the exploit.
Running the Exploit
 | Do not connect to Xbox Live, or login to an Xbox Live-enabled account during the Bad Update game exploit - your console will almost certainly get banned. |
- Disconnect your console from the Internet (either by removing your Ethernet cable, deleting your saved Wi-Fi settings, or changing the DNS to one without internet, like 0.0.0.0.), and sign into a local profile. Tony Hawk: American Wasteland comes with a local profile ("Player1") that should be used; Rock Band Blitz doesn't need a specific profile so you can make your own.
- Insert the flash drive into your console, and perform the entry point specific steps:
- Tony Hawk: American Wasteland: Launch the game. Once at the main menu, select "High Score/Free Skate", if you're asked to load last game progress select "No". Continue through the menu screens until you get to the level select screen. Once there, scroll to the very end of the list and select the "Created Park" option, and then "Load Park". When asked if you want to replace unsaved park, select "Yes". The game will scan your storage devices for save files, and you should see "Hack Xbox" in the list of available custom parks. Select the "Hack Xbox" park file, after the save file is loaded select the "Play Park" option and the exploit process will begin. Set a timer for around 3 minutes or check the Kinect LEDs - if it still hasn't run successfully in 20 minutes or the Kinect LED turns off, reboot your console and try again.
- Rock Band Blitz: Launch the game. Press
 to start, and pick USB storage if the storage selection dialogue pops up. Wait for the "Running exploit" text to show - if the music and/or the background stops/freezes, the Kinect LED turns off, a system error occurs with the RRoD, or the screen becomes a garbled mess, reboot your console and try again.
 - ABadAvatar: If you're currently signed in to a profile, you can just click the
Sign In or Outbutton on the dashboard to bring up the login screen. The login screen will also show automatically after the console boots if no other profiles have Auto Sign-In enabled. If ABadAvatar is set up correctly, it will show a notification and change the LED pattern on the console's front panel once all the profile avatars are showing. To verify that the console hasn't frozen during the exploit process, you can scroll in the avatar selection screen with your controller, check if the LEDs on the front of your console are still blinking, or check the Kinect sensor's camera preview for movement if one is hooked up to the Xbox.
- FreeMyXe/XeUnshackle will now show your CPU key - you should write this down or take a picture - press to continue on "OK", and then when "Yay!" when the patch has been confirmed.
![FreeMyXe beta 1, with text "Hypervisor and kernel have been patched! Your CPU key is: [REDACTED] github.com/InvoxiPlayGames/FreeMyXe", with the sole option "Yay!" selected.](/img/wiki/0cb42d1dea0a961fb2306ef0bd6527c52f620be43795f4a1a45b97cbd156ef2a.webp)
Congratulations, you can now run unsigned code! With the configuration provided in this guide, you will automatically boot into the Aurora dashboard. You can use XeXMenu to easily launch other XEX files, if you are currently in the Microsoft dashboard. If you want to know information on creating and using game backups with Bad Update, follow Creating Game Backups and Playing Game Backups respectively. It's also highly recommended to have a NAND backup of your console in order to recover from any potential bricks in the future.
Prior to FreeMyXe beta5 & XeUnshackle, XEX files had to be patched to remove all media restrictions; this is no longer required with the release of beta5 & XeUnshackle to improve on support for homebrew XEXs (including devkit-signed XEX files, not "dev builds" of games).
If you're using FreeMyXe beta4 or newer, you can also connect the console back to your LAN if you want to use things like FTP, System Link, or XLink Kai, as FreeMyXe has Xbox Live blocking built in. This also applies to XeUnshackle, as it just uses DashLaunch's liveblock. Just make sure to forget your Wi-Fi network or unplug your Ethernet cable before powering off the console. It is ideal to disable Auto Power-Off in your console settings to make sure you're in control of when that happens, and turning that off will be helpful for FTP anyway.
LED Patterns & Meanings
Bad Update will change the console's player LEDs in order to show the status of the exploit, which can be useful to see its current progress. An explanation of what the LED patterns mean is explained on the official Wiki.
Error Codes
If a major issue during the Bad Update exploit process occurs, it can utilize the Universal Error Message (UEM) feature of the Xbox 360's system software. Most of the time, these are just caused by corrupt files, but you can view what each error code means on the official wiki page, or the Error Codes page.