 | This page is intended for advanced technicians only. If you do not have advanced component and BGA rework skills, you will not be able to complete the process successfully. |
Some GPUs can be retrofitted onto earlier boards. This page contains instructions for what changes need to be done in order for the retrofit to work.
Xenon/Zephyr_A
All variants of the 90nm and65nm GPU can be retrofitted onto a Xenon or Zephyr_A motherboard. (Demo Video with Rhea GPU) (Demo Video with Zeus GPU)
Guide by: Octal450
Xenon Limitations
Read this BEFORE doing anything with board!
Xenon limitations with Elpis GPU:
- Boards with Samsung RAM will NOT boot Glitch2, unless you use J-Runner with Extras 3.4.0 or newer. You will need to enable the "Elpis/Rhea" option if your console has Samsung RAM. With Infineon/Qimonmda RAM it is optional.
Xenon limitations with Rhea GPU:
- Many systems when attempting the SMC hack (JTAG) will present random 0020 or 0021 errors when using the diode method. Use the resistor method instead.
- Boards with Samsung RAM will NOT boot Glitch2, unless you use J-Runner with Extras 3.4.0 or newer. You will need to enable the "Elpis/Rhea" option if your console has Samsung RAM. With Infineon/Qimonmda RAM it is optional.
Xenon limitations with a 65nm GPU:
- Retail Xenon firmware will NOT boot because it has no support for 65nm GPU, so you need to use xeBuild as Jasper XSB.
- Jasper retail firmware with type 1 KV can NOT be booted.
- Jasper firmware has NO support of a Xenon type 1 KV, so a Retail NAND can be only booted on a serviced Xenon with type 2 KV, or Elpis motherboard, using Jasper firmware.
- All image types require a Xenon SMC and SMC Config when building as Jasper XSB, which should be automatic if a Xenon source is used, even when the console type is changed.
- RGH requires a custom XeLL file is required which is available here.
- JTAG requires a custom XeLL file to boot. The CB LDB must be blown to 5 to run the required Jasper JTAG firmware.
Instructions
GPU Table
| Name | Part Number | Reliability | GPU/eDRAM Lithography | GPU/eDRAM Temp Target | GPU/eDRAM Temp Critical |
|---|---|---|---|---|---|
| Rhea | X810480 | Unreliable if made in 2007-2008
Reliable if made in 2008 with white milky underfill Reliable if made in 2009 or later |
90nm & 90nm | 75C/78C | 100C/102C |
| X816970
X816971 |
Reliable | ||||
| Elpis | X819195 | ||||
| Zeus | X810478
X817793 |
65nm & 90nm | 71C/73C | 90C/92C | |
| Kronos | X820894 | 65nm & 65nm | 75C/77C |
Stuff GPU
- Replace 90nm U4D1 with reliable 90nm or 65nm
Deswizzling PCIe
- Skip this step if using an Elpis GPU
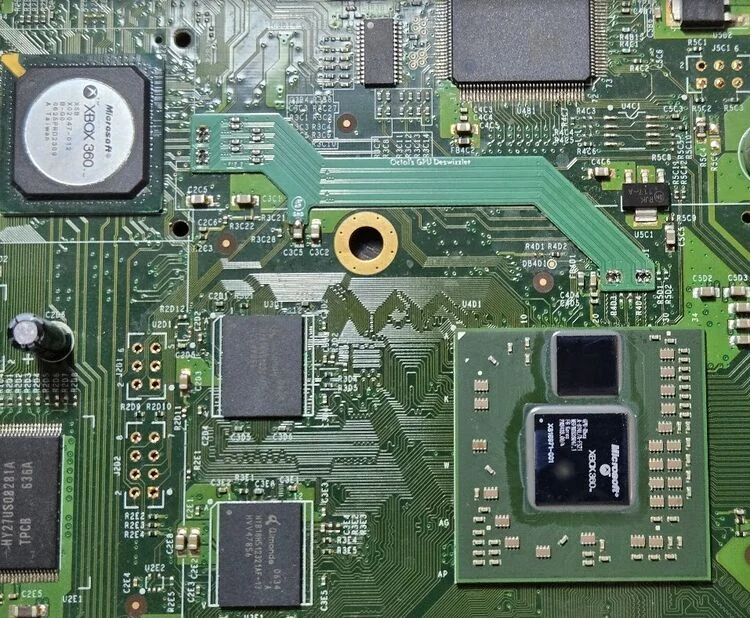
- The PCIe traces were deswizzled starting with the Y2 GPU. Thus, Octal's GPU Deswizzler QSB must be installed. You can purchase it by contacting Josh at Octal's Console Shop, or produce it yourself with the Gerber files located on GitHub.
- Octal's GPU Deswizzler QSB correctly routes the PCIe traces with appropriate length/impedance matching, and isolation from other traces for signal integrity
- Wiring it up manually is NOT recommended, requires trace cuts, and will cause the system to randomly hang or crash due to trace length/impedance mismatching and signal integrity issues from crosstalk
- Unstuff 8x 0.1 uF 0402 C2C1, C2C3, C2C3, C2C4, C4D1, C4D2, C4D3, and either C5D1 (Xenon), or C4D7 (Zephyr_A)
- Stuff these capacitors or 8x new 0.1 uF 0402 6.3V X5R on the Deswizzler QSB
- Solder the Deswizzler QSB to the capacitor pads, and ground to C3C5
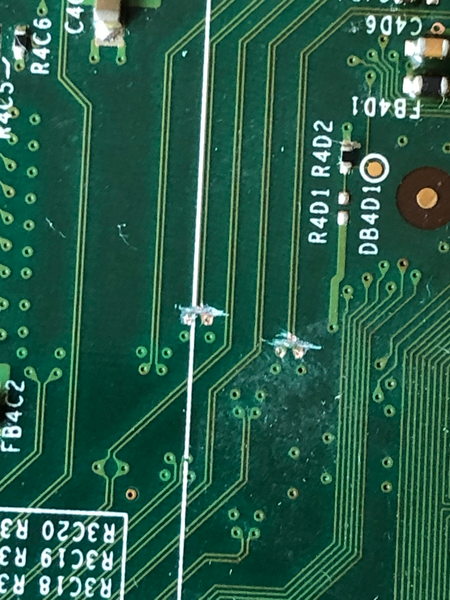
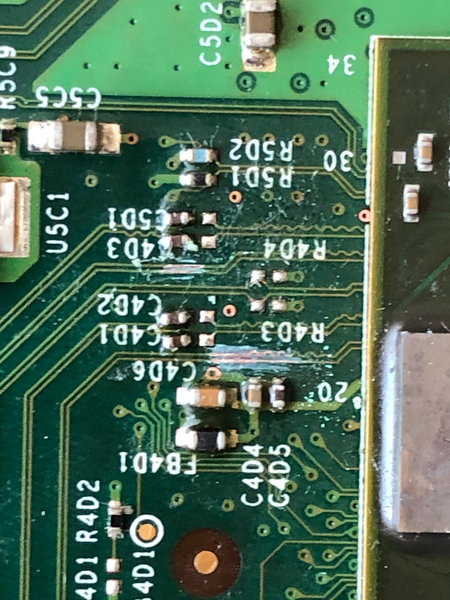
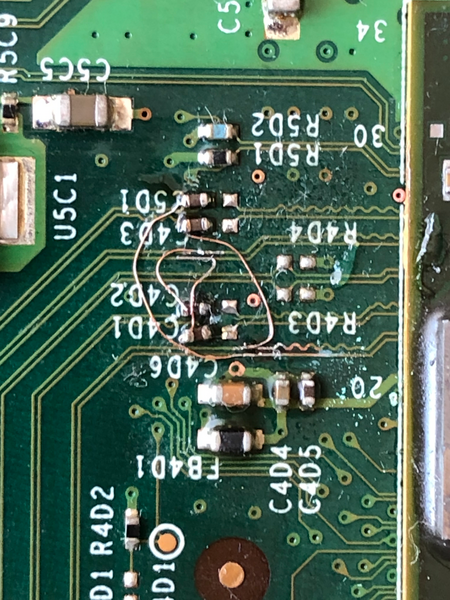
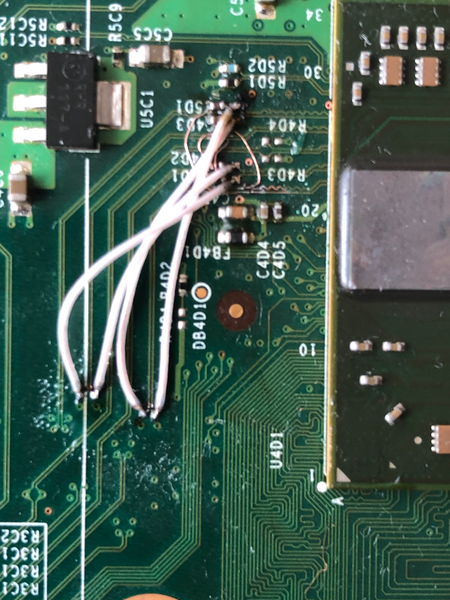
Alternative Manual Deswizzle Wiring (NOT RECOMMENDED):
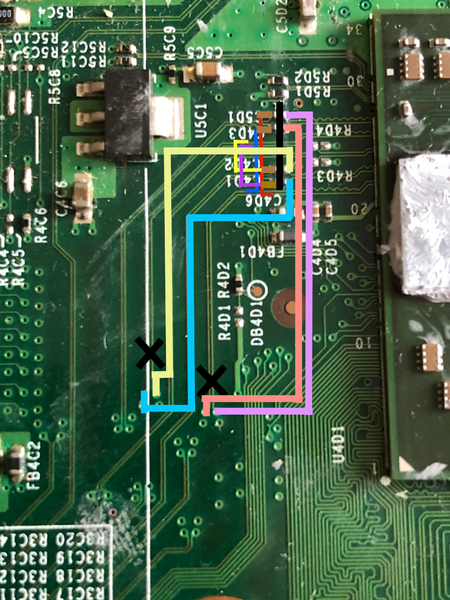
If you don't want to use the Deswizzler QSB, you can manually wire it up, but this is NOT recommended, requires trace cuts, and will cause the system to randomly hang or crash due to trace length/impedance mismatching and signal integrity issues from crosstalk.
Scheme of wiring:
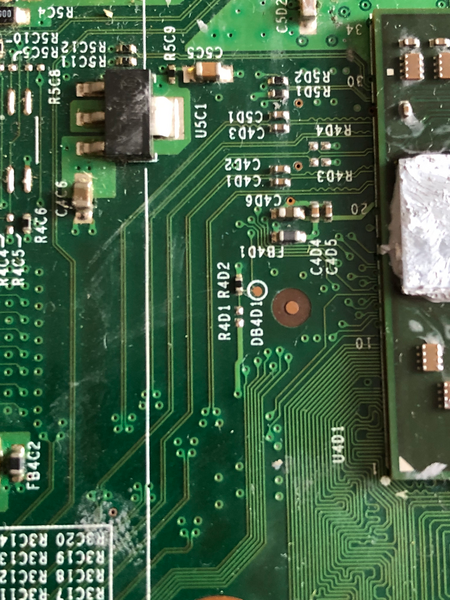
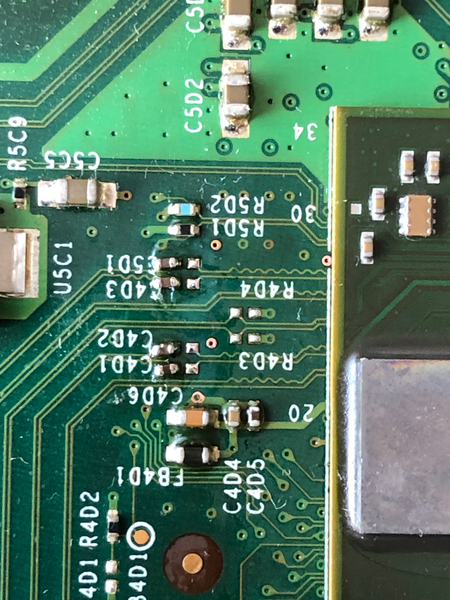
Example of performing this mod:
Set VID 1.075V - 65nm only
- Xenon:
- Unstuff 0 ohm 0402 R8N11
- Unstuff 0 ohm 0402 R8N12
- Zephyr_A:
- Unstuff 0 ohm 0402 R8B9
- Unstuff 0 ohm 0402 R8B10
Set FSB/PCIe/Memory Calibration - 65nm only
- FSB:
- Unstuff 4.87K ohm 0402 R5R3
- Stuff 40.2 ohm 0402 as pullup to nearby V_GPUCORE
- You can either use a wire to the capacitor as shown, or scrape to expose V_GPUCORE voltage plane
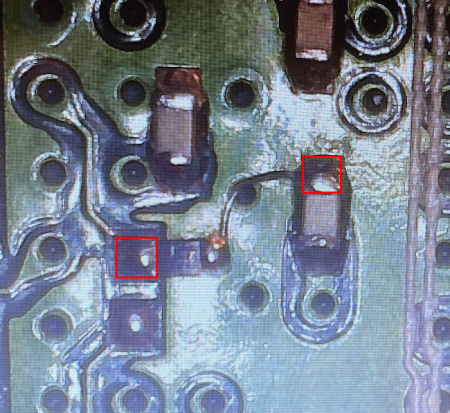
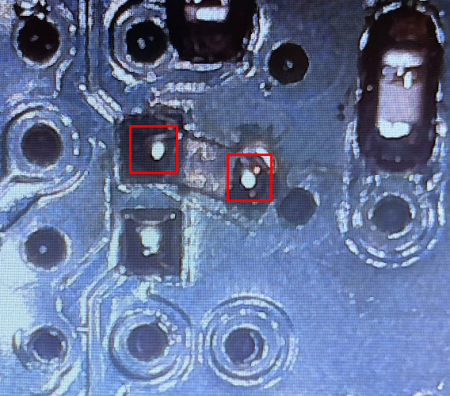
- PCIe:
- Unstuff 1.47K ohm 0402 R4R3
- Unstuff 562 ohm 0402 R5D1
- Replace 2K ohm 0402 R5D2 with 49.9 ohm 0402
- Memory:
- Replace 40.2 ohm 0402 R4R8 with 240 ohm 0402
- Replace 40.2 ohm 0402 R4T1 with 240 ohm 0402
Tie V_GPUPCIE to V_GPUCORE - 65nm only
- Unstuff IC U5C1
- Jump as shown to tie V_GPUPCIE to V_GPUCORE
- Use a 28awg or thicker gauge wire
- Be careful not to short to any nearby components or pads
- Strongly recommended to cover jumper with PCB mask
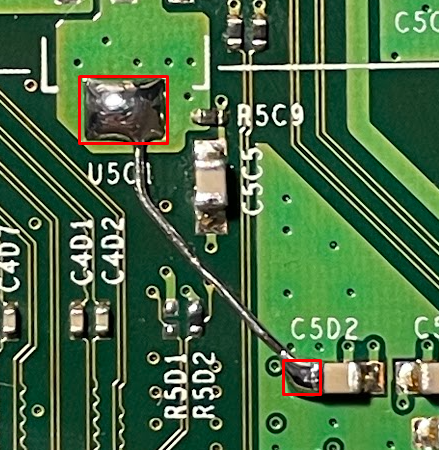
Modify Firmware for 90nm
- Use J-Runner with Extras to dump the NAND
- Open the SMC Config Editor from the NAND menu, and update the thermal targets from the table above
- Write the NAND to the console
Modify Firmware for 65nm
- Use J-Runner with Extras to dump the NAND
- Change the type to Jasper XSB, then RGH the console to get the CPU key
- If the console is JTAGable or has the SMC hack (JTAG) installed, you need to blow fuseline 02 to 5 if it isn't already
- Set the required XeBuild options and build the image
- Open the SMC Config Editor from the NAND menu, and update the thermal targets from the table above
- Write the NAND to the console
Zephyr_B/C
Both variants of the 65nm GPU can be retrofitted onto a Zephyr_B or Zephyr_C motherboard. (Demo Video)
Zephyr_B can have Rhea retrofitted with no changes needed.
Guide By: Octal450
Instructions
GPU Table
| Name | Part Number | Reliability | GPU/eDRAM Lithography | GPU/eDRAM Temp Target | GPU/eDRAM Temp Critical |
|---|---|---|---|---|---|
| Rhea | X810480 | Unreliable if made in 2007-2008
Reliable if made in 2008 with white milky underfill Reliable if made in 2009 or later |
90nm & 90nm | 75C/78C | 100C/102C |
| X816970
X816971 |
Reliable | ||||
| Zeus | X810478
X817793 |
65nm & 90nm | 71C/73C | 90C/92C | |
| Kronos | X820894 | 65nm & 65nm | 75C/77C |
Install GPU
- Replace 90nm U4D1 with 65nm
Set VID 1.075V
- Remove 0 ohm 0402 R8B9
- Remove 0 ohm 0402 R8B10
Set FSB/PCIe/Memory Calibration
- FSB:
- Remove 4.87K ohm 0402 R5R3
- Install 40.2 ohm 0402 as pull-up to nearby V_GPUCORE
- You can either use a wire to the capacitor as shown, or scrape to expose V_GPUCORE voltage plane
- PCIe:
- Remove 1.47K ohm 0402 R4R3
- Remove 562 ohm 0402 R5D1
- Replace 2K ohm 0402 R5D2 with 49.9 ohm 0402
- Memory:
- Replace 40.2 ohm 0402 R4R8 with 240 ohm 0402
- Replace 40.2 ohm 0402 R4T1 with 240 ohm 0402
Tie V_GPUPCIE to V_GPUCORE
- Remove IC U5C1
- Install jumper as shown to tie V_GPUPCIE to V_GPUCORE
- Use a 28 AWG (0.31mm) or thicker gauge wire
- Be careful not to short to any nearby components or pads
- Strongly recommended to cover jumper with PCB mask
Modify Firmware
- Use J-Runner with Extras to dump the NAND
- Change the type to Jasper XSB, then RGH the console to get the CPU key
- If the console is JTAGable or has the SMC hack (JTAG) installed, you need to blow fuseline 02 to 5 if it isn't already
- Set the required XeBuild options and build the image
- Open the SMC Config Editor from the NAND menu, and update the thermal targets from the table above
- Write the NAND to the console
Falcon
Both variants of the 65nm GPU can be retrofitted onto a Falcon motherboard. (Demo Video)
Guide By: Octal450
Instructions
GPU Table
| Name | Part Number | GPU/eDRAM Lithography | GPU/eDRAM Temp Target | GPU/eDRAM Temp Critical |
|---|---|---|---|---|
| Zeus | X810478
X817793 |
65nm & 90nm | 71C/73C | 90C/92C |
| Kronos | X820894 | 65nm & 65nm | 75C/77C |
Install GPU
- Replace 90nm U4D1 with 65nm
Set VID 1.075V
- Remove 0 ohm 0402 R8B9
- Remove 0 ohm 0402 R8B10
Set FSB/PCIe/Memory Calibration
- FSB:
- Install 40.2 ohm 0402 R4R9
- Remove 4.87K ohm 0402 R5R3
- PCIe:
- Remove 1.47K ohm 0402 R4R3
- Remove 562 ohm 0402 R5D1
- Replace 2K ohm 0402 R5D2 with 49.9 ohm 0402
- Memory:
- Replace 40.2 ohm 0402 R4R8 with 240 ohm 0402
- Replace 40.2 ohm 0402 R4T1 with 240 ohm 0402
Tie V_GPUPCIE to V_GPUCORE
- Remove 0 ohm 0402 R4C31
- Install 0 ohm 0603 R4P13
- Install 0 ohm 0603 R4P14
- Remove IC U5C1
Modify Firmware
- Use J-Runner with Extras to dump the NAND
- Change the type to Jasper XSB, then RGH the console to get the CPU key
- If the console is JTAGable or has the SMC hack (JTAG) installed, you need to blow fuseline 02 to 5 if it isn't already
- Set the required XeBuild options and build the image
- Open the SMC Config Editor from the NAND menu, and update the thermal targets from the table above
- Write the NAND to the console
Jasper
The Kronos GPU can be retrofitted onto a Jasper motherboard. (Demo video)
Guide By: Octal450
Instructions
GPU Table
| Name | Part Number | GPU/eDRAM Lithography | GPU/eDRAM Temp Target | GPU/eDRAM Temp Critical |
|---|---|---|---|---|
| Kronos | X820894 | 65nm & 65nm | 75C/77C | 90C/92C |
Install GPU
- Replace Zeus U4D1 with Kronos
Modify Firmware (Optional)
This step is optional; Zeus targets 71C/73C, so there is no harm by running the chip a few degrees cooler
- Use J-Runner with Extras to dump the NAND
- Open the SMC Config Editor from the NAND menu, and update the thermal targets from the table above
- Write the NAND to the console