A notable function of modded Xbox 360s is that you can install game backups of legitimately installed games without needing a valid digital license from the Marketplace. Game backups on modded consoles can also have unlocked licenses, meaning you can play them on any modded console without needing to transfer the profile or licenses manually, like what would be required if you bought something from the Xbox 360 Marketplace. This is especially useful now that the purchasing system on the Marketplace is shut down.
This page will cover how to install game backups & applications, with the various methods and formats of doing so.
If you want to play original Xbox titles, ensure that your Xbox 360 is able to run Xbox games before continuing with the guides.
Xbox Game Discs as .iso Files
Xbox 360 game discs can be duplicated and archived as an .iso image file with a compatible DVD drive (see Redump's article for details) and have historically been the way Xbox 360 games were illegitimately shared on the internet as well.
Converting ISO Files for Modded Consoles
There aren't any native utilities that can run on the Xbox 360 itself to enable the ability to boot or use ISO files in any way, and even if it could, the majority of games wouldn't be able to fit due to the Xbox 360's supported file systems.
That being said, ISO format games can be converted for use on a modified Xbox 360 (JTAG/RGH/Bad Update) if either their files have been directly extracted from a folder (see this section for more information) or converted into a "GOD (Game on Demand)" format game with ISO2GOD.
Burning to DVD Recordable Discs
Consoles that have flashed DVD drives or the NetISO plugin can also play copies of .iso format games from burned discs, which also include sketchy "bootleg" discs that are resold in certain markets.
You will need to create a patch for your .iso copy of the game with Abgx360, then use ImgBurn to select the .dvd file created by abgx360 so it can be burned onto a dual-layer DVD recordable. Afterward, you should be able to pop the disc in your console's disc drive and play the game like it was an official disc.
Games on Demand (GOD), DLC, & XBLA/XBLIG
Software downloaded from the Xbox 360 Marketplace came in six formats, with either STFS or SVOD file systems.
Since the Marketplace is shut down, the only games you can still legally buy digitally are the backwards-compatible titles on the modern Xbox storefront for the Xbox One and Xbox Series family. That being said, it is also possible to install game backups in these formats. Some homebrew also came in each of the formats listed here.
STFS Formats
STFS is the main file system used for packages on the Xbox 360. It's essentially used for any data on the console, excluding Games on Demand, official downloads of original Xbox games, and NXE installations of games.
- Xbox Live Arcade (XBLA) games were usually smaller titles developed with the standard SDK, which were cheap and quick to download. XBLA games are signed with a LIVE header when downloaded from the Marketplace, but the versions of these games seen on discs will instead be signed with a PIRS header. Some Xbox 360 homebrew is also packaged this way.
- Xbox Live Indie Games (XBLIG) were games developed with Microsoft's XNA development tools on retail consoles rather than the standard SDK used by bigger-budget developers. The service would later be discontinued in 2015.
- Demos are packaged similarly to XBLA games but do not require a license. This allows them to be run from pressed and burned discs, even on retail consoles. Some Xbox 360 homebrew is also packaged this way.
SVOD Formats
SVOD is similar to STFS but has many split-up packages to accommodate FATX's file system limitations.
- "Game on Demand" (GOD) is Microsoft's official term for any retail-released title that was listed on the Xbox 360 Marketplace. They are packaged in several SVOD containers and are signed with a LIVE signature.
- Disc games using the official installation feature of the Microsoft dashboard (also sometimes known as an NXE installation, as this feature was introduced with the NXE redesign) are nearly identical to GOD games but are signed with a PIRS header and can't be copied/moved to other storage devices in the stock dashboard.
- Original Xbox games sold on the marketplace are also in an SVOD package, alongside a LIVE signature.
Manage Content on PC
If you want an easy, user-friendly way to manage this content and copy it to either USB storage or an Xbox 360 FATX hard drive mounted with FATXplorer, 360 Content Manager is the preferred application to do so. It even allows you to unlock any type of Marketplace content, including Games on Demand.
View more information about 360 Content Manager on its dedicated wiki page here.
Installation
Unlocking
If you have legitimate content from the Xbox 360 Marketplace but you want to use it on other modified consoles without needing to share an account or connect them to Xbox Live, you can modify their licenses to be unlocked to play them on any modified console.
XBLA and DLC content can be unlocked with XM360, whereas Games on Demand can be unlocked with GOD Unlocker XB360. All Marketplace content can also be unlocked with a PC with 360 Content Manager.
Convert Xbox Game Disc to Game on Demand
Xbox 360 game discs can be directly converted to GOD format using the Disc to GOD script on a console with Aurora.
Simply press the Back button, click Scripts, Aurora Repo Browser, and Utility Scripts, then download the Disc to GOD script. After the download is finished, back out of the Repo Browser script so you can launch the Disc to GOD script, and follow the on-screen prompts.
Converting an ISO to Game on Demand
If you have legitimate dumps of Xbox 360 game discs, these can be converted into Games on Demand with an unlocked license with the ISO2GOD or xtafkit application.
Installing Xbox Live Indie Games
Pre-requisites:
- The Avatar Update installed on your console.
- The XNA Title Update (mirror) installed by placing it in
Content\0000000000000000\584E07D2\000B0000\tu32000100_00000000.- Alternatively, you can install it from the Homebrew Store ("XNA Indie Player Title Update" under "Other"), which will automatically install it to the correct place.
From there, backups of indie games are placed in Content\0000000000000000\584E07D2\00000002 (games are a single file each) and launched via your dashboard or choice.
Despite confusion online, indie games can be played while connected to the internet, without being launched through DashLaunch, and without setting "fakelive" or "autolive" in DashLaunch.
Installing GODs, DLC, & XBLA Content
If you want games to show in the original dashboard, then the games should be installed to your internal or external hard drive under the Content directory inside the public download directory (Content\0000000000000000) and inside the directory with the Title ID. To check what the Title ID is when you're not sure, you can look it up on the Games Database or use another tool that can manage STFS/SVOD files.
If you only want to use GOD or XBLA format games in a custom dashboard like Aurora, then the file path is not important. It can be played anywhere on the console and scanned by the dashboard. Just be aware that DLC still requires installation to the Content directory, and installing these games outside the Content\0000000000000000 directory will not be detected in the Microsoft Dashboard or Xbox Live friend invites.
Path Inside Title ID Directory
For XBLA games, inside the Title ID directory should be a folder named 000D0000, which contains your game files. The full path of a game should look something like this: Content\0000000000000000\[TitleID]\000D0000\[STFS Package].
With GOD games, the directory name is instead 00070000.
DLC and indie games should go inside the 00000002 directory of a Title ID folder.
.xex Software
An unpacked application, also known as "raw files" or a "folder application" or an "extracted folder" or an "XEX folder" is essentially the game files directly copied from a disc or extracted from an STFS/SVOD package into a folder. It will contain a Xenon Executable (.xex) with all the asset files of the game directly accessible. The majority of Xbox 360 homebrew will also be distributed this way, and some illegitimate resources on the internet may share Xbox 360 games in this extracted form as well.
Extracting files from an ISO to Folder
View this page for more information.
Convert Game on Demand or XBLA to Extracted
You can extract an XBLA game with a tool such as wxPirs (mirror) and launch it manually from Default.xex. Some of the dashboards may recognize the game even in this form. As for GODs, you can use GOD2ISO to convert it into a format that's easily extractable as well.
Installation
Games and applications in this format can be placed and used anywhere on the console. You can place your game folders in Hdd1:/Games, for example. The Aurora and Freestyle dashboards need to have a content path manually set to automatically find them, which you can change in the dashboard settings. Other dashboards like XeXMenu have fixed content paths for extracted content.
Homebrew
Most Xbox 360 homebrew distributed on the internet is in this format and has the same installation process.
Homebrew can also be downloaded with the console itself using the Homebrew Store Aurora script.
LibXenon Homebrew
Homebrew compiled with LibXenon is not usually recognized by any dashboard. The executable of LibXenon homebrew contains the .elf extension. To run them, you can also place the .elf file onto the root of a USB storage device and insert it into the Xbox. You can then either execute it manually from the Aurora dashboard's file browser or start the Xbox 360 by pressing the Eject button, which will load directly into the application.
NXE Installation
On the Microsoft Dashboard, you have the option of installing a game disc to the internal drive as a console-signed SVOD container similar to a Game on Demand. Normally, games installed with this method on an unmodified retail console will have several limitations, such as requiring the disc as a license check to play the game, not being playable on consoles other than the one it was installed with, and the inability to move or copy the game with the dashboard's storage utility.
Converting NXE Installations to Game on Demand
Modded consoles can still play these styles of games without the disc, but they will still have the other limitations. It is preferred to convert NXE installed games to Game on Demand for this reason.
To convert NXE installed games into the standard Game on Demand format, you can run the NXE2GOD application on the console itself. It can either be installed manually as detailed with Method 3 or downloaded with Homebrew Store.
Instructions for specific Xbox Game Discs
Multi-Disc Games
Multiple "Play" Discs
Just like the 5th gen and 6th gen systems before it, many large Xbox 360 games ended up relying on disc swapping rather than installing data to the hard drive. Playing digital backups of these on a modded console requires a few extra steps.
If you're using Aurora or FreeStyle, the game discs will swap automatically. If you prefer using the Microsoft dashboard with GODs and/or simpler dashboards like XeXMenu with extracted games, enable autoswap under Dashlaunch's behavior settings.
As extracted/raw format
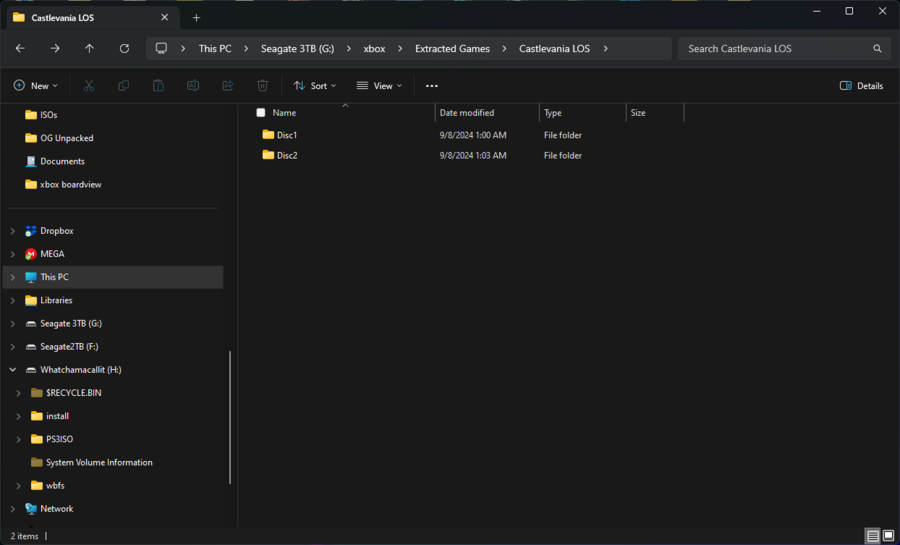
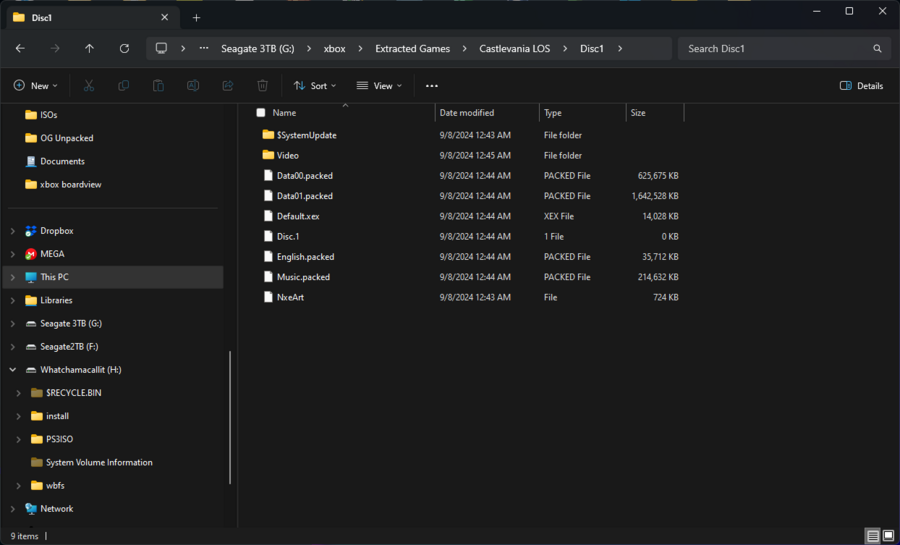
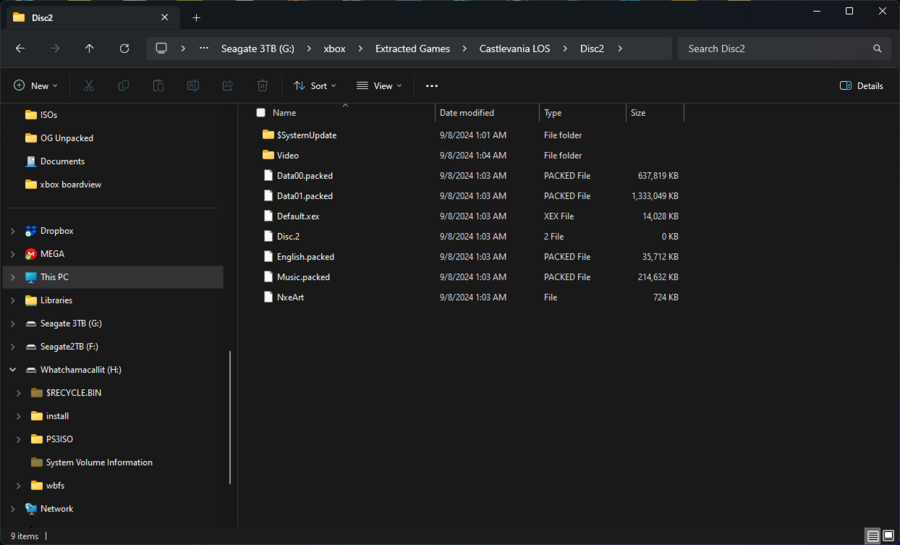
Simply extract both discs like usual, and then rename the folder for each disc as Disc1, Disc2, and so on. Then, put all the folders for each disc into a folder with the game name and transfer it to your console.
An extracted multi-disc game will look like the following example:
As GOD format
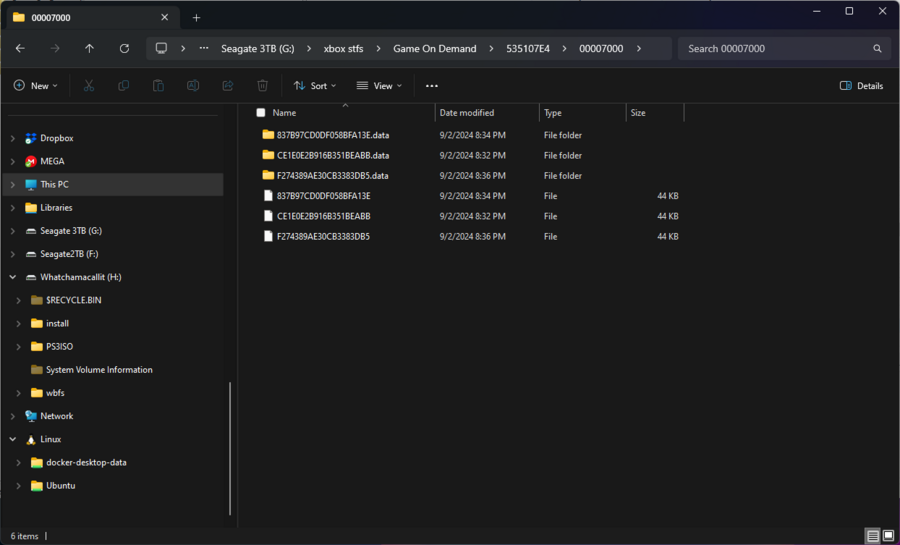
If you convert multi discs as GOD with one of the methods listed in the Games on Demand section of this article, no further steps are required (aside from setting up an auto swap method if you aren't on Aurora or FreeStyle). Simply extract the GOD folder to your preferred location on the console, or the Content\0000000000000000\<TitleID> directory on your console's internal/external storage so it's compatible with Microsoft's dashboard.
A multi disc game converted to GOD will look like the following example:
Installation Disc
If you have a multi-disc game with an "install disc" or a DLC installation disc, it's easiest to just use the real disc's built-in installation wizard on the console to install the game, as it will also do the proper console signing and transfer to the correct file paths. That being said, if your console's disc drive is defective and can't read discs, you can still manually fetch the installation data with a computer by extracting it from an ISO copy of the game. Afterward, you can use USB storage or FTP to transfer the content to your console, ideally with 360 Content Manager. Most of them will have a Content folder inside of them that contains the installation data, and it can be copied to the root of your console's storage. However, there are some exceptions to this rule.
Batman: Arkham Origins (Disc 2)
Move the data from content\0000000000000000\57520828\FFFFFFFF to Content\0000000000000000\57520828\00000002 on the console.
Call of Duty: Black Ops III
Copy the A92CACF8DF6D9DB1C32970035A6B8B63B09C2F1641 and 4FD64D1A99FF002F54CEE0FE922808E1D2D21A5341 package files to Content/0000000000000000/4156091D/00000002 on the console.
Watch_Dogs
Watch_Dogs is a special case where the "install disc" doesn't contain STFS packages on the disc itself. Instead, the disc just has the raw asset files, and the installation wizard on the disc handles the packaging & signing on the fly. To install the disc installation data for this game without using the console's disc drive, you will need to extract both the "play disc" and "install disc" using the info from Method 3. All the files in the installation1 and installation2 folders of the install disc go into the root of the folder created for the play disc, and you will need to launch the game through game.xex instead of default.xex. To be usable in custom dashboards like Aurora, you can create a GOD shortcut to the game.xex file with a program like Shortcut360.
The combined game folder for Watch_Dogs will look like this:
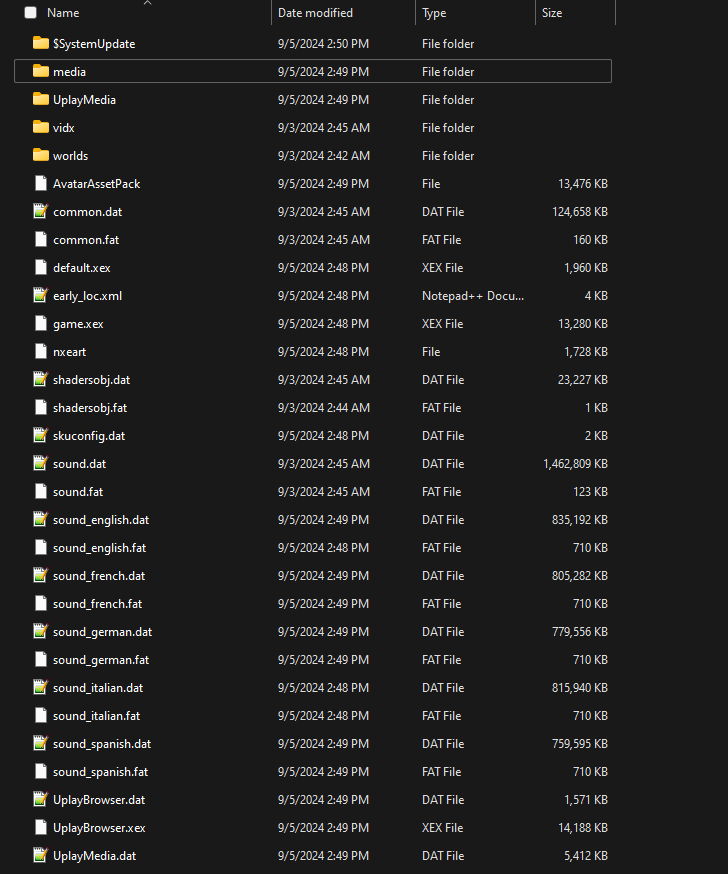
You can also use xdvdfs to pack your combined game folder into one ISO file, which can then be put into ISO2GOD to create one single GOD file for Watch_Dogs.
Wolfenstein: The New Order
The first disc of this game acts as both the "install disc" and a "play disc". However, the installation process of the first disc will not function if you try to launch it in extracted format. If you convert the first disc into a Game on Demand, the game will still run correctly. After you have successfully run the first disc's initial installation, all the "play" discs can now be run as extracted or fully rebuilt GOD format just fine, but you may as well convert all the discs to GOD for consistency.
You can also combine Disc 2/3/4 into one folder by extracting all three discs to their own separate folders and then copying all the contents of Disc 2 and 3 to the folder for Disc 4, replacing any existing files (as the duplicate files are the same on each disc anyway). Afterward, go into the new combined folder for the game, go into the build subfolder, open the build.cfg file, and add the flag +discSwapper_enable 0 at the end of the text file.
After that, you can now play this game as one combined game folder without having to rely on disc swapping by Dashlaunch or your custom dashboard, as this game essentially has a disc swap feature built-in. You can also use xdvdfs to pack your combined game folder into one ISO file, which can then be put into ISO2GOD to create one single GOD file for Wolfenstein: The New Order.
Stock DLC Installer Discs
These game discs use the stock disc DLC installer provided by Microsoft. As such, the file path on the disc won't be the same as where it should be installed on USB or HDD, but the paths to where the DLC should be installed will be listed here. They are a standard case of extracting the content folder from the .iso or disc to the console's storage and can be treated like installation discs.
The folder path for the DLC on the disc itself will be content\0000000000000000\FFED2000\FFFFFFFF
Bioshock 2 (Disc 2)
Move the data from content\0000000000000000\FFED2000\FFFFFFFF to Content\0000000000000000\54540861\00000002.
Bioshock Infinite (Disc 2)
Move the data from content\0000000000000000\FFED2000\FFFFFFFF to Content\0000000000000000\5454085D\00000002.
Dark Souls II: Scholar of the First Sin (Disc 2)
Move the data from content\0000000000000000\FFED2000\FFFFFFFF to Content\0000000000000000\465307E4\00000002.
Dishonored - Game of the Year Edition (Disc 2)
Move the data from content\0000000000000000\FFED2000\FFFFFFFF to Content\0000000000000000\425307E3\00000002.
Dragon's Dogma: Dark Arisen (Disc 2)
Move the data from content\0000000000000000\FFED2000\FFFFFFFF to Content\0000000000000000\43430814\00000002.
The Elder Scrolls IV: Oblivion Game of the Year Edition (Disc 2)
Move the data from content\0000000000000000\FFED2000\FFFFFFFF to Content\0000000000000000\425307D1\00000002.
Fallout 3: Game of the Year Edition (Disc 2)
Move the data from content\0000000000000000\FFED2000\FFFFFFFF to Content\0000000000000000\425307D5\00000002.
Fallout New Vegas: Ultimate Edition (Disc 2)
Move the data from content\0000000000000000\FFED2000\FFFFFFFF to Content\0000000000000000\425307E0\00000002.
Forza Motorsport 2 (Disc 2)
Move the data from content\0000000000000000\FFED2000\FFFFFFFF to Content\0000000000000000\4D5307EA\00000002.
Mafia 2: Director's Cut (Disc 2)
Move the data from content\0000000000000000\FFED2000\FFFFFFFF to Content\0000000000000000\545407E6\00000002.
Mass Effect (Disc 2)
Move the data from content\0000000000000000\FFED2000\FFFFFFFF to Content\0000000000000000\4D5307E8\00000002.
Saints Row: The Third - The Full Package (Disc 1)
Move the data from content\0000000000000000\FFED2000\FFFFFFFF to Content\0000000000000000\5451086D\00000002.
Saints Row IV - National Treasure Edition (Disc 1)
Move the data from content\0000000000000000\FFED2000\FFFFFFFF to Content\0000000000000000\4B4D07F6\00000002.
XBLA Compilation Discs
Some game discs, like the retail copy of Bejeweled 3, come with Xbox Live Arcade titles directly installed onto the disc, and can either be launched with the dashboard's My Games list or booted directly and used with the disc's game launcher.
For the most part, the XBLA game folders on these discs can just be extracted to the Content/0000000000000000 folder on the console's internal/USB storage and be played that way, like if you downloaded it from the Xbox 360 Marketplace.
If you want to play them from the original disc launcher menu (like if it's a collection of XBLA games), then you can extract the contents of the disc (except for the Content folder; use the above instructions for that) to the game's own folder in a directory where you keep extracted game backups.
If you don't want to keep the duplicates of the games and only want to launch them from the console dashboard, delete the versions of the games that have the folders named after the TitleID of the disc, rather than the games that have their folders named after the XBLA game's individual TitleID. The disc's TitleID can be found on resources like abgx360.com.
Converting these game compilation discs to a Game on Demand will not work, but the disc launcher will still work when extracted as long as the Content folder's contents are extracted to the console's internal storage and not in the folder used for the disc launcher executable.
Namco Museum Virtual Aracde
This game disc is a special case where, while it contains XBLA games that can be played from the dashboard, it also contains separate .xex games that can only be launched from the disc's menu.
To play a backup of this game, you simply have to extract the contents of its Content/0000000000000000/ directory to the Content/0000000000000000/ directory on your console's internal storage.
Afterward, you will want to copy all the files from the disc or ISO copy except the Content and, optionally, the $SystemUpdate folder to its own dedicated folder in a directory where you launch other extracted games.