- English
- español
Stock Xbox game consoles shipped with either 8GB Western Digital or 10GB Seagate hard drives, making approximately 5GB of space available as user storage either way. While that storage is sufficient for many game saves and DLCs, you'll need to replace your hard drive with a larger one if you want to install more than a couple of game backups. Additionally, as the original hard drives are now decades old, they can't be expected to last much longer in future service.
Video demonstrations of upgrading your HDD can be found on MrMario2011's channel:
Before You Begin
- The original drives used are PATA, aka IDE. If you're intending to use a SATA adapter to install a later-model drive, then you'll also need to upgrade the stock 40 wire 40 pin data ribbon to an 80 wire 40 pin model. 24" is suggested for easier cable folding, as most 18" ribbons will just barely fit.
- SATA adapters also tend to have electrical contacts which may short against the very drives they're connected to. It's recommended to place a layer of electrical tape over any exposed metal on the back of a 3.5" disk in order to prevent this.
- The original drives are secured using unique passwords based upon unique HDD key values stored in the EEPROM chips of their respective Xbox motherboards, "marrying" them together. This causes them to power up in a locked state, and they can only be unlocked by systems programmed with the same key. If you're still using a stock Xbox BIOS (that is to say, your console is either unmodded or softmodded), then your replacement drive will also need to be password protected - most IDE drives support the required ATA security commands, and probably all SATA drives do.
- If you're using a hardmodded console (that is to say, it's either been modchipped or TSOP flashed), then your replacement BIOS will accept unsecured drives. In this case, with the right adapters you can install just about any type of storage media - even SD or CF cards, which offer no ATA security support at all.
- Most modified BIOS types can only map up to 2TB of storage in total (that is to say, 241 bytes: around 2.2 billion). Use of CerBIOS, or BIOSes making use of the Titan patch, allows up to 16TB per disk (244 bytes: around 17.6 billion).
- To prevent mass data corruption, individual partitions must be formatted using larger clusters (eg via PrometheOS or FATXplorer):
- 16KB clusters for up to a 256GB partition
- 32KB clusters for a 256GB-512GB partition
- 64KB clusters for a 512GB-1TB partition
- etc
Replacing the Hard Drive
- If you are using a modchip or have TSOP flashed your console, then you can directly connect a new drive and have the system boot a formatting tool. For example, if you're running a modchip with PrometheOS then that interface can be used to prepare a new file system and to FTP files into it. If you have an installer disc inserted (eg Rocky's Extras, Hexen, AID, Slayers) then these may instead be used, although unlike PrometheOS, most such options will not set the larger cluster sizes needed to safely use disks larger than ~250GB.
- If your console lacks a hardmod and the current hard drive is non-functional, then unless you previously obtained an EEPROM backup from your system (or have access to a device that can dump that chip directly), the only way to recover your Xbox will be to install a modchip so you can make use of an alternate BIOS which will accept an unsecured drive.
- If your current hard drive is working on an unmodified Xbox, you will need to modify your console before being able to replace the hard drive. A hardmod will allow you to directly install a new drive, while using a softmod will allow you to follow the process on this page to install a new lockable drive. Softmod options include ENDGAME, Game Save Exploits or XBHDM, while hardmod options include installing a modchip or TSOP Flashing.
- If your Xbox is softmodded, you can follow the below processes to obtain your hard drive key by using an EEPROM backup and lock a new IDE hard drive using it. A SATA drive will also work using a SATA adapter and an 80-pin IDE cable. The new drive must support locking.
Method 1: Using a PC
FATXplorer (Recommended)
FATXplorer is a modernised disk management application, intended for use with Windows 7 SP1 or later.
You will need:
- A PC with a PATA (IDE) port
- FATXplorer (a Windows app) extracted to your desktop.
- Either the XBHDM version of Rocky5's Softmodding Tool, or pre-made packs for the C:/ and E:/ partitions for a modchip/TSOP console.
- If you plan on backing up and using the C & E partitions from the old HDD, then neither of these are necessary for you.
- (Optional) Backup of the contents in the C & E partitions from the old HDD
- These can easily be obtained by opening an FTP session to copy the contents of your C & E partitions to your computer first.
- Be sure to get the EEPROM backup file from
E:\Backups. It's needed to lock the new hard drive to your console. - Make sure to use FTP from the NKPatcher settings in order to get the real C partition instead of seeing the ShadowC on a softmodded console.
- If you have a softmodded console, you may still want to back up the C partition, as the XBHDM installer can fail on SSDs and fast hard drives.
- Turn your Xbox off, then connect the new hard drive to the computer.
- Open FATXplorer, and enable the free trial to use the program. You can also put in a license key if applicable.
- Go through the standard formatting procedure while preloading the contents of your C/E backups, if you have them.
- Once finished, remove the old hard drive from the Xbox and attach the new one.
XboxHDM (Not recommended)
The Xbox Hard Disk Maker is a legacy tool, only suitable for PCs running older operating systems such as Vista or earlier.
You will need:
- A PC with a PATA (IDE) port and DVD or CD burner
- XboxHDM (a Linux distro) extracted to your desktop.
If you don't already have an EEPROM backup on your computer, make sure to open an FTP session to copy it to your computer first. The Xbox Softmodding Tool would've already made a backup of it to E:\Backups after the initial installation.
- Launch a utility such as Softmod Installer Deluxe (SID) or a disc such as Auto Installer Deluxe (AID) or Slayers. Select the EEPROM Backup option. Note the directory that it saves in; most likely it is E:\Backup\.
- Open an FTP session and copy the EEPROM.bin to "...\xboxhdm\linux\eeprom\". If you wish to keep all of your previous data, copy the entire C:\ and E:\ drive to your PC and put it in the "...\xboxhdm\linux\" folder and overwrite the files there.
- In the xboxhdm folder, run "make-iso-win.bat" to generate an ISO called "linux.iso". Burn this to a CD or DVD by right-clicking the ISO and selecting "Copy Image to CD" or by using software such as ImgBurn. This is your XboxHDM CD. Turn your PC off.
- Boot into your PC's BIOS by starting the computer and repeatedly tapping F1, F2, or Del on your keyboard depending on your computer. If none of these options work, you may need to Google the BIOS button for your computer brand. From the BIOS, set the PC to boot to CD first in the boot order. Insert your XboxHDM CD and power your PC off.
- Plug your new hard drive into your PC. Start your PC and it should boot into XboxHDM.
- In XboxHDM:
- Type "1" and press Enter to choose "Boot VGA console with xbox-drive utilities".
- After it loads, type "xboxhd" and press Enter.
- Type "1" and press Enter to choose "Build a new Xbox HD from scratch" and it will format the hard drive. If you had backed up your C:\ and E:\ drives earlier, type "yes" and press Enter to accept them. Type "yes" and press Enter when it asks you if you would like an F: drive.
- Restart your computer to go back to the XboxHDM main menu. Type "3" and press Enter to choose "Boot linux with locking/unlocking utilities". Type "lockhd -a" and press Enter. It will search for your EEPROM on the CD and will lock the drive. Turn off your PC and Xbox and plug the hard drive back into your Xbox. It should be able to boot properly now.
Method 2: Using the Xbox
Using PrometheOS (Recommended)
ToDo...
Using CHIMP (Not recommended)
Chimp is a homebrew software tool that can be used to upgrade your hard drive through your Xbox alone, without the use of a separate PC. This tool requires hotswapping, which comes with the risk of permanent hardware damage! Keep in mind that if you're using a SATA adapter, it must have a master/slave jumper in order to do this.
- You will need:
- A softmodded Xbox (hardmod should not need Chimp)
- A backup of your EEPROM
- Chimp261812
- Molex Power Splitter
- Your new hard drive
- A Torx screwdriver to open the Xbox

- Launch a utility such as Softmod Installer Deluxe (SID) or a disc such as Auto Installer Deluxe (AID) or Slayers. Select the EEPROM Backup option. Note the directory that it saves in; most likely it is E:\Backup\.
- Copy the Chimp folder to E:\Applications, then shutdown the Xbox.
- Open Your Xbox.
- Set your secondary hard drive to slave. You can do this by moving the plastic jumper notch on the underside or backside of the drive to point to "SL" or "Slave".
- Plug the single side of the Molex splitter into the Xbox and connect both hard drives to either end of the cable.
- (Optional) Loosen the IDE cable from the back of the DVD drive slightly to make it easier to take out.
- Turn on the Xbox and launch Chimp. When you see the prompt on-screen, unplug the DVD drive and plug your new hard drive into the same slot on the IDE cable.
- Take note of the two hard drive models so that you can tell them apart.
- If your Xbox powers off when launching Chimp, try using AV cables or a different set of component cables.
- Pick Option 1 (Scan For Physical IDE Devices), then option 2 (Clone From Master To Slave).
- If you are cloning to a drive of the same size, choose
Full Disk (Byte by Byte), otherwise chooseSelective (Select Partitions). - If you have a 1TB or smaller drive, choose
C E & FthenF occupies all available space. Otherwise, chooseC E F & GandF and G splits space evenly.
- If you are cloning to a drive of the same size, choose
- The clone may take a while. When the cloning is complete, it will ask if you want to lock the new hard drive. If the Xbox is softmodded you MUST lock the hard drive. If the Xbox is hardmodded it doesn't matter whether you lock the hard drive or not.
- When it is finished, power off the Xbox, remove the molex splitter, and attach only your new hard drive.

Compatible IDE to SATA Adapters
The StarTech IDE2SAT2 adapter is the most highly recommended adapter. It is also significantly smaller than most generic ones. It is recommended to set the jumpers for your adapter to"Cable Select" or "Master." Only set it to "Slave" if you are adding a second hard drive.
The vast majority of SATA adapters (including StarTechs!) should not be expected to function through an Xbox's stock 40 wire IDE ribbon, and will usually lead to a service screen with code 13 even if everything else is set up correctly. An 80 wire 40 pin IDE ribbon (Ultra ATA) can be considered mandatory when using any kind of SATA adapter. 24" ribbons are suggested, as most 18" ribbons will just barely fit.
| Brand | Name | Model | Details | Chipset | Link | Image | Reliability | Comments |
| Digitus | Digitus IDE to SATA adaptor | DS-33151-1 | Conforms to Serial ATA 1.0 specification, revision 2.2, Transfer rate 1.5Gb/s. LBA48 support | Jmicron JM20330 | link | 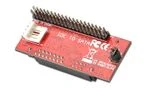
|
Works | When using on a softmodded box it tends to timeout at reboot (need to shutdown complete). On a tsop flashed box with iND-BiOS it works perfect (due to longer boot time?) |
| Delock | Delock Converter SATA > IDE | 61702 Discontinued / Replaced by 62510 | Compliant to Serial ATA 3 Gb/s.Supports PIO and DMA modes. Has LED interface. LBA48 support. Up to UDMA5 supported, unknown if UDMA6 works. | Marvell 88SA8052 | link | 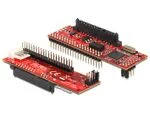
|
Works | Instant boot and has no issues with in game resets[1]. Has HDD led header so you can attach a standard PC HDD LED for monitoring disk activity. Transfer speed seems to be absolute max of ATA33, tested with a file copy between two partitions on a SSD reaching about 16.2 MB/s, since ATA33 is simplex the total data transfer is 32.4MB/s. Very fast boot times.[2] |
| Unbranded | PATA/IDE To Serial ATA SATA Adapter Converter For HDD DVD | HLSP-2106 | LBA48 support | Jmicron JM20330 | link | 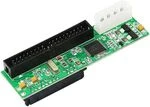
|
TBD | May or may not have incorrectly configured resistors. No master/slave jumper. |
| Unbranded | ATA Female to 40 pin Male 3.5 inch IDE Adapter for PC to SATA Hard Drive Interface Adapter | EVB-002-03 | TBD | Jmicron JM20330 | link | 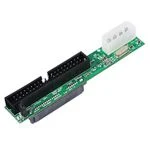
|
Works (if modified) | Will likely have three incorrectly configured resistors, among other things. Replace RH1 with the resistor from R15 (0603 - 10KΩ), leaving R15 unpopulated. Replace R16 with a 0603 - 100Ω resistor. Boot time should be nice and quick after modifications. |
| Unbranded | DealExtreme SATA to IDE Converter Driver - Red REV?? | RXB-639B | TBD | IDE/SATA-D0F-B75K80041 | link | 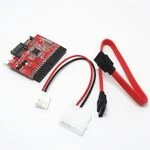
|
Poor | Works for some, although has a bad reputation. There are multiple versions - some work better than others. |
| Unbranded | Parallel PATA to Serial SATA Hard Disk Converter | RXD-629A7-7 | Compliant with SATA 1.0a specification. Compatible with Ultra ATA 133. | Sunplus SPIF223A | na | 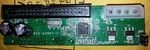
|
Poor | No jumper should be installed [1]. Some SATA drives may have issues with this controller [2]. Some users experience issues booting up after having powered off the Xbox for a long time - error 7[1]. Unreliable[3] |
| StarTech | 2.5in and 3.5in 40 Pin Male IDE to SATA Adapter Converter | IDE2SAT2 | LBA48 support, UDMA6 support | Marvell 88SA8052 | Amazon link StarTech link | 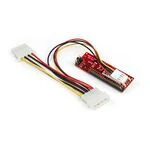
|
Works | Adapter is compatible with both soft and hard modded (TSOP reflash or modchip installed) consoles. Occasionally has compatibility issues with Samsung SDG-605b drives. |
| Unbranded | PATA IDE TO SATA Converter | JP103-5 | LBA48 support, up to UDMA4 support. UDMA5 may or may not work, but should always work if the DVD drive is removed. | Likely same as M03 | link | 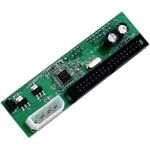
|
Works | Models are basically the same as each other. Only major difference is that the M03 doesn't come with the optimal resistor configuration, as R4 (0603 - 100Ω) and RH1 (0603 - 10KΩ) are unpopulated. Only R4 needs to be populated for the HDD initilization (and thus boot time) speeds to be as expected. |
| VER:M03 | IDE/SATA-D0F-B77CS0F41 | link | 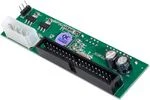
|
Works | ||||
| Kingwin | SATA to IDE Bridge Board | ADP-06 | Data transfer rate up to 3.0 Gbps | Genesys GL830 (may use different chips) | link | 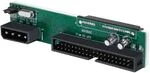
|
Works | Seemed to have better compatibility for v1.6 Xboxes. It's only issue is the lack of a Master/Slave jumper, which is necessary to use with Chimp for HDD cloning.[4] It may have the same issue as the VER:M03 where a 100 ohm resistor is either missing or incorrectly populated at RH1, causing HDD initialization to be abnormally slow, though this claim needs verification. |
References
- ↑ Jump up to: 1.0 1.1 1.2 https://www.reddit.com/r/originalxbox/comments/a0z77m/currently_making_a_list_of_ide2sata_adaptors
- ↑ Jump up to: 2.0 2.1 https://www.xbmc4xbox.org.uk/forum/viewtopic.php?f=13&t=612
- ↑ https://www.reddit.com/r/originalxbox/comments/7z26oj/transfer_games_directly_to_an_original_xbox_hdd/
- ↑ https://www.reddit.com/r/originalxbox/comments/a0m60e/comment/eajxl2a/?context=3