This page will explain the process of reverting your console firmware, or "downgrading" as some might think of it.
What is the revert?
The PS4 saves the data of current and previous firmware versions on the motherboard's 32 MB firmware chip (you may think of it as a "BIOS" chip, though this terminology is incorrect). Usually, this is an update failsafe. They are referred to as "Slot A" for the active slot and "Slot B" for the backup/inactive slot.
The reverting process takes advantage of this and replaces the current with the previous firmware version by corrupting the active slot, allowing you to go from the current firmware, such as 11.02, to the previous firmware, such as 10.50.
To be able to revert, small amounts of microsoldering are required. Make sure you are either already skilled enough to do it or practice on alternative hardware based on what needs to be done for the revert. You may be able to find a technician experienced in either console repair/modding or general electronics repair to do the process for you as well.
In short, you will be soldering to the NOR (the aforementioned 32 MB flash chip, which you can also take off the board to read and write to) and soldering to the Syscon + temporarily lifting one of its pins and soldering to the pin to glitch it into debug (the entire Syscon can also be desoldered to read and write).
For the NOR, you will use the command line in cmd or choice-based command-line scripts via Wee Tools. For the Syscon, you will use a GUI or Wee Tools again similarly. What you will do is take advantage of the slots and corrupt Slot A to try and make it activate the failsafe of reading from Slot B.
Can I revert? FAQ
 | There is a risk of your console being bricked if you damage the Syscon or NOR past the point of being able to read and write, or if you are unable to write back original working dumps of the NOR and Syscon, or if you do not have clean usable dumps of the NOR and Syscon |
| Make a backup of your savedata and anything else like captures. |
| IF you are updating from lower firmware with the intention of going back to lower firmware, first you should make a NOR and Syscon dump while your current (or lowest) firmware is in the active slot to avoid issues with getting back to your lower firmware. See potential Syscon issues below before updating. |
If you have a compatible Syscon, your Syscon must be A0X-COLX (X=Digits on your Syscon) for it to be compatible.
Reverting is usually useful if you can revert to jailbreakable firmware. Reverting, even if not to jailbreakable firmware, can still be useful for the chance at being in range of a future exploit.
- Can I revert without soldering?
- No.
- Can I use a DNS to downgrade?
- No.
- Can I revert if a firmware update has fully downloaded?
- No.
- Q: Can I replace the HDD and install lower firmware on a new one?
- No.
- Q: Can I still revert to a previous firmware if I have factory reset my PS4?
- Yes.
- Q: Can I use someone else's console backup and have its games unlocked?
- No.
- Q: Can I connect to PSN while not on the latest firmware and download PS Store content?
- No.
- Q: Can I revert if I replaced my HDD and/or reinstalled firmware via recovery pup?
- No, but you can still update and revert to the current one.
Can I unlock a game? My game is locked.
- If a game or game demo is locked after being unlocked, you can try rebuilding the database. If that does not work, you will have to either write back the Syscon dump or do the whole process again.
- If you connect to the internet without a DNS, your game will lock. See: Blocking OFW Updates
- "I downloaded a console backup, and my games are locked?"
- The games that come with a console backup do not give you a license for them. You cannot unlock them if they are retail PKGs. If they are FPKGs, you can only unlock them by jailbreaking with a HEN.
Syscon abnormalities/issues
Occasionally, the Syscon data needs a bit more manipulation either due to how the data was laid out internally or because of residual data. This is why UART is recommended to debug any issues.
Error CE-40947-4 - How to avoid it
Following the above advice of taking a NOR and Syscon dump before updating, if your device is secondhand and/or has a real PSN account on it, it may be soft locked in an account primary state. This state will make it impossible for you to activate the console as primary once you have updated to the latest firmware and want to revert with an activated account. The solution to this is to do the following:
- Dump your NOR and Syscon by using the guide on this page. While you follow along with the guide, you will also activate UART in the NOR and Debug in the Syscon.
- While activating Debug in the Syscon, the "Patching the Syscon to avoid error CE-40947-4" part of the guide explains how to factory reset the Syscon data. Do it if you are unsure of the current console state, or do it if you know a real PSN account is currently on the console. There are no real downsides to doing it, but major downsides to not doing it and ending up needing it. WeeTools PRO also should have a function for this, either in Syscon rebuilder or elsewhere in newer updates.
Revert fail ERROR: main(3738) checkUpdVersion
This is due to the Syscon having residual data related to the firmware it is looking to boot with. To resolve it while you are patching the Syscon, try using patches B and C, meaning you apply patch B and then apply patch C to the newly generated Syscon file. Sometimes a different combination may be needed, or more than 2 patches may be needed (read the guide below to see Syscon patching options). Alternatively, the PRO version of WeeTools has an advanced function that should mitigate issues with Syscon rebuilder.
Firmware mechanics, firmware slots, and use cases
 | NOR is always written first, followed by Syscon. If you have written a NOR dump, you HAVE to write to Syscon too. Make sure to have matching dumps in firmware and dump time. Dump NOR first followed by Syscon. |
| Read 'Slots and how you can take advantage of them' to understand how to switch between any firmware you have a dump of. |
Firmware behavior
- Allowing an update to start installing overwrites slots. Having it fully downloaded overwrites slots. Allowing it to partially download does not overwrite slots.
- Replacing the HDD and reinstalling the same or a higher firmware will overwrite the current slot, causing you to lose the previous lower firmware.
- You can use more than one HDD on the system, allowing you to swap between the 2 either when on the same firmware or once you have flashed different firmware to the console via NOR and Syscon backups. Installing firmware to a secondary HDD overwrites the previous slot, making you lose the lower firmware.
- You can keep separate HDDs for each firmware you go to or for the same firmware.
Slots and how you can take advantage of them
If you have a compatible Syscon.
The PS4 keeps the current and previous firmware information saved on the motherboard. The revert allows you to take advantage of that and swap the current firmware slot with the previous one, allowing you to use lower firmware on the console (if the previous slot had lower firmware).
- If you dump NOR and Syscon while your current firmware is 11.00 and your previous is 10.50, you can revert to 10.50.
- If you dump NOR and Syscon while your current firmware is 11.00, you can save it for later and continue updating the console as many times as you want to higher firmware, so 11.02, then 11.50, then 11.52, etc. However, because you have a dump of NOR and Syscon while on 11.00, you can always write that backup back and be able to reinstall 11.00 and start from there again, or if you had lower firmware in the inactive slot, you could still revert to it.
- After reverting from 11.00 to, say, 10.50, you can make a dump again and keep it to be able to always go to 10.50 without having to revert and patch things only by writing it back as mentioned above.
- Writing a NOR and Syscon backup without any patching to the slots will allow you to start using the console on the firmware that has the active slot. This means that after taking a NOR and Syscon dump while on 11.00 (11.00 being the active slot), you can then update to 11.02 and then 11.50, overwriting the 2 slots, but still be able to write back the 11.00 dumps and start again from 11.00.
- Lastly, a final thing to attempt to elaborate on regarding everything above. If you are on 11.00 and you dump your NOR and Syscon, and you then update to 11.02 and then you update to 11.50, you can still write back the NOR and Syscon dumps of when you were on 11.00 and then start over from 11.00. This will work from any starting firmware you are on or your lowest firmware after you have reverted to a lower firmware, if possible.
Use cases
- As expected, the main use of this is to go back to exploitable firmware.
- Another common use is to have a console that can go between exploitable and retail to play online, sync trophies, or download more content from the PlayStation Store by updating and later going back to exploitable firmware.
- Some people use it to unlock trophies for themselves or others.
- In rarer cases, exploit and Homebrew testing. It can be done with test/dev kits in an easier manner.
Retaining game demos or all data after the revert
- By choosing patch method A in Syscon patching, you retain all current user data when you revert. This also leaves all digital content working.
- You can use it for games compatible with Lua Loader. This will allow you to keep any installed games unlocked after the revert.
- You will have to update the console to the latest firmware, download the desired games, and make the console primary for the account.
- Before shutting it down, use Nomadic's DNS so that when you reboot, it does not attempt to connect to the internet and lock the games: Blocking OFW Updates
- Q: Can I burn a disc?
- A: No.
- Q: Can I use a demo from another console?
- A: No.
- Q: Can I inject a license after installing an Artemis game PKG/FPKG?
- A: No.
- Q: Can I use someone else's console backup and have the game unlocked?
- A: No.
- Q: Can I connect to PSN while not on the latest firmware and download the demo?
- A: No.
- Q: Can I burn a disc?
UART previous and current firmware information
It has been observed over UART that the PS4 displays slot information in a few situations.
- When the revert sends you back to the same current firmware.
- secure loader build: Jul 2 2024 05:21:06 (r10749:release_branches/release_11.520) [711MHz]
- AGESA: KG&CN.BDK W9311
- standby 11008000
- When the revert is successful.
- secure loader build: Aug 31 2023 05:20:35 (r10690:release_branches/release_11.000) [711MHz]
- AGESA: KG&CN.BDK W9311
- standby 11520000
- When you update the console in safe mode, it displays the current and previous status post-update. (Not useful to tell you what your previous firmware was before installing an update.)
- secure loader build: Jan 15 2018 05:20:59 (r9101:release_branches/release_05.050) [711MHz]
- AGESA: ThebePBDK W5C21
- standby 05030000
- During boot after SceShellCore starts. Search for "[ShareBlockingCache]".
- [ShareBlockingCache] SDK(05530011:05550021) Master(00010001:00010001) --> Use current version. count = 4
- If you have different firmwares in the slots. Search for "[ShareBlockingCache]".
- [ShareBlockingCache] SDK(05530011:05550021) Master(00010001:00010001) --> Use current version. count = 4
- If you have factory reset. (2 possible readings) Search for "[ShareBlockingCache]".
- [ShareBlockingCache] Initialize First Version Up
- [ShareBlockingCache] Initialize from master file. count = 4
- The above are examples and have been observed to have the "count = 4" be different between consoles.
- If you have different firmwares in the slots. Search for "[ShareBlockingCache]".
- [ShareBlockingCache] SDK(05530011:05550021) Master(00010001:00010001) --> Use current version. count = 4
Required/Recommended Hardware
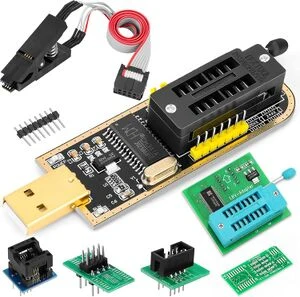
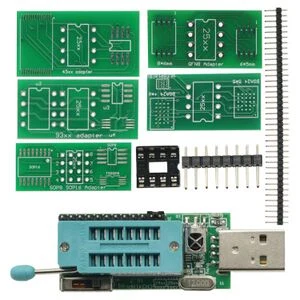
A list of 99% of things you will need or are recommended to have.
Required
- Patience
- Soldering iron, 99% isopropyl alcohol, flux, solder, brass/copper ball to clean soldering iron tip, and Kapton tape. Specific recommendations for soldering equipment can be found here.
- A hot air rework station and nozzle, while optional, are also recommended. A hot air station will help with Syscon pin lifting.
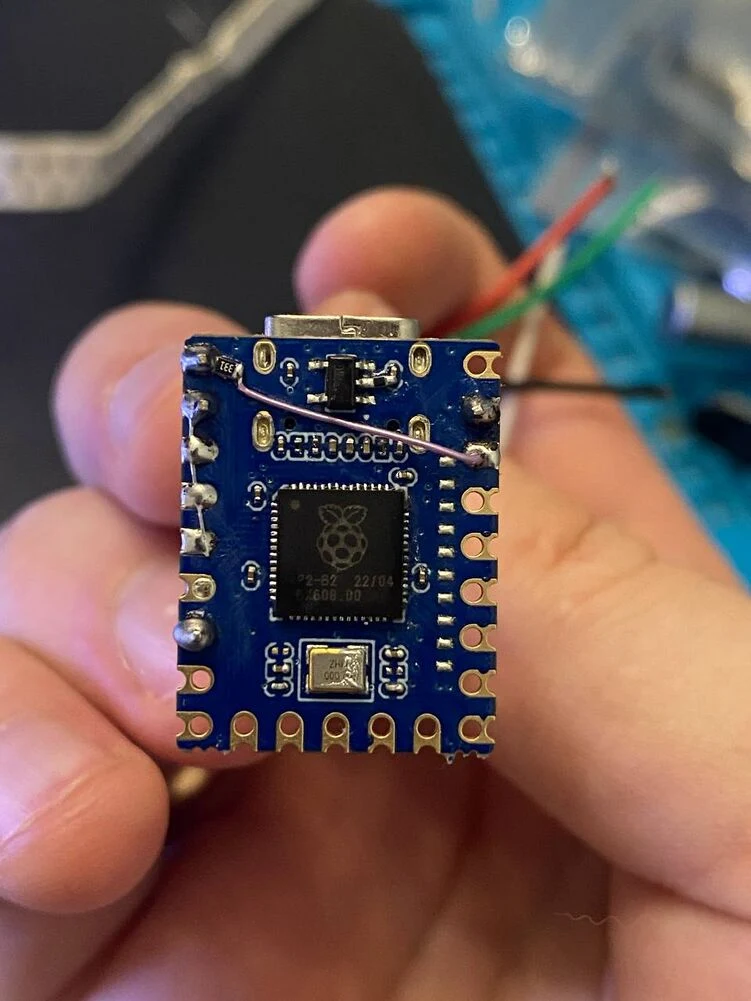
- Either a Teensy 2.0++, 4.0, or 4.1, or an original RP2040-based Raspberry Pi Pico for Syscon flashing. Teensy 2.0++ and Pico can also be used for SPI NOR flashing (see below)
- Notice: If using a Teensy 4.0 or 4.1, using a separate SPI programmer (mentioned below) is mandatory along with doing a 3.3v mod to it (if it's a model that can't output 3.3v natively) if reading NOR off the board, at least until someone makes a universal easy-to-use SPI flasher firmware for it.
- Needed only for Teensy 2++ - SMD Component - 3V Regulator XC6206P302MR SOT23 "65Z5".
- Needed only for Teensy 2++ - SMD Component - 3.3V Regulator MCP1825S-3302EDB, MCP1825S-3302E/DB MCP1825S-3302E MCP1825S 1825S-3302 1825 SOT223, 1825S33 EDB2050 J34. (Range of names for the same item).
- Needed for any Teensy: 100-200 ohm resistor, SMD or otherwise.
- Needed for the Pico: 200-500 ohm resistor (SMD or otherwise), in addition to an N-Channel MOSFET (ideally with a low VGS threshold that's < 2V for the Pico to reliably trigger it)
- Any SPI programmer, such as the CH341A, CH347, XGecu T76, UsbAsp, Teensy 2.0++ with SPIWay, RP2040 Raspberry Pi Pico with pico-serprog etc.
- If you're buying a CH341A, make sure to either buy one that can switch to 1.8V or comes with a 1.8V adapter.
- This bundle will allow you to read and write the NOR while it is off the board. However, if you are reading it on the board, you will still need to buy an adapter that can either natively switch to 3.3V or modify the black adapter to output 3.3V. Trying to read the NOR with too high of a voltage will typically result in corrupted reads.
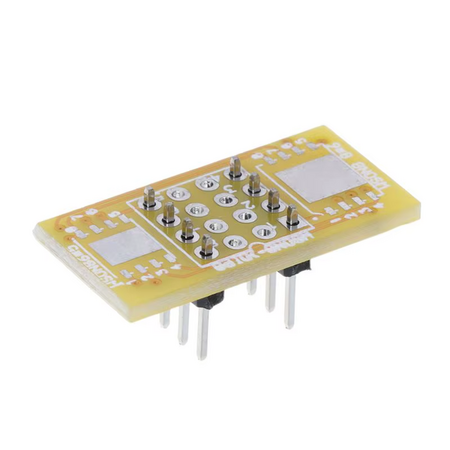
- For CUH-12xx, Slim, and Pro models, you may need a WSON8 breakout board if you are reading the chip OFF the board if your programmer didn't come with a QFN8 breakout board, as the NOR chips are a different form factor than the CUH-10xx/11xx (glossy HDD cover models). You can also alternatively solder wires to the SOP8 adapter that comes with the CH341A.
- Other devices compatible with flashrom may work, but instructions on using them on the PS4 here are TBW.
- If you're buying a CH341A, make sure to either buy one that can switch to 1.8V or comes with a 1.8V adapter.
- Any kind of USB-to-TTL adapter that supports 3.3V. Make sure to set it to 3.3V by moving the corresponding jumper. Some examples of TTL adapters are below.
- CH340G
- CP2102
- FT232
- CH341A/CH347 in TTL mode
- Make sure your CH341A is natively outputting 3.3V!
- Raspberry Pi Pico with firmware such as pico-uart-bridge
- Desktop/Laptop.
- Thin multi-color wires, 30 AWG (~0.255 mm) or smaller. 2 meters of 8 colors or more are enough, but remember to shorten them to sub-40 centimeters.
- Using the same color is not recommended, but if you can keep track of them, it works. You can use a Sharpie marker to designate the wires in a pinch.
- Multimeter.
- Wee Tools, Syscon Tools, and NORway (see the Downloads section for info)
Recommended
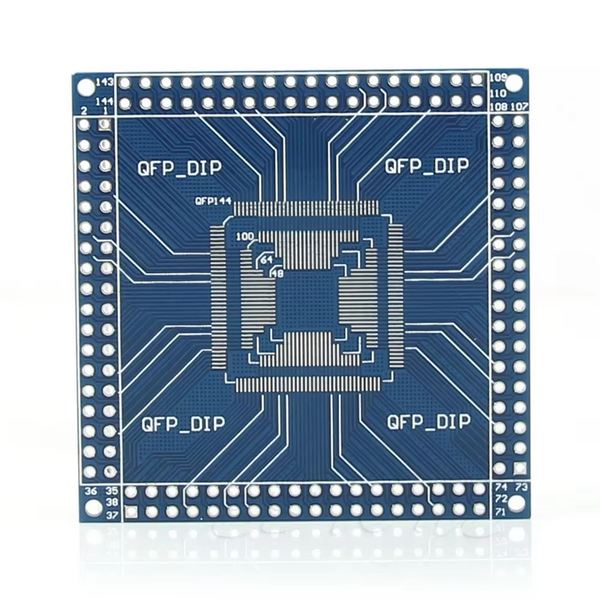
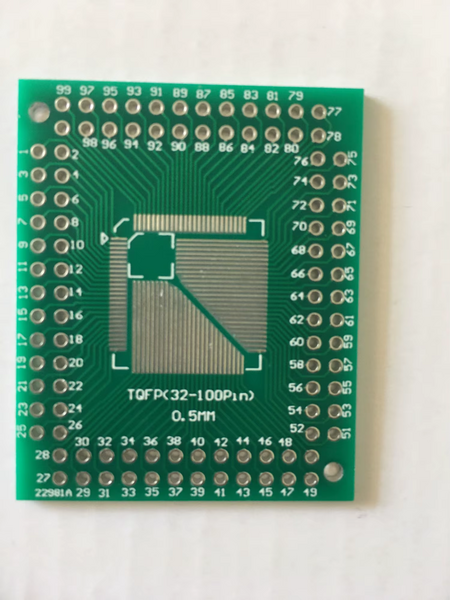
- LQFP100/LQFP64 breakout board for the Syscon. LQFP100 Syscons are used on the CUH-10xx/11xx, and the CUH-12xx/Slim/Pro models use LQFP64 Syscons.
- Breadboard set with Arduino wires, or Arduino wires male and female + male and male. Highly recommended.
- Mini Test Hook Probe Spring Clip - Recommended, as it will help with lifting the Syscon pin with the Teensy.
- Any kind of microscope or magnification will greatly help you.
Tips before starting
How it can go
You need a lot of patience for this, so brace yourself and don't panic if things do not go smoothly. As you read, the guide will try to cover any small issues or common problems.
Soldering
If you are new to soldering or just need some advice for this specific project.
- Use a thin tip and clean it often.
- Use good amounts of flux and be patient if you bridge anything. Use solder wick to remove it. Hot air and the soldering iron with plenty of flux are also good.
- Recommended temperature is 380 Celsius for the soldering iron and 350 Celsius for the hot air gun with an air speed of 30%.
Software
Wee Tools and Syscon Tools, along with NORway, are open-source tools. They are created by trusted people. Writing to the Syscon does have a chance of bricking it, in which case you would need to replace it.
Hardware
When taking apart the console and soldering to the motherboard, be cautious not to damage other parts of it.
Required Downloads
Essential Tools
- PS4 Wee Tools
- Latest Python
- Putty for UART, if on Windows. (optional, can be substituted with any equivalent app, including PS4 Wee Tools itself)
- HxD for file comparison (optional, can be substituted with any equivalent app, including PS4 Wee Tools itself)
- Images to make your own diagrams
- Assets & information from Syscon Tools, PS4 Wee Tools, Modded Warfare, this GBATemp guide, this Reddit post, and NORway will be referenced in the guide.
Pico Tools
- ReneSos (Mirror) for flashing the Syscon
- pico-serprog firmware & Flashrom software for flashing the NOR
- On Windows, you can use the Windows version here.
- On Linux, it's likely you can just install flashrom with your distribution's package manager.
- On macOS, you can get it with brew or MacPorts.
Teensy Tools
- Teensy Loader (also comes with Syscon Tools)
- Syscon Tools (optional, Windows only)
- SPIway from the NORway repository, if you own a Teensy 2.0++ (optional)
- For SPIway, you will also need Python 2.7.2 and pySerial 2.5. Make sure to target the Python 2.7 installation during the pySerial setup.
Spansion NOR reading alternative for Teensy 2.0++
For the Teensy 2.0++, the Spansion-branded NOR chips are not supported in the main NORway repo; you can either use Wee Tools or this edited SPIway version that adds Spansion support.
If you are using a Teensy 4.0 or 4.1 and will be reading on or off the board with a CH341A, you can ignore this.
Unpack this zip and drag and drop the .py file and replace it in the NORway folder. Then use the .hex whenever NOR reading or writing is needed with your Teensy 2.0++
CH341A/CH347/UsbAsp Programmer Tools
If you have one of the aforementioned programmers, you will need one of the apps below, depending on your operating system. If you have a more advanced programmer, such as the XGecu T76, you will need to look into what the manufacturer recommends to use with the device. Note that, if it wasn't obvious before, you will still need a Teensy or Pico to program the syscon IC. These programmers will only be able to read/write to the NOR flash.
- Windows: Either NeoProgrammer (source) or UsbAsp-flash
- macOS/Linux: IMSProg
Wee-Tools Dependencies
- Install the latest version of Python, and tick "Install to path" while also ticking "as admin".
- Open your operating system's terminal, cmd, or Powershell.
- Type out the following command and press enter after each one.
pip install pyserial pycryptodome- If pip fails, make sure Python is installed or run
py -m ensurepip --upgradeorpy get-pip.py.
- You can open Wee-Tools from the "run" script in the root of the zip/folder.
Prepping a Teensy 2.0++
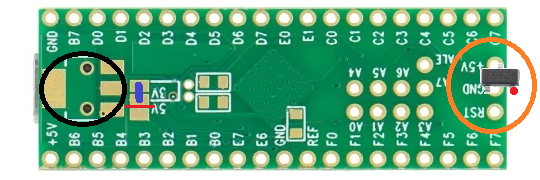
- On the bottom of the Teensy, solder the 3.3V regulator (MCP1825S-3302EDB) in the black circle.
- Make a cut on the board that goes to 5V where the red line is. Confirm there is no continuity to the middle pad with a multimeter. You can then bridge the 2 pads with solder, shown in blue.
- Solder the 3V SOT23 regulator (XC6206P302MR 65Z5) to the ground and 5V on the opposite side of the Teensy shown in an orange circle. The leg of the "65Z5" will be VCC for the NOR (shown in red on the leg).
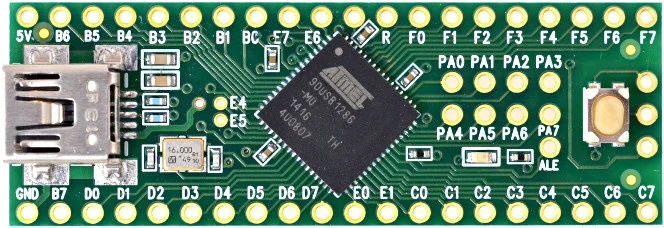
- Install a 100-200 ohm resistor between D2 and D3. You can solder it on or use a breadboard at this point in the process.
- Solder legs to relevant pins of the Teensy (5V-B0, GND, D2, D3, D4, and D5 +) to C6, C7, F6, and F7 for stability on the breadboard.
- You do not have to solder ground (shown in black) to the Syscon pins; you can use ground from anywhere on the board.
Prepping a Teensy 4.0 or 4.1
| The Teensy 4.0 and 4.1 do not have universal easy-to-use NOR firmware, so it is recommended to use one of the other SPI programmer options as mentioned above. |
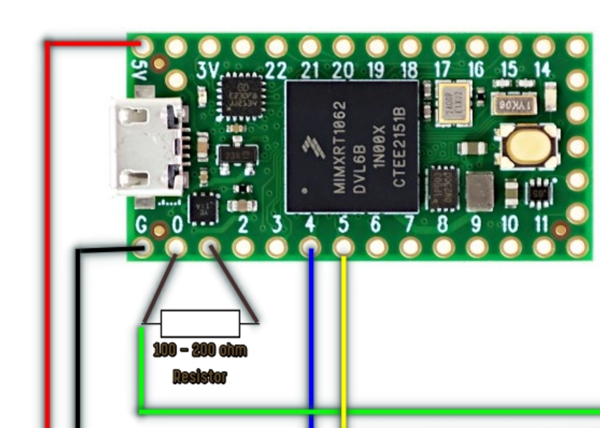
Install a 100-200 ohm resistor between 0 and 1. You can solder it on or use a breadboard at this point in the process.
You do not have to solder ground (shown in black) to the Syscon pins; you can use ground from anywhere on the board.
Prepping a Raspberry Pi Pico
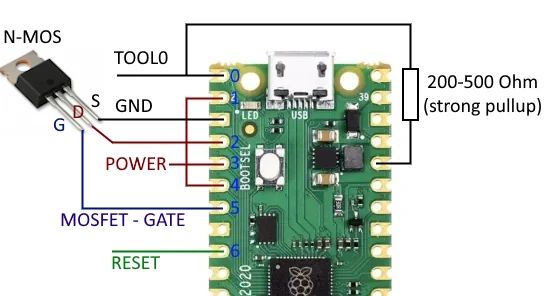
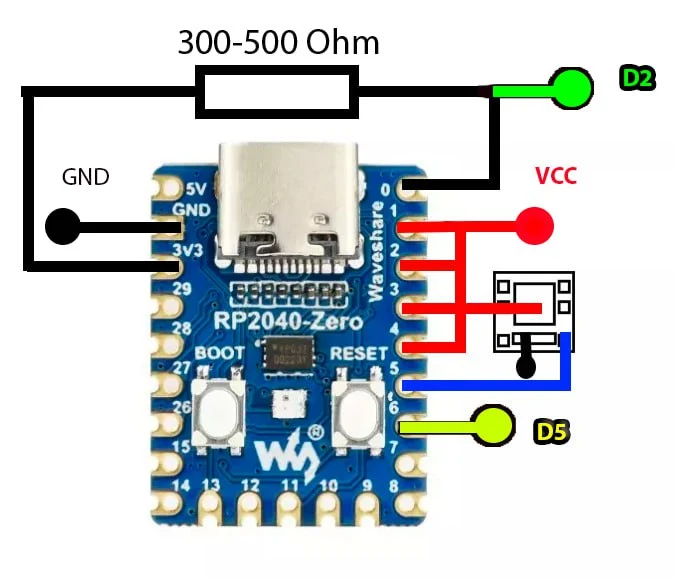
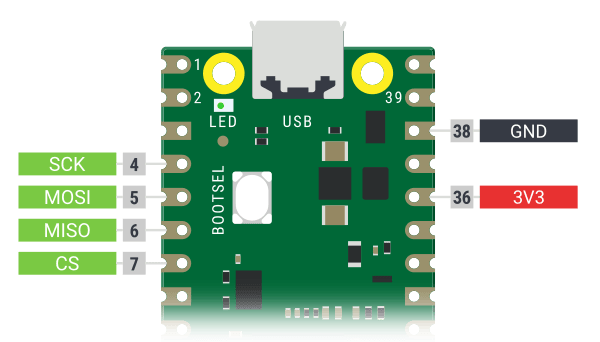
As mentioned in the required hardware section, you will need to have a 200-500 Ohm resistor and an optional MOSFET. The resistor is bridged between GPIO0 (the TOOL0 wire) and the Pico's 3.3V output (located at Pin 36)
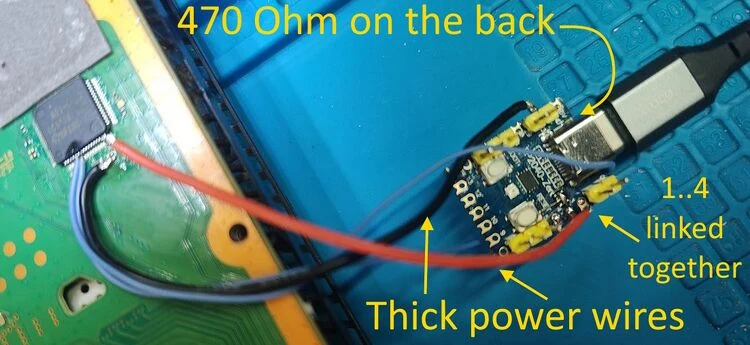
The MOSFET's drain and source pins can be directly inserted into the Pico's pins 3 and 4, respectively, while the gate pin is bent outward to connect to GPIO5. All the pins between GPIO1/2/3/4 (excluding ground at Pin 3) are also bridged together to increase output current. "POWER" is connected to the PS4's 3.3V line, represented in the syscon diagrams below this section as VDD/EVDD.
When not using a MOSFET, you can connect a wire from the bridged GPIOs to the Syscon's VDD/EVDD pins directly. However, you will either need to cut the VCC trace on the PS4 motherboard, or lift both of the VDD/EVDD pins on the Syscon in order for it to work.
Diagram
Raspberry Pi Pico
RP2040-Zero
Prepared RP2040-Zero Example
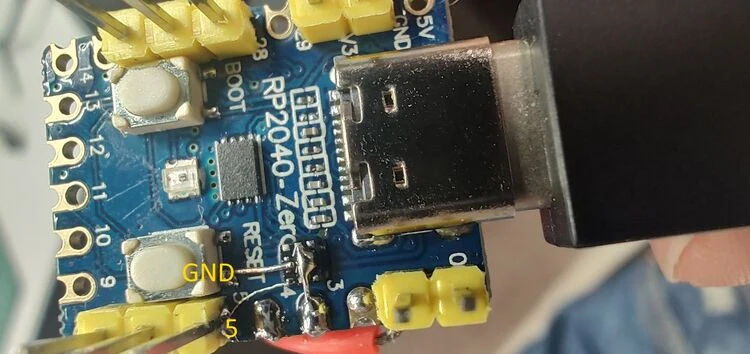
Soldering to the Syscon
| Be very careful when trying to lift the Syscon pin. A few methods are written below, but you have to be very careful. Consider removing it from the board if needed. |
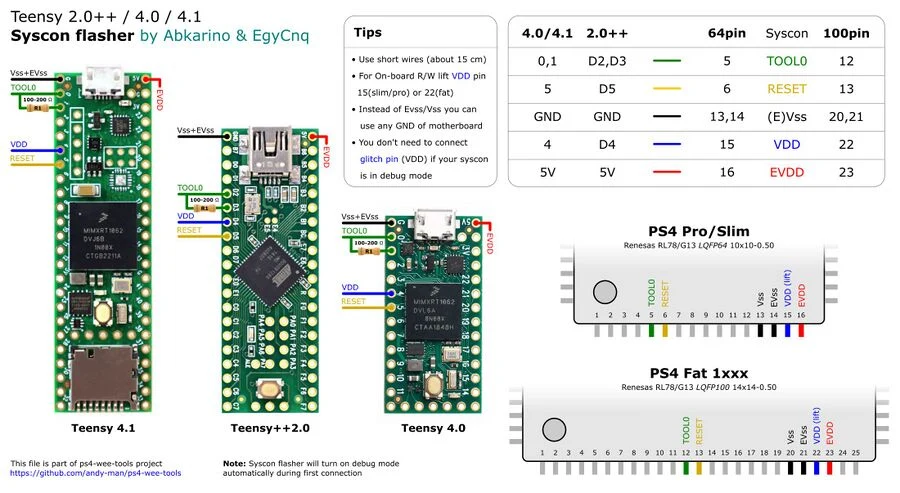
Instead of soldering ground on the Syscon's pins (which are already both connected to ground), you can use ground from anywhere on the PS4 board to the Teensy. The same applies for the TOOL0, RESET, and (E)VDD pins, though if you're not doing the ReneSos MOSFET glitch method, you will still need to lift and solder to the VDD pin.
Diagram(s)
Teensy & Syscon Pinout
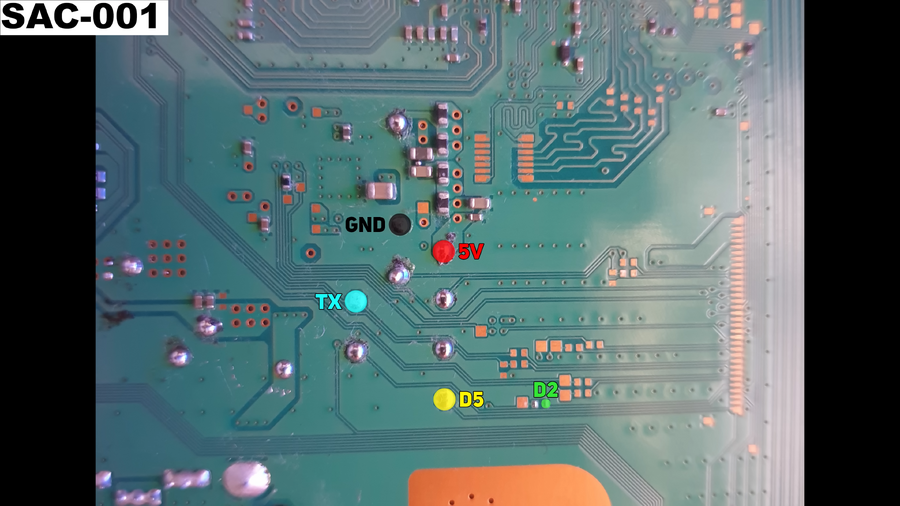
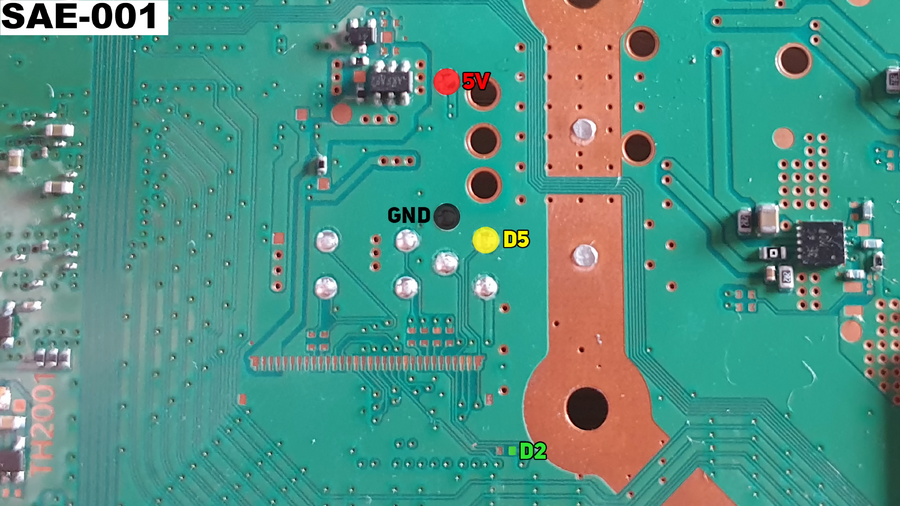
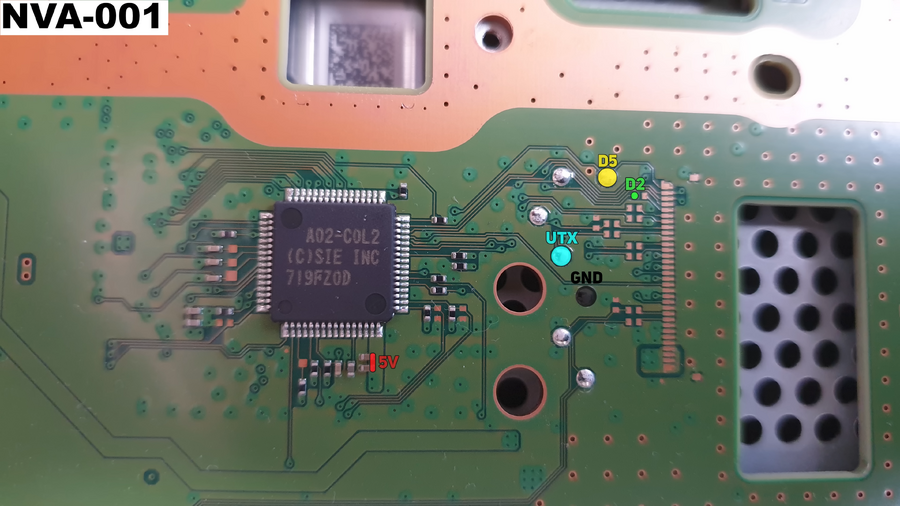
UART & Syscon Alternate Points
Note that if you are soldering to the Syscon for the first time, you will still need to lift and solder to the Syscon's VDD pin unless you're reading it off the board or you're doing the ReneSos MOSFET glitch method.
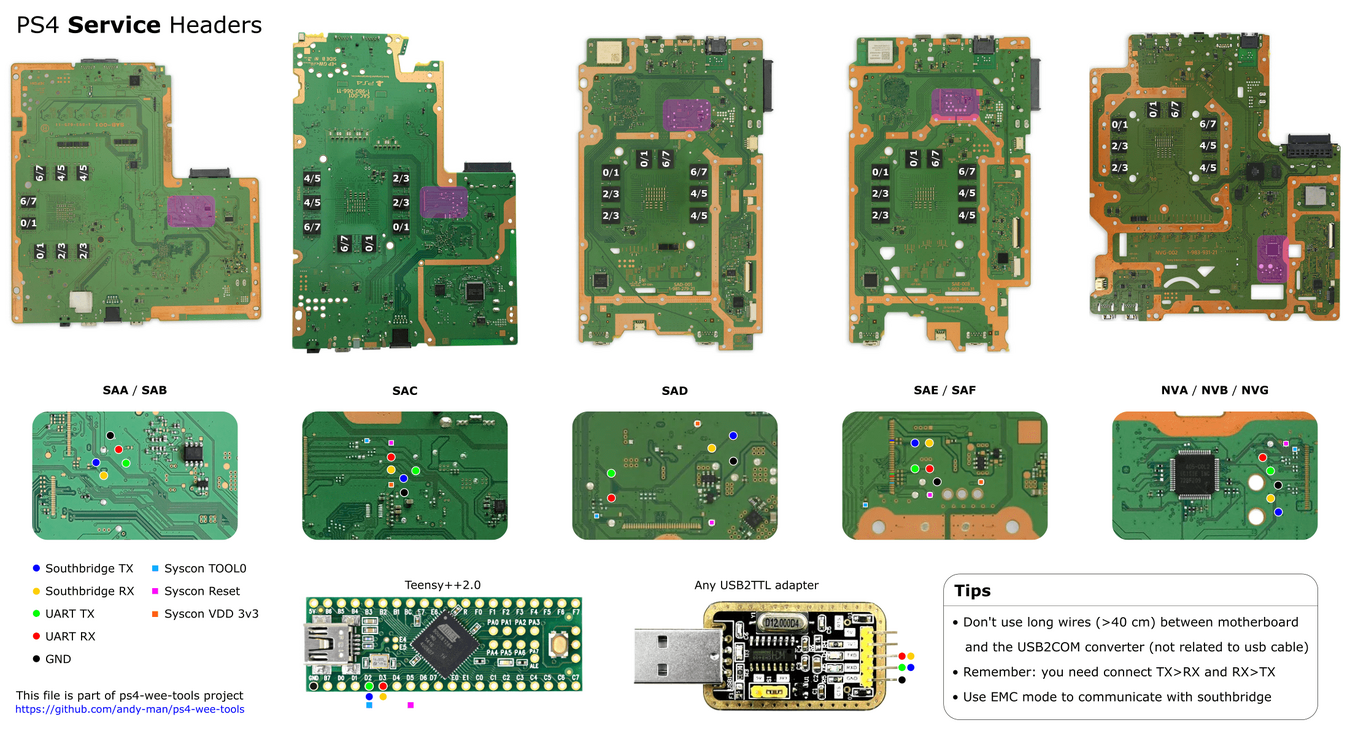
SAA/SAB-001 Alternate Syscon Points
For reference, "D2" is TOOL0, and "D5" is Reset.
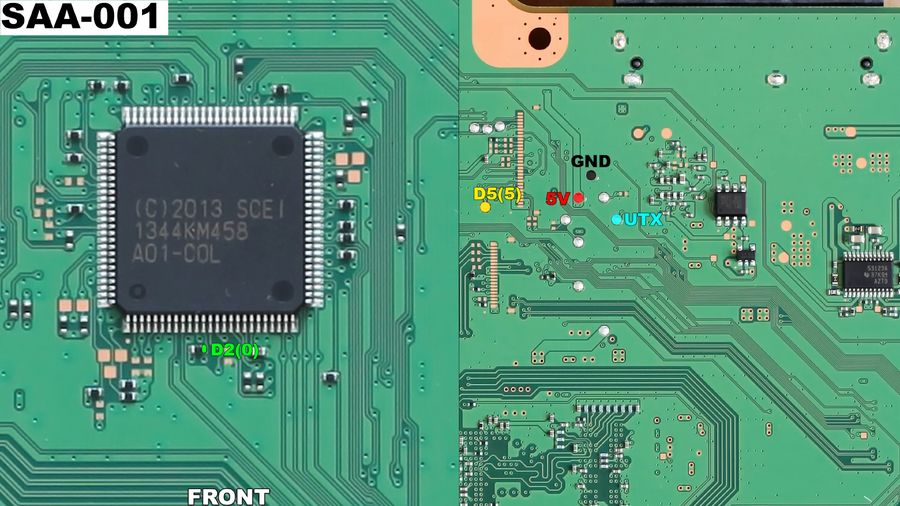
SAC-001 Alternate Syscon Points
For reference, "D2" is TOOL0, and "D5" is Reset.
SAE/SAF-00x Alternate Syscon Points
For reference, "D2" is TOOL0, and "D5" is Reset.
NVA/NVB/NVG-00x Alternate Syscon Points
For reference, "D2" is TOOL0, and "D5" is Reset.
Lifting the Syscon pin
This process can take a long time, even with previous practice. Be very patient and careful, as if you damage the pin, you will have to carry out a repair to reconnect it to the motherboard.
- Apply flux to Pin 15 or 22, depending on your Syscon model 50 or 100 pin.
- Apply solder to lower the melting point.
- Use tweezers, a test hook clip grabber, jumper wires, or solder/tie a wire to the pin.
- If you are using tweezers, you can warm the leg up with the soldering iron or hot air and start lifting it at an angle in both directions.
- If you are using test hooks, you can warm it with the soldering iron until it can move up.
- If you are using a wire, pull upwards extremely lightly while warming it up with the soldering iron.
Desoldering the Syscon
If you do not feel comfortable lifting the pin, you can attempt to lift the whole Syscon from the board. The process is similar to lifting the NOR but is still harder.
- Apply flux around the Syscon.
- Apply solder to the pins of the Syscon to lower the melting point.
- You can stretch tweezers and try to grab it, but be gentle.
- Take your hot air gun and set it to around 400-450 Celsius with airflow of 30-40%.
- Warm up the motherboard around the Syscon; avoid prolonged direct heat to it.
- Once it is warm enough, you can tap it or its pins, and if they move, try to pull up very gently.
- Place it on a breakout board if you have purchased one per the recommendations earlier in the guide.
Reading the Syscon (for all Teensys)
Make as many reads as possible; at least 2 is good. Then, compare each one to each other with their hashes.
Flashing the Teensy
Please note that all disc drive flex cables should be disconnected until you have written back a debug-enabled Syscon dump.
- Connect the Teensy to your computer.
- Open the Teensy Loader app. You can go to PS4SysconTools-main\HW\Loaders and open teensy.exe if you downloaded Syscon Tools.
- Go to Wee Tools, and in the assets\hw\syscon_flasher folder, drag and drop the .hex for your Teensy model into the teensy.exe window. Or do the same thing but with the .hex file PS4SysconTools-main\HW\ in the respective folder for your Teensy model when using Syscon Tools.
Optional: Reading the Syscon off the board
Reading it off the board requires the same wires, but you don't have to lift the pin, since it is not on the board.
With Syscon Tools
- Open Syscon Tools.
- Open the dropdown and select "Dump Full Syscon Flash".
- Dump the Syscon at least two or more times, and place the dumped files in the Wee Tools folder.
- You can compare files in Wee Tools after loading them in it. Simply use the file browser in Wee Tools to navigate to where your dumps are, and press C to compare every file in the current folder. If they are all the same, you can move on.
- Alternatively, you can use any software that allows you to create file hashes, such as 7-Zip or PeaZip. HxD's data comparison feature (Analysis > Data comparison > Compare [Ctrl + K]) can also be used.
- Once you have the dumps, you can set the Syscon aside and then follow the "Patching the Syscon" section.
With Wee Tools
- Open Wee Tools.
- You will now load the Syscon reading and writing part of the software. Make sure you are selecting "Syscon r/w (SCTool by Abkarino & EgyCnq)". Type 4 and press Enter.
- Select the COMX/ttyd port of your Teensy. On Windows, you can check it in Device manager.
- Type 1 and press enter to read all. Wait until the Syscon is dumped.
- Dump the Syscon at least two or more times. You can use Wee Tool's own file manager to compare them; all you need to do is go to the folder with each of your dumps, and if they are all the same, you can move on.
- You can compare files in Wee Tools after loading them in it. Simply use the file browser in Wee Tools to navigate to where your syscon dumps are, and press C to compare every file in the current folder. If they are all the same, you can move on.
- Alternatively, you can use any software that allows you to create file hashes, such as 7-Zip or PeaZip. HxD's data comparison feature (Analysis > Data comparison > Compare [Ctrl + K]) can also be used.
- Once you have the dumps, you can set the Syscon aside.
- Close Wee Tools
Reading the Syscon with ReneSos (Raspberry Pi Pico)
Credit for this information goes to 15432, as he is the one who made both the tool and the original guide on how to use his tool.
Please note that all disc drive flex cables should be disconnected until you have written back a debug-enabled Syscon dump.
Flashing the Pico
- While holding the BOOTSEL button, plug the Pico into your PC. This is needed if your Pico already has firmware on it.
- If your Pico is already blank, you may not need to use the BOOTSEL button, but it won't hurt to use it either way.
- Drag and drop the relay.uf2 file in the new RPI-RP2 folder, and eject the Pico after the transfer is done.
Using ReneSos
- Launch the ReneSos app, and press "Detect" to detect the syscon chip.
- If connected for the first time, "Debug", "Erase", and "Write" are unchecked (this indicates a locked chip)
- Press "Debug Mode", and press "Yes" when asked for Glitch. The glitch exploit will usually be within 30 seconds.
- If it takes more than 5 minutes, check your MOSFET, use thicker/shorter wires, or cut the power trace.
- Select "CodeFlash" and press "Read" to get the full dump. It is recommended to do at least two dumps for verification.
- Select the "Reset" button to completely reset the Syscon chip, removing any security locks. After that, select "Detect" again to ensure the chip is unlocked.
- Select "CodeFlash" again, and click "Write" to write back the dumped data to your syscon. Make sure to say yes to the next prompt that asks to enable debug mode so that you don't have to do the glitching step again.
Patching the Syscon with Wee Tools
Since the first dumps of the Syscon do not have debug enabled, you will do so and take note of the files you've changed. Do not write back non-debug-enabled files to the Syscon after putting the pin down, because you will have to lift it again.
- Open Wee Tools.
- From there, choose 1 to open the file browser.
- Select the Syscon dump file you want to use.
- Type 1 and enter to enable debug. (The file will be updated in real time)
- Select "Auto SNVS Patch".
- Select method B. (Method A can be used for retaining license data for PS Store content.)
- A new Syscon dump file will be generated having "-patch B" in its name. This is what you will write to the Syscon after each NOR switch file write until revert success.
Patching the Syscon to avoid error CE-40947-4
Since the first dumps of the Syscon do not have debug enabled, you will do so and take note of the files you've changed. Do not write back non-debug-enabled files to the Syscon after putting the pin down because you will have to lift it again.
- Open Wee Tools.
- From there, choose 1 to open the file browser.
- Select the Syscon dump file you want to use.
- Type 1 and enter to enable debug. (The file will be updated in real time).
- Select "Additional tools".
- Select "Rebuild Syscon's SNVS" (Factory Reset).
- Type y and press enter.
- A new Syscon dump file will be generated having "clean" in its name. This is what you will write back to the console before updating to higher firmware.
- It is not recommended to both patch the Syscon for revert and for CE-40947-4 avoidance at the same time. It has been observed to work but is not guaranteed.
Patching the Syscon for keeping licenses of PS Store content
- The only difference here is that you have to choose Method A. This will also allow you to keep the licenses for any other installed games, including on external/extended storage.
- A new Syscon dump file will be generated having "-patch A" in its name. This is what you will write to the Syscon after each NOR switch file write until the revert is successful.
Soldering to the NOR
If possible, take the NOR off the motherboard and read it directly. If not, take extreme care to make all cables a similar length and keep them around 6 inches (15 centimeters) or just enough for them to stick out of the console housing.
It is also recommended to be able to completely disconnect the NOR from the Teensy at any point; you can do this by using a breadboard or switches in the middle of the cables going to the NOR.
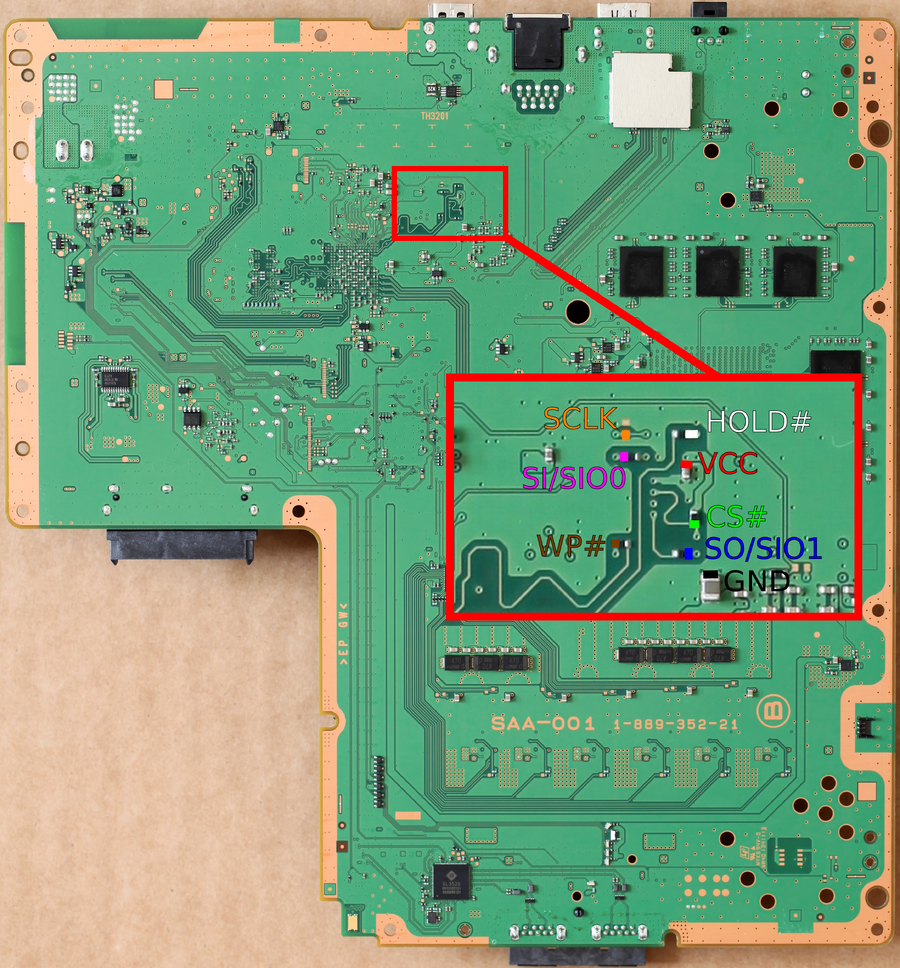
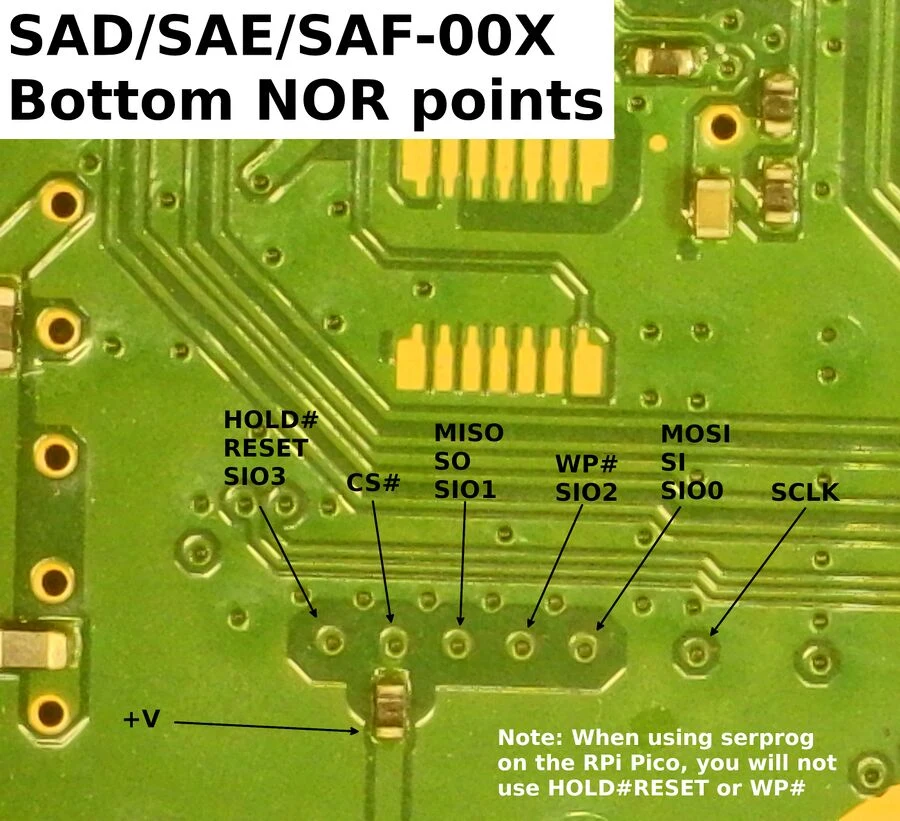
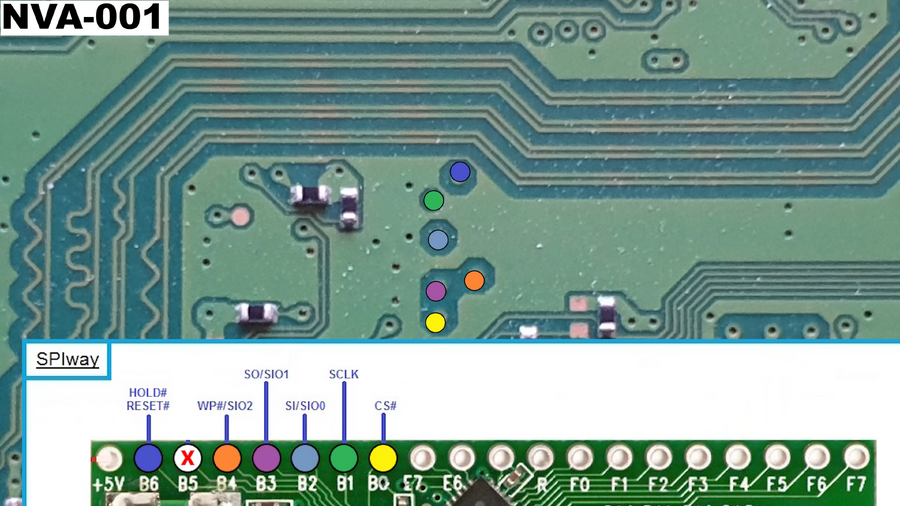
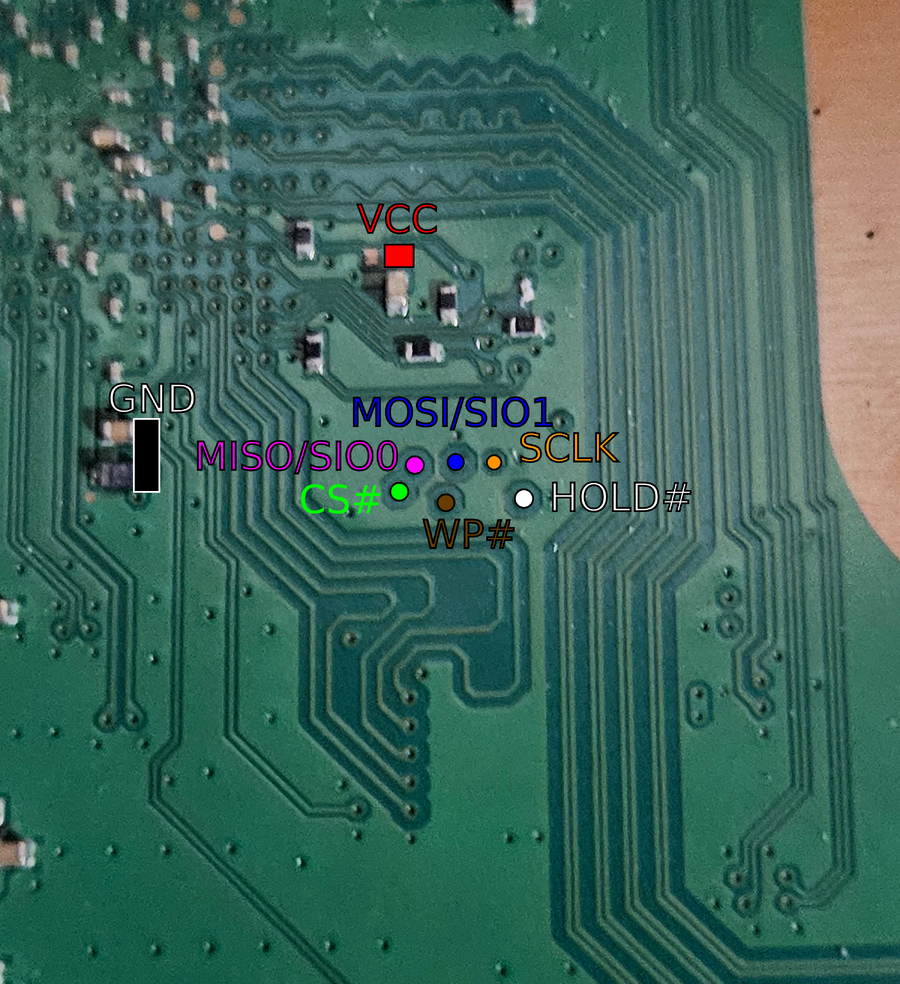
You will need to solder 6-9 wires to the NOR. One is ground and can be taken from anywhere on the motherboard. SIO3 WP# (write protection) is optional, but if you're not connecting it to your flasher, you may be able to tie it to ground with a 10K ohm resistor as an alternate form of disabling write protection.
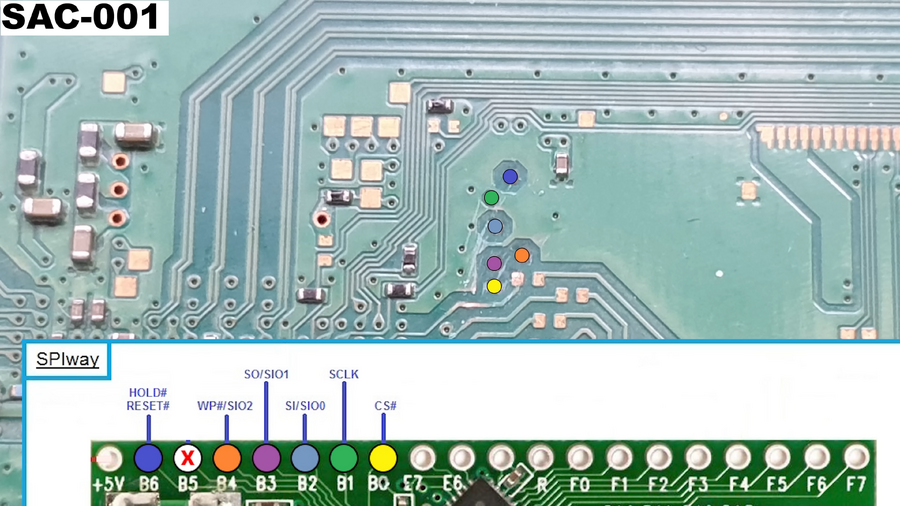
The alternate points for the SAC-001 and Slim/Pro motherboards will also require scraping off the solder mask to solder to them. Please take your time when scraping it to ensure the motherboard isn't irreparably damaged.
Pinouts
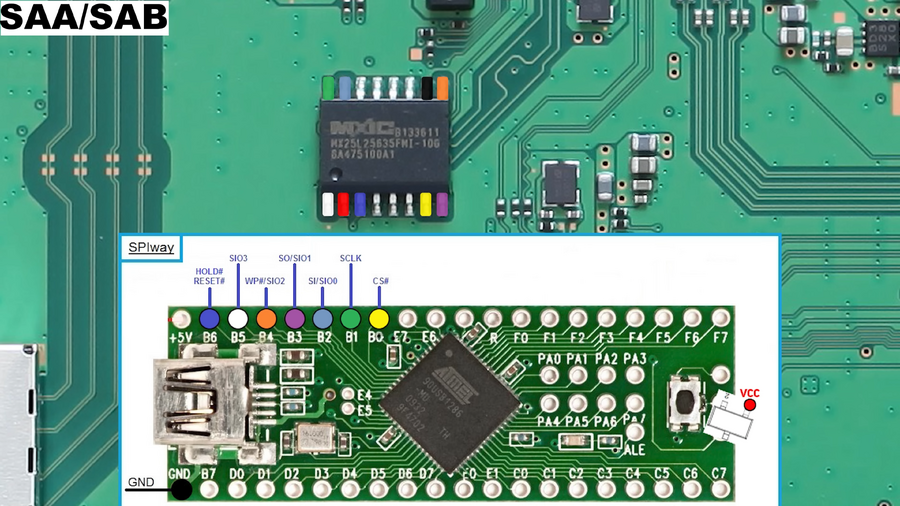
SOP16 (Used on SAA/SAB-001)
| Pin | Function |
|---|---|
| 1 | HOLD |
| 2 | VCC |
| 7 | CS |
| 8 | MISO |
| 9 | WP |
| 10 | GND |
| 15 | MOSI |
| 16 | CLK |
WSON-8 (Used on SAC-001 and all Slim/Pro motherboards)
| Pin | Function |
|---|---|
| 1 | CS |
| 2 | MISO |
| 3 | WP |
| 4 | GND |
| 5 | MOSI |
| 6 | CLK |
| 7 | HOLD |
| 8 | VCC |
Diagrams
Teensy 2.0++ (SPIWay)
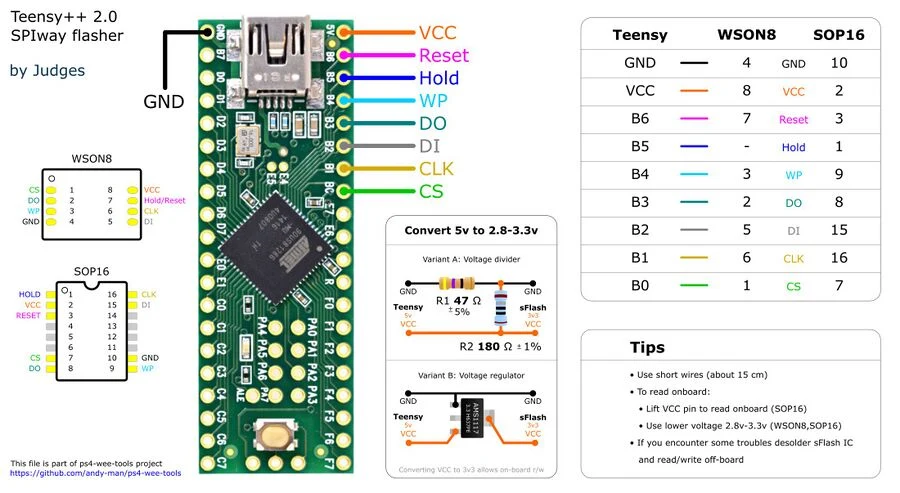
Raspberry Pi Pico (serprog)
SAA/SAB-001 SOP16 Diagram
On these early motherboards, the NOR is on the top of the motherboard, unlike the SAC-001 and Slims.
SAA/SAB-001 Bottom Alternate Points
SAC-001 Bottom Alternate Points
SAD/SAE/SAF-00x (Slim) Bottom Alternate Points
NVA-001 (Pro) Bottom Alternate Points
NVB/NVG-00x Bottom Alternate Points
Desoldering NOR
- Apply flux around the NOR.
- Apply solder to the pins of the NOR (Phat models) to lower the melting point if possible.
- Cover the Southbridge IC and the oscillator with something to protect them from flux and heat.
- Take your hot air gun and set it to around 350-400 Celsius with airflow of 30-40%, depending on the nozzle you use.
- Warm up the motherboard around the NOR chip. Avoid prolonged direct heat to it.
- Gently tap it until it moves off and can be removed.
Reading the NOR
Make as many reads as possible (around 3 is a good amount, but at least 2 should be done), then compare each one to each other using their file hashes. Afterward, use the NOR validator from Wee Tools.
- If you are getting different files, then your wires are not a good length or have a bad connection. Double-check everything.
Raspberry Pi Pico Setup
- While holding the BOOTSEL button, plug the Pico into your computer. This is needed if your Pico already has firmware on it.
- If your Pico is already blank, you may not need to use the BOOTSEL button, but it won't hurt to use it either way.
- Drag and drop the pico_serprog.uf2 file in the new RPI-RP2 folder, and eject the Pico after the transfer is done.
Reading with flashrom
- After you install the flashrom app on your computer, launch your terminal/CMD/PowerShell in the same PATH as the executable, and enter the following command:
-
./flashrom.exe -p serprog:dev=COM5 -r nordump.bin - The COM number is the emulated serial port assigned to the Pico. On Windows, you can check the assigned COM port of your Pico by looking in Device Manager.
-
- It may take up to 10-15 minutes. The Windows version does not have a progress bar. On Linux, you can add the
--progressparameter. - After the first dump is complete, enter the command again, but name the dump file something different (such as
nordump2.bin). Once the dumps are complete, place them in the Wee Tools folder.
Teensy 2.0++ Setup
- Connect the Teensy 2.0++ to your computer.
- Open the Teensy Loader app. You can go to PS4SysconTools-main\HW\Loaders and open teensy.exe if you downloaded Syscon Tools.
- Go to Wee Tools, and in the assets\hw\spiway folder, drag and drop the "spiway_v0.60_teensy2.0.hex" into the Teensy window. You can also do the same thing but with the SPIway.hex file in NORway-master\SPIway\Release if you want to use NORway, the alternative NORway files linked in the Downloads section.
- In the Teensy window, enable auto-load.
- Press and hold the program button on the Teensy for 2-3 seconds, then release it.
- If you have a 4.0 and 4.1, you should follow the Reading with an SPI programmer (CH341A/CH347/UsbAsp/etc.) section.
Reading with Wee Tools
- Open Wee Tools.
- You will now load the NOR reading and writing part of the software. (Double-check that what you are choosing is called "sFlash r/w (SPIway by judges)" as the option.) Type in 3 and press Enter.
- It will list available COM ports. Choose the one that is called "USB Serial Device" (this is usually your Teensy) by typing the number assigned to it and pressing Enter. On Windows, you can check the assigned COM port of your Teensy by looking in Device Manager.
- Once the NOR chip information is visible, you will now read it by selecting the "Read all" option. Type in 1 and press Enter.
- Dump the NOR at least two or more times
- Compare files in Wee Tools after loading them in it. Simply use the file browser in Wee Tools to navigate to where your dumps are, and press C to compare every file in the current folder. If they are all the same, you can move on.
- Validate the NOR dumps you have.
- Close Wee Tools.
- Open Wee Tools.
- From there, choose 1 to open the file browser.
- Find the dumped file you want to validate and select it by its number.
Reading with SPIway (Teensy 2.0++)
This section is only applicable to Windows. It may be possible to set up the prerequisites of SPIway on macOS or Linux as well, but it won't be covered here. It is advised to just use Wee Tools instead.
- Install Python 2.7.
- Install pySerial and make sure to choose Python 2.7 as the installation path.
- Open Cmd in the NORway-master folder.
- Check that you can detect the NOR.
- Type out
py -2.7-32 SPIway.py COMX infoand press enter. Change the X in COM with the COM port of your Teensy. You can check it in Device manager. - If you can read your NOR info, you can continue. You will now dump the NOR.
- Type out
py -2.7-32 SPIway.py COMX dump "filepath"- In "filepath" place a path that you want the files to be saved to along with a file name.
- For example,
py -2.7-32 SPIway.py COMX dump "C:\Users\user\Desktop\nordump01.bin"
- Dump the NOR at least two or more times. Once the dumps are complete, place them in the Wee Tools folder.
- Compare files in Wee Tools after loading them in it. Simply use the file browser in Wee Tools to navigate to where your dumps are, and press C to compare every file in the current folder. If they are all the same, you can move on.
- Once you have the dumps, you can set the NOR aside and place the dumped files in the Wee Tools folder. Then follow the "With Wee Tools" section from step 9.
Reading with a dedicated SPI programmer (CH341A/CH347/UsbAsp/etc.)
This section is for Teensy 4.0 or 4.1 users too.
If applicable, apply the 3.3V mod to your USB Programmer CH341A if you don't want to use the 1.8V breakout board or a CH341A that can natively switch to 3.3V, or another SPI flasher entirely.
Reading on the board
- Find the diagram for your NOR chip and solder the wires to it by looking at the assets in Wee Tools, SPIway, or Images Zip from the Downloads section. You can also create your own diagram between the NOR and Teensy with whatever color wires you have.
- Solder your NOR wires to the plain breakout board.
- If you have a CH341A that can't be adjusted to 1.8V, attach the breakout board to the 1.8V adapter, and attach that to the CH341A.
- If your CH341A can be adjusted to 1.8V, just make sure to set the switch to the 1.8V position and attach the NOR breakout board directly to it.
- Download the corresponding flashing software for your programmer from the link in the Downloads section.
- If you're on Windows, you will need to install the drivers for your programmer. In the AsProgrammer/NeoProgrammer folders, install the driver for your CH341A/CH347 and connect it to the computer.
- When you open it, click "Detect" and select the device. You can now read the NOR.
- Once it is done reading, you can save it. Start with naming it something like "nordump1.bin".
- Use the software to read the chip at least one or more times. You can check the CRC of each read in the little log window at the bottom of the program. If they are all the same, you can move on.
- You can also use other software such as HxD, 7zip, PS4 Wee Tools, etc. to check the hashes of all the dumps if they're the same.
- Once you have the dumps, place the dumped files in the Wee Tools folder.
- Follow the "Patching With Wee Tools" section from step 9.
Reading off the board
- Attach the NOR to the corresponding WSON8/SOP8 or SOP16 breakout board. Make sure pin 1 of the NOR matches with pin 1 on the board.
- Attach the NOR breakout board to the SPI programmer.
- If you have a CH341A that can't be adjusted to 3.3V, make sure to modify it so that it can.
- If your CH341A can be adjusted to 3.3V, just make sure to set the switch to the 3.3V position.
- Download the programming software for your operating system from the link in Downloads above, and connect the programmer to the PC/Laptop
- If you're on Windows, you will need to install the drivers for your programmer. In the AsProgrammer/NeoProgrammer folders, install the driver for your CH341A/CH347 and connect it to the computer.
- When you open it, click "Detect" and select the device. You can now read the NOR.
- Once it is done reading, you can save it. Start with naming it something like "nordump1.bin".
- Use the software to read the chip at least two or more times. You can check the CRC of each read in the little log window at the bottom of the program. If they are all the same, you can move on.
- You can also use other software such as HxD, 7zip, PS4 Wee Tools, etc. to check the hashes of all the dumps if they're the same.
- Once you have the dumps, place the dumped files in the Wee Tools folder.
- Follow the "Patching With Wee Tools" section from step 9.
Patching the NOR
Once your NOR dump is selected in Wee Tools, you will be able to see information about it, such as the console model it came from, its serial number, its southbridge model, and, most importantly, the estimated current and previous slots.
Legitimate CoreOS Patch Method
For this method, you will need to reinstall the firmware version that your console's active slot is currently set at with Safe Mode (making sure to temporarily disconnect your Syscon/NOR tools if they're attached), and then do another NOR dump to get a NOR dump that has the active and backup slots on the same firmware. Luckily, the Syscon does not need to be dumped again for this process.
- First, validate the NOR by typing 8, pressing enter, followed by 6, and enter.
- Then, press enter to go to the previous menu.
- Type 1, press enter, select your original NOR dump, press 1, press 1 again, and press enter to enable UART. Then, type 0 and enter to go back. You can now patch it to swap the active and backup slot.
- Select option 5 for the Legit CoreOS Patch menu.
- Type Y to accept, and select your second dump that has the updated active/backup slots.
- After you are done generating the file, you can close Wee Tools.
Manual Patching Method
- First, validate the NOR by typing 8 and pressing enter, followed by 6 and enter.
- Then press enter to go to the previous menu.
- Type 1 and press enter, then type 1 and press enter to enable UART. Then type 0 and enter to go back. You can now patch it to swap the active and backup slots.
- Depending on your console model, you can use specific patches; they will be generated for you to flash and attempt.
- Next you will select "Switch CoreOS slot" type in 4, and press Enter.
- You will now generate the slot switch files. You will save them as individual files after each go. You will have to write them to the NOR and then write the debug-enabled slot switched Syscon afterward.
- Type in 1 to start applying a patch pattern. (This is what you will redo with 1-14)
- Type y to save it as a separate file.
- Type * to skip flashing it at this moment.
- Do the same thing between steps 9 and 11, with the only difference being choosing different patch patterns 1-14.
- After you are done generating the files, you can close Wee Tools.
As mentioned earlier in the guide, after writing NOR, you have to write Syscon too. This means each time you write the NOR, you need to write to the Syscon again until the revert is successful.
Writing to the NOR
Raspberry Pi Pico
- The flashing process with the Pico is similar to the dumping process, but simply changing one of the command operators. You can also place the patched NOR file in the root of %USERPROFILE% (Windows) or $HOME (macOS/Linux) so it can be accessed more easily in the terminal. An example command is shown below:
./flashrom -p serprog:dev=COM5 -w nordump1_legit_patch.bin
Teensy 2.0++
Writing With Wee Tools
- Open Wee Tools.
- You will now load the NOR reading and writing part of the software. (Double-check that what you are choosing is called "sFlash r/w (SPIway by judges)" as the option.) Type in 3 and press Enter.
- It will list available COM ports. Choose the one that is called "USB Serial Device" (this is usually your Teensy) by typing the number assigned to it and pressing Enter. You can check the assigned COM port of your Teensy by looking in Device Manager.
- Type 10 to erase all NOR data.
- If chip erasure fails, your wires are too long or not the same length, or there is a bad connection. Double-check everything.
- Type s and press enter, then select the NOR dump that has UART enabled and has the slot switch patch you want to attempt to write.
- Then type 4 and press Enter to "Write all" of the previously chosen file. (The option is subject to space changes, so double-check that what you are choosing is called "Write all"
- If writing fails, try a shorter cable between the Teensy and PC/laptop, or check your cables between the Teensy and NOR.
- Type 1 and press enter to read what you just wrote to the NOR.
- You can compare the file you wrote to the file you dumped in Wee Tools after loading them in it. Simply use the file browser in Wee Tools to navigate to where your dumps are, and press C to compare every file in the current folder.
- If they are the same, you can move on.
Writing With SPIWay
Open your terminal/CMD/PowerShell in the NORway-master folder.
- Check that you can detect the NOR.
- Type out
py -2.7-32 SPIway.py COMX infoand press enter. Change the X in COM with the COM port of your Teensy. You can check it in Device manager. - If you can read your NOR info, you can continue. You will now write to the NOR.
- Type out
py -2.7-32 SPIway.py COMX erasechipand press enter. Change the X in COM with the COM port of your Teensy. You can check it in Device manager. - If chip erasure fails, your wires are too long or not the same length, or there is a bad connection. Double-check everything.
- Type out
py -2.7-32 SPIway.py COMX vwrite "filepath"and press enter. - In "filepath" place the path of the NOR dump that has UART enabled and has the slot switch patch you want to attempt to write.
- For example,
py -2.7-32 SPIway.py COMX dump "C:\Users\user\Desktop\nordump01_slot_switch_X.bin"
- For example,
- Wait until it finishes writing. If writing fails, try a shorter cable between the Teensy and PC/laptop or check your cables between the Teensy and NOR.
Writing to the Syscon
Raspberry Pi Pico
Re-flashing Relay.uf2
- While holding the BOOTSEL button, plug the Pico into your PC. This is needed if your Pico already has firmware on it.
- If your Pico is already blank, you may not need to use the BOOTSEL button, but it won't hurt to use it either way.
- Drag and drop the relay.uf2 file in the new RPI-RP2 folder, and eject the Pico after the transfer is done.
Using ReneSos
Note that since you enabled debug mode on the syscon during the dumping process, you will no longer need the MOSFET connected to the Pico to have read/write on the syscon you're working with anymore.
- Launch the ReneSos app, and press "Detect" to detect the syscon chip.
- If connected for the first time, "Debug", "Erase", and "Write" are unchecked (this indicates a locked chip)
- Press "Prog Mode", select "CodeFlash", and click "Write" to write back the dumped data to your syscon.
- You can say yes to the next prompt that asks to enable debug mode, but it's likely not needed as you already enabled it during the dumping process earlier in this guide.
Teensy 2.0++
Re-flashing SPIWay
- Connect the Teensy 2.0++ to your PC/Laptop.
- Go to PS4SysconTools-main\HW\Loaders and open the teensy.exe.
- Go to Wee Tools, and in the assets\hw\syscon_flasher, drag and drop the .hex for your Teensy model into the teensy.exe window. Or do the same thing but with the .hex file PS4SysconTools-main\HW\ in the respective folder for your Teensy model when using Syscon Tools.
With Wee Tools
- Open Wee Tools.
- You will now load the Syscon reading and writing part of the software. Make sure you are selecting "Syscon r/w (SCTool by Abkarino & EgyCnq)". Type 4 and press Enter.
- Select the COMX port of your Teensy. You can check it in Device manager.
- Type s and press enter. Then, select the Syscon dump that has Debug enabled and has been slot switched.
- Type 4 and press enter. Wait for it to write. (Or type 5 and press Enter, then type 2 and press Enter to partially write to "Syscon SNVS/NVS" if you have previously written a full syscon dump and already have debug enabled.)
- Type 1 to read what you just wrote.
- You can compare the file you wrote to the file you dumped in Wee Tools after loading them in it. Simply use the file browser in Wee Tools to navigate to where your dumps are, and press C to compare every file in the current folder. If they are the same, you can move on.
- After writing back a full syscon dump that has debug enabled, in the future, when writing, type 5 instead of 4. 5 allows you to do a partial write to a specific area, "Write area". Choose to write "Syscon SNVS/NVS" by typing 2 and pressing Enter.
With Syscon Tools
- Open Syscon Tools.
- Press on "Options" and select "Enable Advanced Options".
- From the dropdown, select "Write Full Syscon Flash".
- Then select the Syscon dump that has Debug enabled and has been slot switched.
- Enable the option "Verify Dump" and press "Start" then wait for it to finish.
- You can also manually double-check if it fails or if you forget to enable it.
- Open the dropdown and select "Dump Full Syscon Flash".
- Select where you want to save it.
- Press Start.
- You can compare the file you wrote to the file you dumped in Wee Tools after loading them in it. Simply use the file browser in Wee Tools to navigate to where your dumps are, and press C to compare every file in the current folder.
- If they are the same, you can move on.
After writing back a full Syscon dump that has debug enabled, in the future when writing, pick "Write Syscon NVS/SNVS Only" instead of "Write Full Syscon Flash" if you are reverting.
Soldering the NOR back
- Apply flux and clean the pads of solder or apply solder to them to mix and add lower-temperature solder.
- Clean the flux and apply fresh flux.
- Align the NOR and reflow it, or solder one leg and reflow it.
- Clean the flux and confirm there are no bridging or loose pins.
Putting the Syscon pin down
After you have written the debug enabled + slot switched Syscon dump, you can now desolder the wire and put the pin down. Make sure it is soldered down. The rest of the wires have to stay for now or permanently if you so desire.
Soldering the Syscon back
There are a few ways you can solder it back.
Flowing it on
- Apply flux and clean the pads of solder, or apply solder to them to mix and add lower-temperature solder.
- Clean the flux and apply fresh flux.
- Align the Syscon correctly and secure it by soldering a few pins on each side to the pads.
- Take your hot air gun and flow it back into place.
- With tweezers, check the pins and confirm they are all soldered down.
- Use solder wick to wick away any bridges and check for shorts between every pin with a multimeter.
Manually soldering each pin
- Apply flux and clean the pads of solder, or apply solder to them to mix and add lower temperature solder.
- Clean the flux and apply fresh flux.
- Align the Syscon correctly and secure it by soldering a few pins on each side to the pads.
- Solder down each one individually.
- Use solder wick to wick away any bridges and check for shorts between every pin with a multimeter.
Drag soldering
This method can create a lot of bridged pads; do not do it if you do not have solder wick.
- Apply flux and clean the pads of solder, or apply solder to them to mix and add lower-temperature solder.
- Clean the flux and apply fresh flux.
- Align the Syscon correctly and secure it by soldering a few pins on each side to the pads.
- Drag the soldering iron slowly across the pins and solder them down.
- Use solder wick to wick away any bridges and check for shorts between every pin with a multimeter.
UART
You can use UART to see boot logs to find out if the revert is successful or to check your current slots before reverting. UART needs to be enabled by dumping & patching the NOR or by jailbreaking (see Getting Started) and running the permanent UART payload.
Solder wires to the UART points depending on your model, shown in the UART & Syscon Alternate Points section.
- Make sure to set your USB to TTL adapter to 3.3V by moving the corresponding jumper.
https://github.com/EchoStretch/ps4-payload-sdk/releases/latest
https://github.com/Al-Azif/ps4-payload-guest
https://github.com/TheMagicalBlob/Blobs-Payload-Sender/releases/tag/1.7.1-Final
Using Wee Tools
In the main Wee Tools menu, press 2 to enter the UART mode, and select your TTL adapter.
Using Putty (Windows)
- Install Putty.
- Connect your UART-TTL device to the PC/Laptop.
- In Putty "Serial line" write the COMX of your UART-TTL device.
- In "Speed" write 115200.
- In "Connection type" select Serial.
- You can now give it a name in "Saved Sessions," then press on save.
- Press on Open at the bottom.
Booting
- Sever the connection between the PS4 and Teensy/Syscon/NOR, then connect UART and partially assemble the console and boot it.
- Observe the boot logs and reference "UART previous and current firmware information" from earlier in the guide.
- If your active slot becomes the previous desired firmware, you can now reinstall firmware and test the console shortly before removing all wires and putting it back together or leaving them in for a permanent revert setup.
- If you fail to boot into the inactive slot, you will have to restart the process and write a different NOR switch slot file while writing the same patched Syscon file.
Retaining Artemis Game Demos or your data in general
| Do not download firmware from the PlayStation website! Sony only hosts the latest unexploitable firmware version. Also, remove any discs from the console. |
Using this option, your new or current internal storage will retain the current data but reinstall the current active firmware.
You cannot downgrade firmware by replacing the HDD or trying to install older firmware from a USB drive. See FAQ for a more detailed explanation.
On the 2 websites below, retail/official firmwares are update files that let you update from, for example, firmware 8.50 to 9.00. Do not download them. On the 2 websites below, recovery firmwares are firmware reinstallation/recovery files that you can use when prompted for firmware after reverting; they WILL allow you to retain current user data on the drive.
- Download the desired recovery firmware version file onto your PC by visiting one of the following sites. Do not get beta firmwares.
- DKS - PS4 Official Firmwares - Recommended because of the faster download speeds.
- PS4 Firmwares - Darthsternie's Firmware Archive - No account or CAPTCHA required, but slower download speeds.
- Unpack your archive and or rename the .PUP file to PS4UPDATE.PUP (must be in all caps).
- Prepare a USB stick drive by formatting it to FAT32 or exFAT and creating a folder on the root of the drive named PS4 and another folder inside PS4 named UPDATE. Copy PS4UPDATE.PUP into the UPDATE folder. The final structure should look like this:
PS4 > UPDATE > PS4UPDATE.PUP. - Plug the USB stick into an empty slot on your PS4.
- Boot the PS4 and press OK when it asks you for a USB with your current firmware. Accept any prompts.
- The PS4 will now install the firmware on the HDD, and you will reboot with the demos retained and active.
Reinstalling current firmware
| Do not download firmware from the PlayStation website! Sony only hosts the latest unexploitable firmware version. Also, remove any discs from the console. |
Using this option, your new or current internal storage will be a clean install if the drive is new.
You cannot downgrade firmware by replacing the HDD or trying to install older firmware from a USB drive. See FAQ for a more detailed explanation.
After replacing your internal storage (Guides for replacing PS4 internal storage)
On the 2 websites below, retail/official firmwares are update files that let you update from, for example, firmware 8.50 to 9.00.
On the 2 websites below, recovery firmwares are firmware reinstallation/recovery files that are used when replacing the HDD, and in either case you can stay on the same firmware you are currently on or update to a higher firmware while changing the HDD.
- Download the desired recovery firmware version file onto your PC by visiting one of the following sites. Do not get beta firmwares.
- Since you are only replacing the drive, you want to stay on the current firmware, so download recovery firmware for the same firmware you are currently on.
- DKS - PS4 Official Firmwares - Recommended because of the faster download speeds.
- PS4 Firmwares - Darthsternie's Firmware Archive - No account or CAPTCHA required, but slower download speeds.
- Unpack your archive and/or rename the .PUP file to PS4UPDATE.PUP (must be in all caps).
- Prepare a USB stick drive by formatting it to FAT32 or exFAT and creating a folder on the root of the drive named PS4 and another folder inside PS4 named UPDATE. Copy PS4UPDATE.PUP into the UPDATE folder. The final structure should look like this:
PS4 > UPDATE > PS4UPDATE.PUP. - Plug the USB stick into an empty slot on your PS4.
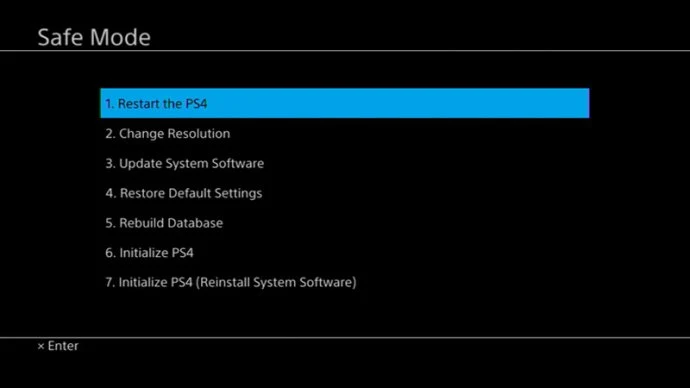
- Boot into PS4's recovery settings by turning off the PS4 and holding the PS4 power button until it beeps 2 times. Recovery mode should look like this:
- Once in Safe Mode, choose option 7. Initialize PS4 (Reinstall System Software)
- Press OK, YES, NEXT, or ACCEPT to any additional options.
- The PS4 will now install the firmware on the HDD.
- REMOVE ANY ETHERNET CABLE AND/OR SKIP WI-FI SETUP. Keep everything offline during and after setting up your PS4.
- After setup, navigate to Settings > System > Automatic Downloads > Uncheck Featured Content, System Software Update Files, Allow Restart and Application Update Files.
- See: Blocking OFW Updates
Permanent setup tips
- If you’re doing a permanent mod, a workaround is to use one of those DIP switches found on AliExpress or other stores. When turning the switch on, it won’t boot but it will give you the ability to R/W the NOR chip. When turning off, you can’t R/W the NOR chip, but you can boot it.
- Keep wires as short as possible and use connectors from the aforementioned Arduino kits in recommended items.
- When putting the console back together, take time to make sure wires are not being crushed extensively or are in the path of a screw.
- You can always flash the NOR and Syscon files post UART and debug enabling to return to the current firmware you started on. Or make a new dump of the lowest firmware available to you post revert.
- Do not write back a non-debug-enabled Syscon dump. It will force you to lift the pin again to enable Debug.
Troubleshooting
Hardware
- Plugging the USB into the Teensy while the PS4’s power cable is in: If you plug in the USB into the Teensy, with all the wires connected, while the PS4’s power cable is in, it can cause the Teensy to fail or may cause issues with the Syscon chip or the NOR chip. Try avoiding this.
- CS# (B0) pin of NOR chip is connected: If the CS# pin of the NOR chip is connected (soldered) to the Teensy, plugging the PS4 in will cause it to beep 3 times and have a blue light staying on constantly. If powered off and then on, it will act dead. To fix it, just desolder the CS# pin from the PS4 motherboard, and it will boot up normally (if you have working NOR/SYSCON dumps written on it, obviously)
- 3 beeps with blue light staying on (BLoD): Bad soldering on board
- If the solder on the motherboard is excessive around the NOR chip area, or solder touches in contact with scraped parts of the board (you know, when you scratch to reveal the copper points, you might also accidentally scratch outside that point, leaving copper to show), it might do the same issue. To fix it, simply clean off all the solder from the NOR chip area (alt points, maybe the chip itself too) as well as excess solder that might’ve gotten onto resistors. Clean with IPA as well.
- No signs of life/no power: PIN 15/16 or PIN 22/23 (VDD/EVDD0) not connected properly
- If the VDD pins are not connected on the ground pad (the pads below), it will fail to give any sign of life. Could also happen if PIN 15/16 (NOT pin 22/23) pins are not bridged.
- If you used resistors near NOR for read/write, bad soldering can cause no signs of life. Check that everything is soldered correctly by performing a beep test from the IC pins to the other ends of the resistors.
Software
NOR and Syscon writing
- Always write to the NOR first, then the Syscon. If you are stuck at a blue light, it means you wrote out of sync and have to start over and write to NOR, then Syscon, to get back on track. This is why having NOR and Syscon backups is important.
- Never write back a Syscon dump that has debug disabled. You can, though, keep the original dump separate and patch a copy of it.
- If you are getting different NOR dumps or Syscon dumps, check your soldering, but it will most likely be the cables being too long. Shorten them or desolder the chip and read it in an alternative way.
NOR reading/writing
- Always read back the NOR after writing and compare it to what you wrote.
- If you cannot get any data from the NOR, double-check your wires are in the correct points on the Teensy. (Applies to Wee Tools and NORway).
- If you cannot erase the NOR, it is an issue with the wires. Shorten them or make them the same length, or both.
Syscon reading/writing
- Disconnect all the disc drive flex cables until you write back a debug-enabled dump.
- In case writing to Syscon fails, retry writing, and if you continue to be unable to write to it, then it may be bricked and will need to be replaced.
- If Syscon Tools cannot read or write, reboot the Teensy.
- If the Syscon cannot be exploited even though debug is enabled, it is an issue with the wires. Shorten them or make them the same length, or both.
Missing homebrew apps or games (retail & FPKGS)
If retail packages are missing after the revert, you should rebuild the database from safe mode. If they come back, you can then rebuild the FPKG database to return homebrew apps and FPKG games. If retail apps and games do not come back from rebuilding the database in safe mode, then after jailbreaking and rebuilding the FPKG database, they will return alongside any homebrew and FPKGs. See: Rebuilding FPKG Database
Oops, I broke something
- If you broke the Syscon pin, try to very gently solder a thin enamel wire to it and tape it to the top of the chip, then enable debug mode to read it and either solder the wire down when you are done or replace the chip.
- If you knocked off a component somewhere, you will have to post online to Discord or Reddit and ask for help getting its value.
- If the console is not booting, double-check for shorts or other potential issues.
References/Thanks
- AlAzif for wiring and NOR reading/writing information, CoreOS slot behavior, along with all their contributions to the scene.
- Dr.Cryogenic for soldering advice, software tips, CoreOS slot behavior, and revert specific steps.
- Teligin174 for NOR reading, coreOS behavior, and revert advice.
- forte500 for internet connection warning and game-locking behavior.
- Bread for troubleshooting documentation.
- The creators of: