This page will explain the various ways you can install pkg/fpkg files to a homebrew enabled PS4.
Quick Facts
Recommended order of installation
To avoid any issues, the recommended order of installing files is Base Game → Update → DLC.
What are PKGs and "FPKG"s?
In short:
- pkg = Official game, update or dlc file a normal pkg that checks the user who launches the app has a license to run they are usually game updates found on Orbis-Patches used to update your retail owned games digitally and physically while running GoldHEN.
- fpkg = dumped game with fake verification via Debug or GoldHEN.
- All pkg files come in the .pkg file format
- An active internet connection refers to your PC and or PS4 being able to connect to your router (or hotspot) via Wi-Fi or Ethernet.
What is a Title ID?
- The product code is distinct to a region, and the common codes you’ll see are CUSA, PCAS, and PLAS.
- R1 USA - CUSA
- R2 Europe - CUSA
- R3 Asia - PLAS, PCAS
- The product code is followed by a 5 digit unique number identifier.
- The Title ID is the Product code along with the unique numerical identifier of the game.
- For example, the USA version of Minecraft is CUSA00744, while the European version of Minecraft is CUSA00265.
- Another example Resident Evil 2, where USA is CUSA09193, while Asia is PLAS10335.
- The majority of games you come across will use CUSA.
How to install retail game updates
Note that you can only dump or play game updates compatible with your current firmware or lower than it.
You can only install retail game updates onto disc/digital games, not FPKG ones.
Using Itemzflow
Disable your DNS so you are able to download retail content directly to the console. You can do this by setting up your internet connection again and choosing the "Easy" setup.
- Download and install Itemzflow then launch it.
- Go to your disc/digital game select it by pressing

- Select "Retail Game Updates" by pressing
- Scroll through available updates
- Select the update you want to install and press .
Using OrbisPatches
- Download the update from Orbis Patches
- Download pkg-merge to merge the parts into one (if needed) by placing all the parts into a folder and dragging the folder onto the pkg-merge exe and waiting for it to finish
- Then install the merged pkg update via one of the methods below.
USB Method
You can use any kind of USB drive or External USB-HDD/SSD enclosure as long as it can power on from the usb port and is formatted in EXFAT
- Format your drive to ExFAT.
- Place your pkgs on the root of drive, and plug the drive into your PS4.
- After jailbreaking or while jailbroken, go into the GoldHEN menu at the top left of the home screen.
- Go into Debug Settings.
- Under "Package Installer" make sure "Package Source" is usb [ usb:/ ] if it is Hdd [ hdd:/data/pkg/ ] change it to usb[ usb:/ ]
- Go into Package Installer
From there, you can choose to install any 1 pkg you want, or alternatively you will be automatically asked if you want to install all the available pkgs.
Over a network connection
 | FTP methods transfer to the console and then install. The downside is that it takes up double the storage, but if you are having trouble with software tools, it is a good alternative. |
| GoldHEN 2.3 or above required. |
Connection methods
Connecting a PS4 to a PC Without an Active Internet Connection
This involves connecting the PS4 and PC to each other with an Ethernet cable, but without an active internet connection on the PC.
This method is fast, but slightly technical.
Windows
- After jailbreaking, connect an Ethernet cable between your PC and PS4
- Create a folder called "pkg" and put your pkgs inside of it
- Connect your PS4 to your PC with a LAN cable (in case you unplugged it)
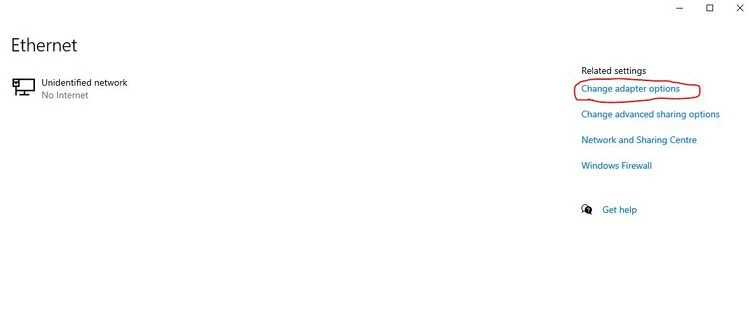
- On your PC go into Start → Settings → Network & Internet → Ethernet and then, at the top right, choose "Change Adapter Options". You can also access the adapter settings by pressing Windows Key + R writing ncpa.cpl in the Run program, and pressing enter.
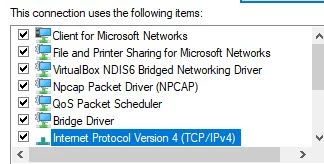
- Find the Ethernet Adapter you are using and right click on it then choose "properties"
- Double left click on "Internet Protocol Version 4 (TCP/IPv4)"
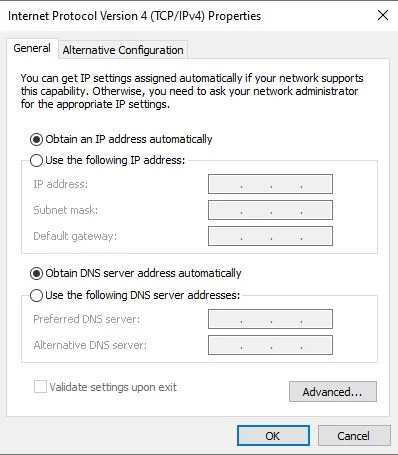
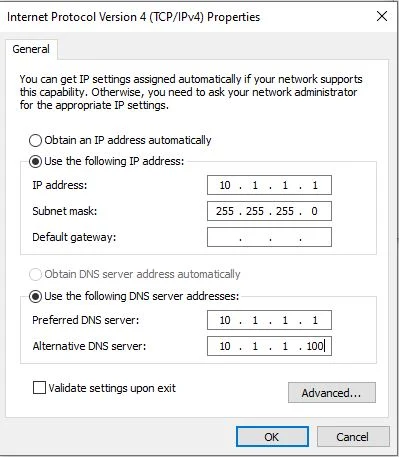
- Press on the empty circle next to "Use the following IP address:" to unlock the fields below it
- Fill them in to match as shown in the image below
- Go to your PS4, and go into Settings > Network > Set Up Internet Connection
- Choose "Use a LAN Cable" then choose "Custom" then choose "Manual"
- Set "IP Address" to "10.1.1.2"
- Set "Subnet Mask" to "255.255.255.0"
- Set "Default Gateway" to "10.1.1.1"
- Set "Primary DNS" to "10.1.1.1"
- Set "Secondary DNS" to "10.1.1.100"
- Set "MTU Settings" to "Automatic" Set "Proxy Server" to "Do Not Use"
- Test Internet Connection and once you get an IP Address go back to the home screen.
macOS (Automatic IP)
After jailbreaking, connect your PS4 to your Mac via Ethernet. You may need a USB Ethernet adapter if either your Mac doesn't have any extra Ethernet ports, or you are already using the built-in Ethernet port for its current internet connection.
Afterwards, test the internet connection on the PS4. Once you get an IP Address, go back to the home screen.
macOS (Manual IP)
- After jailbreaking, connect your PS4 to your Mac via Ethernet.
- You may need a USB Ethernet adapter if either your Mac doesn't have any extra Ethernet ports, or you are already using the built-in Ethernet port for its current internet connection.
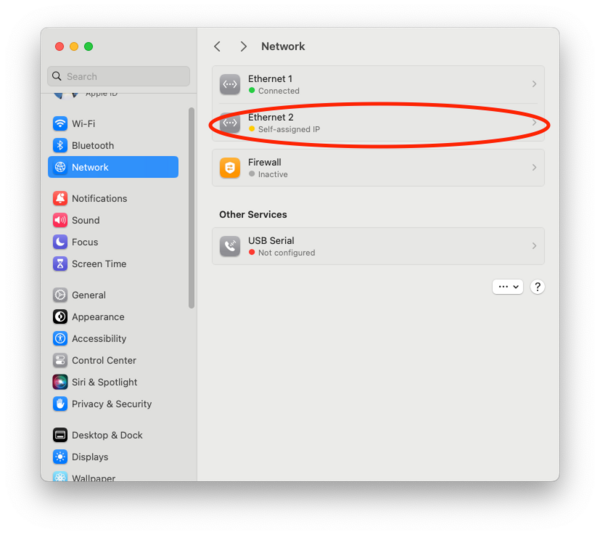
- Go to the your Mac's Network settings in System Settings → Network. You can do this quickly by opening Spotlight with Command + Space, and searching
networkin the search bar. - Select the Ethernet adapter used to connect the PS4 to the Mac.
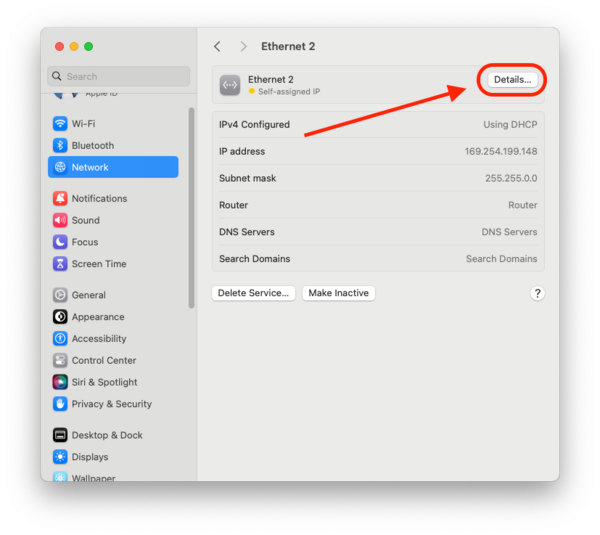
- Select its Details menu.
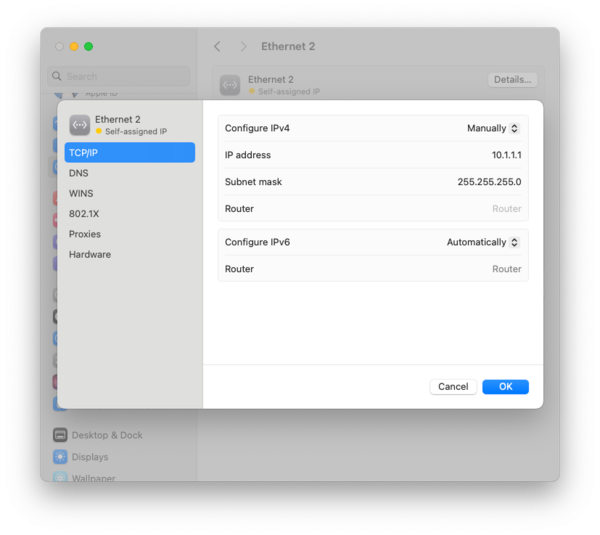
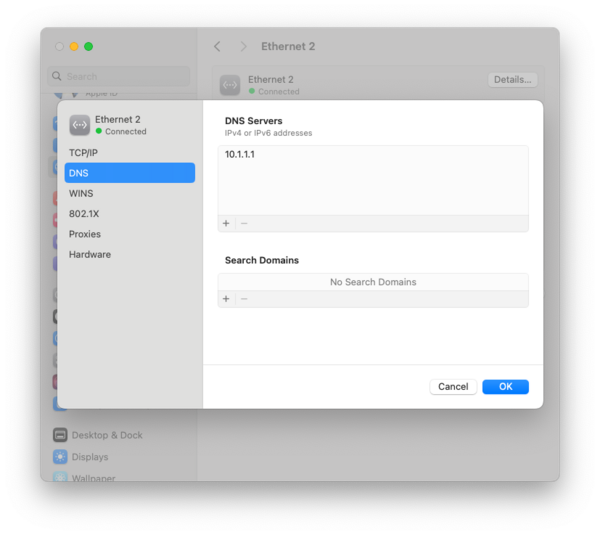
- Enter the following settings for TCP/IP and DNS.
- Go to your PS4, and go into Settings > Network > Set Up Internet Connection
- Choose "Use a LAN Cable" then choose "Custom" then choose "Manual"
- Set "IP Address" to "10.1.1.2"
- Set "Subnet Mask" to "255.255.255.0"
- Set "Default Gateway" to "10.1.1.1"
- Set "Primary DNS" to "10.1.1.1"
- Set "Secondary DNS" to "10.1.1.100"
- Set "MTU Settings" to "Automatic" Set "Proxy Server" to "Do Not Use"
- Test Internet Connection and once you get an IP Address go back to the home screen.
Connecting a PS4 to a PC with a Bridged Internet Connection
This method involves connecting the PS4 and PC to each other with an Ethernet cable, but also bridging the PC's internet connection to the PS4. It's faster and easier to set up than the first method, in while also having the bonus of internet access for the web browser, streaming apps, HB Store, or updating GoldHEN cheats/plugins over the internet.
Windows
- After jailbreaking, connect your PS4 to your PC via Ethernet.
- Go to your LAN adapter settings. You can do this by pressing Windows Key + R, writing
ncpa.cpl, and pressing enter. - You can then right click on your Wi-FI or Ethernet adapter that has an active internet connection and then then right click and choose Properties.
- Find the Sharing tab, and tick the
Allow other network users to connect through this computer's internet connection. - Create a folder called "pkg" and put your pkgs inside of it.
- On your PS4, setup a normal LAN internet connection with all default settings.
- Go to
Settings, and thenNetwork - Select
Set Up Internet connectionand chooseUse a LAN Cable. - Choose
Easy. - Choose
Automaticfor the IP Address settings.
- Go to
- Test Internet Connection and once you get an IP Address go back to the home screen.
macOS
- After jailbreaking, connect your PS4 to your Mac via Ethernet.
- You may need a USB Ethernet adapter if either your Mac doesn't have any extra Ethernet ports, or you are already using the built-in Ethernet port for its current internet connection.
- Go to the your machine's sharing settings in System Settings → General → Sharing. You can do this quickly by opening Spotlight with Command + Space, and searching
internet sharingin the search bar. - On the drop down menu for
Share your connection from, select the device that's being used for the Mac's current internet connection (either the Wi-Fi, or an available Ethernet adapter) - Under
To devices using, select the other Ethernet adapter connected to the PS4. You can leave the NAT64 option disabled. - Create a folder called "pkg" and put your pkgs inside of it.
- On your PS4, setup a normal LAN internet connection with all default settings.
- Go to
Settings, and thenNetwork - Select
Set Up Internet connectionand chooseUse a LAN Cable. - Choose
Easy. - Choose
Automaticfor the IP Address settings.
- Go to
- Test Internet Connection and once you get an IP Address go back to the home screen.
LAN connection on both devices through a router with Wi-Fi or Ethernet
This method is very slow over Wi-Fi (especially on early CUH-1XXX models, as they only have 2.4 GHz Wi-Fi!) but is easy to setup.
After jailbreaking, connect your PS4 and PC to your home network over Wi-Fi or Ethernet.
PKG Installation Methods
Itemzflow
Itemzflow is the most stable way to install, even though the setup is a bit technical.
The NFS folder path should have no spaces. Disable firewall or reinstall drivers for WLAN and LAN if connection issues persist.
Windows CLI
- On Windows, download Winnfsd
- Open a cmd window and cd to where WindNFSd.exe is located.
- Type in
ipconfigand press enter to find your current IP address and take note of it. - Copy the path of the folder you want to mount onto the PS4. Create a new one anywhere if needed.
- You can now start the NFS by typing in the following command.
WinNFSd.exe -addr yourIP pathtotheNFSfolder / - For example:
WinNFSd.exe -addr 192.168.1.14 D:\PS4\Games /
Windows GUI
- On Windows, download Winnfsd
- Download Easy NFS GUI
- Open the Easy NFS GUI application.
- Set the share folder (for example D:\PS4\Games) and your IP by reading your current IP or using the "IP info button" to view all IP info, and type it out manually.
- Press the "Run NFS server" button.
macOS Terminal
Luckily, macOS has had build-in nfsd support ever since Mac OS X Jaguar, so nothing needs to be installed in order to use it.
There is also a third party GUI utility called NFS Manager that can tweak the NFS settings as well, but this section will just cover setting it up manually through the Terminal.
- Open your Network settings. You can use Spotlight to search for "Network" in order to access this quickly.
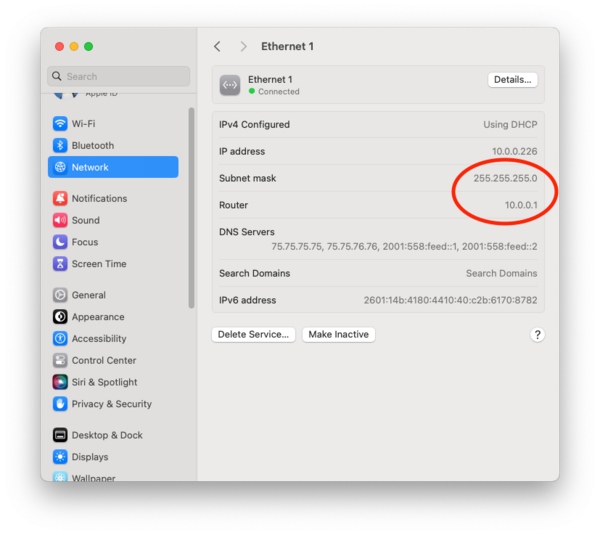
- Select the device that has your internet connection, and take note of the subnet mask and the router's IP address.
- Open the Terminal application.
- Enter the command
sudo nano /etc/exportsto edit the share settings. - Type or paste the folder path for the folder you want to mount onto the PS4, the IP address of your local network, and then the subnet mask of your local network. You can see an example of an /etc/exports configuration below.
/Users/YourUserName/YourPKGFolder -network 192.168.1.0 -mask 255.255.255.0 -rw- -network can either be your whole network (as shown in the example, where then ending numbers are 0), or just the PS4's IP address.
- -mask is your network's subnet mask. Enter the value that you saw in your Network settings.
- Anything at the end are additional options. In the example above, -rw allows for read and write access.
- Press Ctrl + O to save the file, and then press Return. To exit Nano, press Ctrl + X.
- Type
sudo nfsd enableto enable the NFS share, if it isn't enabled already. You can verify if the share's by settings by typingshowmount -e.- If you made any future changes to /etc/exports (like changing the folder path), you will need to restart nfsd by typing
sudo nfsd restartfor the changesx to apply.
- If you made any future changes to /etc/exports (like changing the folder path), you will need to restart nfsd by typing
- Launch Itemzflow and after the "download covers" prompt (if you haven't disabled it) press "Options" on your controller.
- In Itemzflow settings locate and select "Fuse NFS IP"
- There input your PC or Server IP address and press R2 for example:
192.168.1.14- To only access specific subfolders you can do so when you Fuse the NFS IP in itemzflow for example:
nfs://192.168.1.14/pkg - This will give you access to the following sample path
D:\PS4\Games\pkg
- To only access specific subfolders you can do so when you Fuse the NFS IP in itemzflow for example:
- After setting up NFS, to your desired folder place fpkgs inside of it. If you have set the folder to one that already has fpkgs, continue.
- Go to Itemzflow settings, select "PKG Installer", then go to "hostapp". From there, you can install any fpkgs by selecting them or installing all the fpkgs in the directory by selecting "install all". A progress bar will show up after installation starts.
- You can enable background installation by pressing
 in the PKG Installer menu.
- You can enable background installation by pressing
Using Remote PKG Sender
- Download Remote PKG Sender on your PC.
- Download and install Flatz Remote Package Installer on your PS4.
- Start Remote Package Installer on your PS4.
- Start PS4 Package Sender On your PC.
- Switch to Config and select your Networkinterface (IP Address)
- Choose a Server Port if necessary and apply or restart the server.
- Choose the path of your PKG files.
- Switch to Server and add your files to the queue (Processing Center)
- Start your install process with any of your files.
Using DirectPackageInstaller
If on a phone, make sure you're on the same network as the PS4. This will only work on the same LAN.
- Download DirectPackageInstaller on your PC or phone.
- Enable BinLoader in GoldHEN settings.
- Download and install the .NET 8 Runtime.
- Open DPI. In its options, input your PS4 IP Address and your PC IP Address.
- On Windows, you can find it opening command prompt and entering ipconfig. In the IPv4 section, take note of IP Address.
- Select Open, select your packages.
- Select Install. Your packages will start to be sent to the PS4.
Using FTP
You can use FileZilla or any other alternative of your choice. The negatives in this method are heavy, as it takes double the time and double the space, but if you are having trouble setting up any of the other software then it is a decent alternative.
- Go into GoldHEN at the top left of the home screen.
- Go into "Server Settings"
- Enable the FTP server by making sure the box to the right of "Enable FTP Server" is ticked.
- Find your Console IP address by going into Settings>System>System Information
- Download FileZilla
- In FileZilla, type your PS4 IP address in the
Host:field.- Example: "ftp://192.168.0.1" and in "Port:" "2121"
- If the connection fails, type in a username. Anything will do. You can also restart the FTP server on the PS4, then restart FileZilla.
- On the left window of FileZilla, go to where you made the folder "pkg" and drag and drop it to the right side window into the folder called *data*
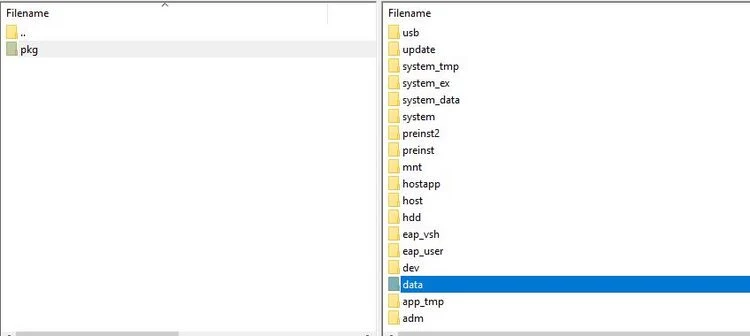
- In the future, you can go into the "data" folder and drag directly into the "pkg" folder
- Go into GoldHEN at the top left of the home screen.
- Go into Debug Settings.
- Under "Package Installer" change "Package Source" from usb[ usb:/ ] to either Hdd [ hdd:/data/pkg/ ] or All
- Go into Package Installer.
- From there, you can choose to install any pkg you want, or alternatively you will be automatically asked if you want to install all the available pkgs.
Remember to delete pkgs from the "pkg" folder after installing them to regain space.