 | The steps on this page are considered risky for your console, as there is a chance you can brick it. Please have someone else mod your console if you are not experienced in soldering! |
RGH1 is for non-Xenon phat consoles with dashboard 14699 and lower. It uses CPU_PLL_BYPASS to slow down the CPU. While there were other RGH1-targeted chips, such as EDGE360, X360 Glitchip, and SQUIRT360; most of them are not obtainable anymore and won't be mentioned. While RGH1 can be used on Zephyrs, EXT_CLK is far more reliable with those motherboards and also works on Xenon. RGH1.2 is also much better than RGH1 on Falcon and Jasper motherboards.
Equipment Needed
- A compatible glitch chip:
- CoolRunner Rev A/B/C/D
- CR3 Lite
- Matrix
- A PC running Windows Vista or later
- A soldering iron, solder, flux, and isopropyl alcohol with cotton swabs
- J-Runner with Extras
- A NAND & glitch chip flasher
- A NAND backup with XeLL written to the console
Reading your NAND
There are a few different tools for reading your NAND chip: xFlasher 360, Nand-X, JR Programmer, Matrix USB NAND Flasher, PicoFlasher, or a LPT cable. Consider the pros and cons below and choose the method that’s right for you. An LPT cable is not recommended as it's extremely slow, requires more work than other options, and cannot be used to program glitch chips.
A guide on how to dump and write to a standard NAND can be found here.
| Device | Pros | Cons |
|---|---|---|
| xFlasher 360 |
|
|
| PicoFlasher |
|
|
| 4GB USB Tool |
|
|
| SD Card Tool (any brand) |
|
|
| Nand-X |
|
|
| Matrix USB NAND Flasher |
|
|
| LPT Cable |
|
|
Programming the Glitch Chip
- Plug the cable from your programmer into the chip programmer. Slide switch on the CoolRunner to "PRG".
- If you are using an xFlasher, ensure the switch is set to
SPI.
- If you are using an xFlasher, ensure the switch is set to
- Open J-Runner with Extras. Click "Program Timing File" in the upper left and select your console’s tab and the relevant radio button for RGH1.
- Click "Program". When complete, unplug the cable from the glitch chip and set the switch back to "NOR".
Glitch Chip Installation
Motherboard points
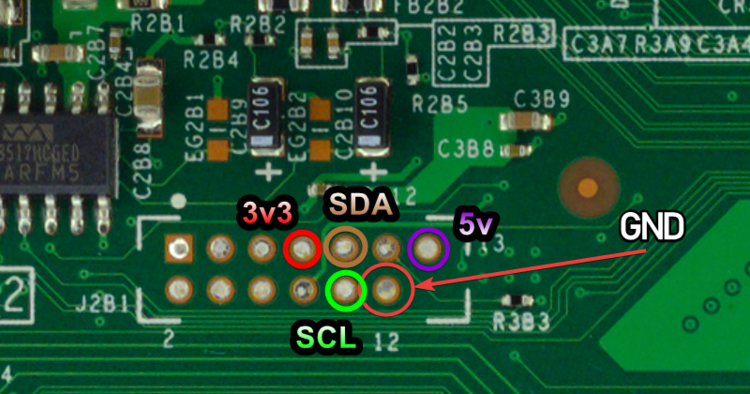
3.3v, 5v, & GND
SDA and SCL are ignored with RGH1.
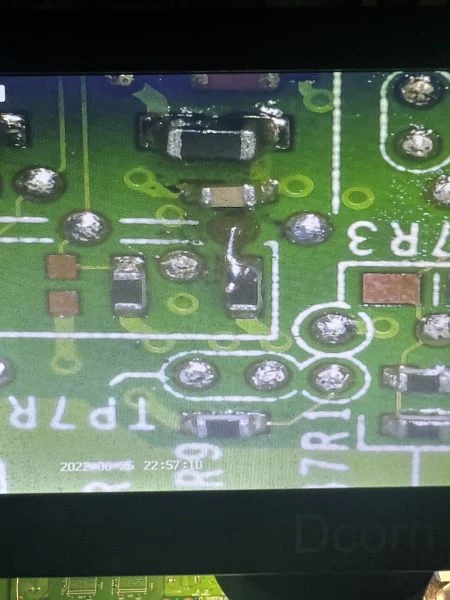
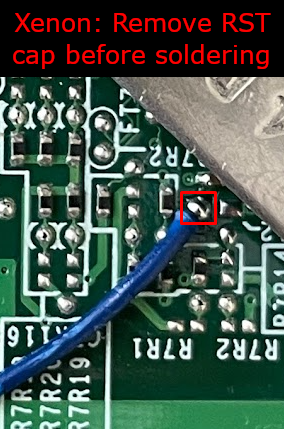
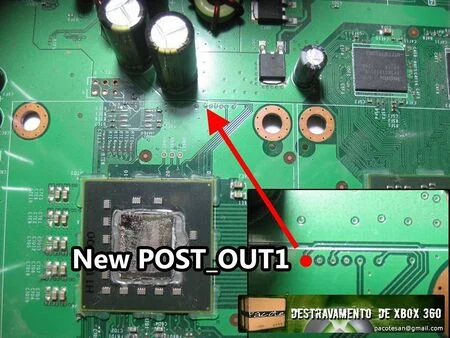
CPU_RST
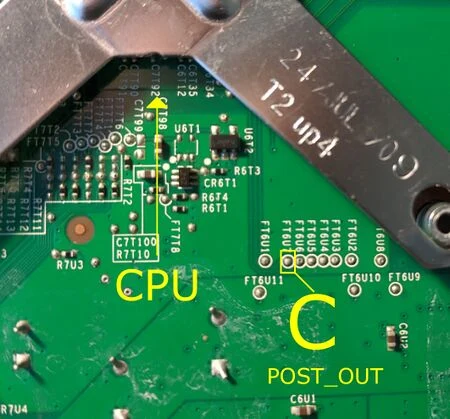
POST
- Bottom
- Top (requires scraping)
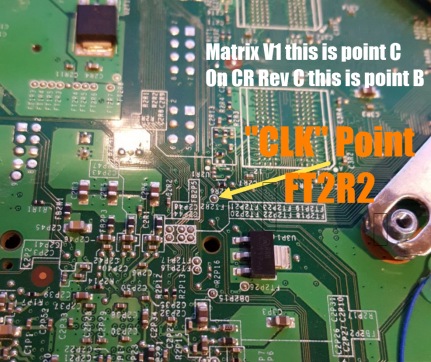
STBY_CLK
- Top
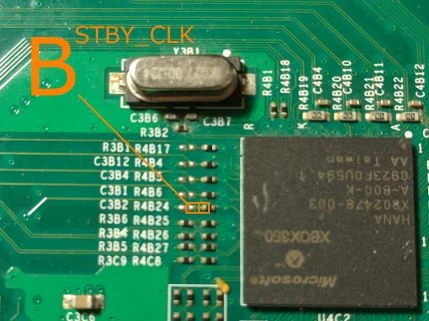
- There are 2 points boxed; either can be used.
- Bottom
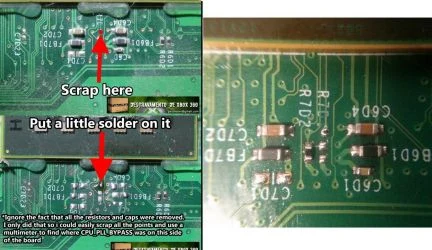
PLL
- Bottom
- Top (under CPU heatsink; requires scraping)**
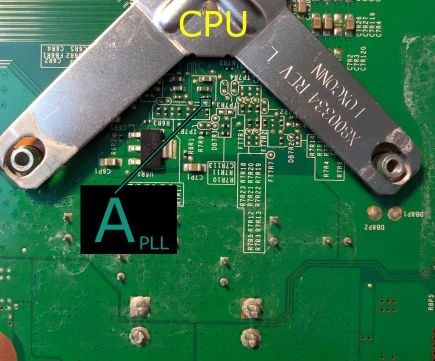
Glitch Chip Diagrams & Pinouts
CoolRunner Rev A/B/C/D

- A - PLL
- B - STBY_CLK (only if not using oscillator)
- C - POST
- D - RST
CR3 Lite

- A - PLL
- B - STBY_CLK (only if not using oscillator)
- C - POST
- D - RST
Matrix Glitcher
- A - RST
- B - POST
- C - STBY_CLK (only if not using oscillator)
- F - PLL
Testing the Console
Once you've finished soldering, clean up any flux with isopropyl alcohol and cotton swabs. Partially re-assemble your Xbox 360, ensuring that:
- Heatsinks are attached (If they were removed for some reason)
- Fan(s) are in place and plugged in (On a phat console, the fans can be angled on top of the heatsinks to cool them for testing)
- The RF board is plugged into the front of the console
- An A/V or HDMI cable is plugged into the Xbox 360 and into a TV or monitor
- A power brick is plugged in to both the wall and Xbox 360
- (Optional) An ethernet cable is plugged into the Xbox 360 and a LAN (e.g. a switch, router, or directly to a PC)
Turn on your console, and it should boot into XeLL-Reloaded within a minute. If you don't have an ethernet cable connected, write down (and/or take a picture of) the "CPU Key" listed on screen. If the console doesn't boot into XeLL, check all previous steps and double check your wiring accuracy and quality.
Writing a New NAND Image
Once you have successfully booted XeLL, we can use XeBuild to make a Freeboot image with your now obtained CPU key, which is a modified version of the OS built specifically for your console.
Decrypting & Patching the NAND
- Open J-Runner and select
...next to the Load Source field and select one of your original NAND dumps if not already selected. In the upper right of J-Runner, ensure theGlitchradio button is selected. If not, enable it. - Enter your CPU key into the CPU Key text field.
- The J-Runner software itself can automatically grab the CPU key of a console if both are connected to the same network. To do this, enter the IP address XeLL gives you into the lower right of the app. You can then click
Get CPU Keyand XeLL will automatically decrypt the retail NAND dump you backed up earlier. It's recommended to also click "Extract Files" in order to extract additional data from the NAND, such as your keyvault. - You can also use XeLL's built-in web server to get the CPU key; simply enter the Xbox's IP address in your preferred web browser. You will see information about the console, and the CPU key can be easily copy and pasted from this web page. It's recommended to download the keyvault as well.
- If you didn't have access to an Ethernet cable to plug the Xbox into a PC or LAN, you can manually type the CPU key into J-Runner in order to decrypt your original NAND dump.
- The J-Runner software itself can automatically grab the CPU key of a console if both are connected to the same network. To do this, enter the IP address XeLL gives you into the lower right of the app. You can then click
- Go in the
Patchestab and enable any desired options. Commonly used ones will be listed below.UsbDSecwill remove the console's security restrictions of XInput peripherals, allowing you to use various controllers or controller adapters as long as they output the XInput protocol. This is also mentioned in the Using Modern Controllers page.XL HDDandXL USBenable the ability to use USB/SATA storage larger than 2 TB, with the caveat that they have to be formatted in a special way with FATXplorer.
- Click "Create XeBuild Image". This will take a few moments, and when it's finished, it will be a
updflash.binfile in J-Runner's working directory. You can click theShow Working Folderbutton in order to quickly get to it.
NAND Flasher Method
- Power down the console and connect your programmer to the motherboard.
- If you are using an xFlasher, ensure the switch is set to
SPI.
- If you are using an xFlasher, ensure the switch is set to
- In J-Runner, select the
updflash.binXeBuild image created by the program and click "Write NAND". - Disconnect your NAND programmer from the console's motherboard and the PC when the process completes.
- Check if the console boots to the Microsoft dashboard. If it successfully boots to the dashboard, it is an indication that you've successfully hacked your console.
- Continue in the Cleaning Up section.
XeLL Method
- Copy the
updflash.binfile created by J-Runner to a FAT32 formatted USB storage device and plug it into your powered-off console. - Turn on your console. It will boot into XeLL and begin flashing your NAND. Once it has finished, it will power off your console.
- With Bad Update, you can also access XeLL with either XeUnshackle directly, or the XellLaunch application.
- Turn it back on, and it should boot to the Microsoft dashboard, which is an indication that you've successfully hacked your console.
- Tune boot times if necessary.
- Continue in the Cleaning Up section.
Cleaning Up
Remove your NAND programmer wires and clean the points. Clean all flux off the board, allow it to dry, and test it once more before re-assembling.
Installing XeXMenu
- Plug a flash drive into your Xbox 360 and navigate to Console Settings > Storage. Select the flash drive and format it.
- Make sure you have hidden folders enabled on your PC.
- Go into
File ExplorerunderViewon top, check markHidden Items.
- Go into
- Plug the flash drive into your PC. Open the
Contentfolder, select "New Folder", and name it0000000000000000(16 zeroes). Open the new folder, make another folder under the nameC0DE9999, open that folder, and finally make one last folder called00080000The full folder path should now be0000000000000000/C0DE9999/00080000/. - Extract the
C0DE99990F586558file from the XeXMenu archive to the0000000000000000/C0DE9999/00080000/directory on the USB drive. - Safely eject your flash drive and plug it into your Xbox 360. Navigate to the Demos section of your dashboard, and it should list XeXMenu there. Select it to launch it.
- You can install XeXMenu to your hard drive by going to Console Settings > Storage and copying it from your flash drive to the hard drive.
From here, you can install any homebrew or mods that you want. See this page for a list of recommended modifications and applications to install.