 | The steps on this page are considered risky for your console, as there is a chance you can brick it. Please have someone else mod your console if you are not experienced in soldering! |
The R-JTOP hack is an open source modification that allows you to run unsigned code, mods, game backups, and homebrew on phat consoles. It works by glitching the CB fuse check when loading the old JTAGable CB, which allows JTAG (SMC Hack) to be performed like normal. R-JTOP works the same way as the R-JTAG(+) hack and achieves the same result through a different method. It is preferred over R-JTAG, as it doesn't require out of production Team Xecuter hardware while having better glitching performance, but it is lesser used than normal RGH methods, and therefore you will not receive much support if you run into issues. There is generally little reason to use R-JTOP over RGH1.2 because of this.
Note: R-JTOP does not support S/E motherboards.
Requirements
Below are the requirements to R-JTOP your Xbox 360. It’s recommended to read ahead and choose the NAND dumping method and R-JTOP specific wiring that’s right for you, as you will need a NAND programmer and potentially more equipment depending on which methods you choose.
To check that your console is exploitable, it must meet the following conditions. You must have:
- An original Xbox 360 console (Xenon/Elpis, Falcon/Opus, Jasper, or Tonasket model). You can look at the back of your console and check this guide to find out what model you have.
- Zephyrs do not have any R-JTOP timing files, but can use the standard EXT_CLK method instead. It may be possible to compile R-JTOP timing files that use EXT_CLK for Zephyr, but this isn't widely tested. Thus, this guide only covers Xenon/Falcon/Jasper/Tonasket consoles that have timing files available.
- A console on dashboard 15572 or higher. You can check this by navigating to Settings > Console Settings > Hover over System Info. Your dashboard version will be shown in the top right in the form 2.0.xxxxx.0, where xxxxx is your dashboard version.
- If it is on a lower dashboard, you can update it to the latest.
- Soldering experience. The Xbox 360 is not a good place to learn to solder. Regardless of which dumping method you choose, you will need a soldering iron, solder, and flux.
You will also need:
- A NAND reader that can program glitch chips (JR Programmer, NAND-X, or two Matrix USB NAND Flasher)
- A XC2C64A-based glitch chip or the ability to compile the source for another chip
- CoolRunner 3
- CoolRunner Rev C/D
- Matrix V1/V3
- J-Runner with Extras (Includes R-JTOP timing files for Falcon and Jasper.)
- If you have a Xenon/Elpis, use these timing files.
- Equipment listed in the relevant R-JTOP specific wiring diagrams
Reading Your NAND
There are a few different tools for reading your NAND chip: xFlasher 360, Nand-X, JR Programmer, Matrix USB NAND Flasher, PicoFlasher, or a LPT cable. Consider the pros and cons below and choose the method that’s right for you. An LPT cable is not recommended as it's extremely slow, requires more work than other options, and cannot be used to program glitch chips.
A guide on how to dump and write to a standard NAND can be found here.
| Device | Pros | Cons |
|---|---|---|
| xFlasher 360 |
|
|
| PicoFlasher |
|
|
| 4GB USB Tool |
|
|
| SD Card Tool (any brand) |
|
|
| Nand-X |
|
|
| Matrix USB NAND Flasher |
|
|
| LPT Cable |
|
|
Programming the Glitch Chip
- Plug the cable from your programmer into the chip programmer.
- If you are using an xFlasher, ensure the switch is set to
SPI - CoolRunner: Slide switch on the CoolRunner to "PRG".
- If you are using an xFlasher, ensure the switch is set to
- Open J-Runner with Extras. Click "Program Timing File" in the upper left and select your console’s tab and the relevant radio button for R-JTOP.
- Click "Program". When complete, unplug the cable from the glitch chip.
- CoolRunner: Set the switch back to "NOR".
JTAG Wiring
The extra wiring for R-JTOP is the same as the wiring for the JTAG hack. Choose the guide that pertains to you:
Xenon
- This is the traditional method for Xenon & Elpis motherboards, and cannot be used on non-Xenon retail motherboards due to them missing the unused pins for debug LEDs.
AUD_CLAMP
This is the traditional method for Zephyr, Opus, Falcon, or Jasper motherboards. This method may disable 5.1 audio output.
AUD_CLAMP + Boxxdr
- This is an alternative method is for Zephyr, Opus, Falcon, or Jasper motherboards. This method may disable 5.1 audio output.
AUD_CLAMP + Open_Tray
- Use this method if the traditional or Boxxdr method doesn't boot, you receive E79 errors, or you have issues with HDMI. This method may cause your DVD drive to eject on bootup. Also, your console will reboot instead of shutting down if you turn off the console while a controller is charging via USB.
Glitch Chip Wiring
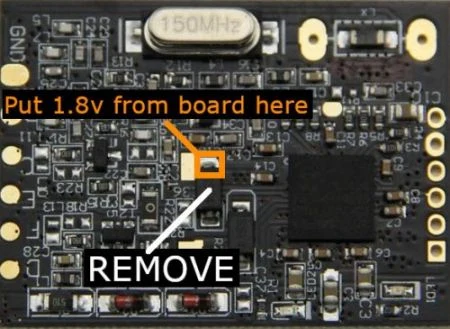
The wiring for R-JTOP is the same as the wiring for RGH 1.2. If you have EXT_CLK timing files, make sure to use that solder point instead of the one for PLL.
Motherboard Points (Phat)
Glitch Chip Pinouts & Diagrams
CoolRunner Rev C or D

- A - PLL or EXT_CLK
- B - STBY_CLK (only if not using oscillator)
- C - POST
- D - RST
CoolRunner 3 Lite

- A - PLL or EXT_CLK
- B - STBY_CLK (only if not using oscillator)
- C - POST
- D - RST
Matrix Glitcher

- A - RST
- B - POST
- C - STBY_CLK (only if not using oscillator)
- F - PLL or EXT_CLK
Decrypting the NAND
Once you have successfully obtained your CPU key, we can build an XeBuild image, which is a modified NAND built specifically for your console.
- If you want to use J-Runner with the console connected to LAN to get the CPU key, enter the IP address XeLL gives you into the lower right of the app. You can then click
Get CPU Keyand XeLL will automatically decrypt the retail NAND dump you backed up earlier. - If you want to use XeLL's web page to get the CPU key, enter the Xbox's IP address in your preferred web browser. You will see information about the console, and the CPU key can be easily copy and pasted from this web page.
- If you didn't have access to an Ethernet cable to plug the Xbox into a PC or LAN, you can manually type the CPU key into J-Runner in order to decrypt your original NAND dump.
Writing a New NAND Image (NAND Flasher)
- Power down the console, and connect your programmer to the motherboard and computer.
- If you are using an xFlasher, ensure the switch is set to
SPI.
- If you are using an xFlasher, ensure the switch is set to
- Open J-Runner and select
...next to the Load Source field and either select your nanddump1.bin or nanddump2.bin if not already selected. In the upper right corner of the window, select the dashboard version you chose for the patched dump that you wrote to the motherboard and select theJTAGradio button. Make sure theR-JTAGandAud_Clampcheckboxes are enabled. - Click
Create XeBuild. This will take a few moments. - Click
Write NAND. - Disconnect your NAND programmer from the console when the process completes, and check if the console boots to the Microsoft dashboard. If it successfully boots to the dashboard, it is an indication that you've successfully hacked your console.
- You may want to leave your Xbox 360 disassembled so that you can disable the eFuse-blowing circuit so you can't accidentally install official updates on your console.
- Remove your NAND programmer wires and clean the points. Clean all flux off the board, allow it to dry, and test it once more before re-assembling. You're now free to install XeXMenu (instructions in section below).
Writing a New NAND Image (XeLL with USB Storage)
- Open J-Runner and select
...next to the Load Source field and either select your nanddump1.bin or nanddump2.bin if not already selected. In the upper right corner of the window, select the dashboard version you chose for the patched dump that you wrote to the motherboard and select theJTAGradio button. Make sure theR-JTAGcheckbox is enabled.- If you have a non-Xenon console, the
Aud_Clampcheckbox should be enabled.
- If you have a non-Xenon console, the
- Click
Create XeBuild. This will take a few moments. - Copy updflash.bin to a FAT32 formatted USB storage device and plug it into your powered-off console. Turn on your console and it will boot into XeLL and begin flashing your NAND. Once it has finished, it will power off your console. Turn it back on, and it should boot to the Microsoft dashboard, which is an indication that you've successfully hacked your console.
- You may want to leave your Xbox 360 disassembled so that you can disable the eFuse-blowing circuit so you can't accidentally install official updates on your console.
- Remove your NAND programmer wires (if they are still attached) and clean the points. Clean all flux off the board, allow it to dry, and test it once more before re-assembling. You're now free to install XeXMenu (instructions in section below).
Installing XeXMenu
- Plug a flash drive into your Xbox 360 and navigate to Console Settings > Storage. Select the flash drive and allow the console to format the flash drive.
- Extract the
CODE9999folder from XeXmenu 1.2.7z to your Desktop. - Plug the flash drive into your PC. Create a new folder on the flash drive and name it
0000000000000000(16 zeroes). Open the new folder, then drag theCODE9999folder into it. - Safely eject your flash drive and plug it into your Xbox 360. Navigate to the Demos section of your dashboard, and it should list XeXMenu there. Select it to launch it.
- You can install XeXMenu to your hard drive by going to Console Settings > Storage, and copying it from your flash drive to the hard drive.
From here, you can install any homebrew or mods that you want. See this page for a list of recommended modifications and applications to install.